background image

Always set the throttle to the Fast position when
throwing snow.

If the engine slows down under a load or the wheels
slip, shift the machine into a lower gear.

If the front of the machine rides up, shift the
machine into a lower gear. If the front continues to
ride up, lift up on the handles.

The pivoting scraper on the machine is not
recommended for use on gravel surfaces. But if you

must use the machine on a gravel surface, adjust the
skids further down to prevent the pivoting scraper
from picking up rocks.

Maintenance

Note:

Determine the left and right sides of the machine from the normal operating position.

Recommended Maintenance Schedule(s)

Maintenance Service

Interval

Maintenance Procedure

After the first 2 hours

• Inspect the traction cable and adjust it if necessary.
• Inspect the auger/impeller cable and adjust it if necessary.

After the first 5 hours

• Change the engine oil.

Before each use or daily

• Check the engine oil level and add oil if necessary.

Every 50 hours

• Change the engine oil. Change the engine oil every 25 operating hours when

operating the engine under a heavy load.

Every 100 hours

• Replace the spark plug.

Yearly

• Check the skids and the scraper and adjust them if necessary (all models except

model 38654).

• Check the skids and adjust them if necessary (model 38654 only).
• Inspect the traction cable and adjust or replace it if necessary.
• Inspect the auger/impeller cable and adjust or replace it if necessary.
• Check the auger gearbox oil and add oil if necessary.
• Lubricate the hex shaft.

Yearly or before storage

• Check the air pressure in the tires and inflate them to 17–20 psi (116–137 kPa).
• Drain the gasoline and run the engine to dry out the fuel tank and the carburetor at

the end of the season.

• Have an Authorized Service Dealer inspect and replace the traction drive belt and/or

the auger/impeller drive belt, if necessary.

Important:

You can find more information about maintaining and servicing your machine at

www.Toro.com.

Important:

Refer to your engine operator’s manual for additional maintenance procedures. For engine

adjustments, repairs, or warranty service not covered in this manual, contact an Authorized Briggs
& Stratton Servicing Dealer.

Preparing for Maintenance

1. Move the machine to a level surface.

2. Stop the engine and wait for all moving parts to stop.

3. Disconnect the spark plug wire. Refer to Replacing

the Spark Plug.

Checking the Engine Oil Level

Service Interval:

Before each use or daily—Check

the engine oil level and add oil if
necessary.

20

Summary of Contents for 38624

Page 1: ... Customer Service and have the model and serial numbers of your machine ready Figure 1 identifies the location of the model and serial numbers on the machine Write the numbers in the space provided Figure 1 1 Model and serial number location Model No Serial No This manual identifies potential hazards and has safety messages identified by the safety alert symbol Figure 2 which signals a hazard that...

Page 2: ...e operating this machine Be thoroughly familiar with the controls and the proper use of the machine Know how to stop the machine and disengage the controls quickly Never allow children to operate the machine Never allow adults to operate the machine without proper instruction Keep the area of operation clear of all persons particularly small children Exercise caution to avoid slipping or falling e...

Page 3: ...machine stop the engine and make certain the auger impeller and all moving parts have stopped Disconnect the spark plug wire and keep the wire away from the plug to prevent someone from accidentally starting the engine Do not run the engine indoors except when starting the engine and for transporting the machine in or out of the building Open the outside doors exhaust fumes are dangerous Exercise ...

Page 4: ...s off the pavement Then lift the handles quickly to bump the front of the machine on the pavement Repeat if necessary until a stream of snow comes out the discharge chute If you cannot unclog the discharge chute by bumping the front of the machine stop the engine wait for all moving parts to stop and use the cleanout tool never use your hand If a shield safety device or decal is damaged illegible ...

Page 5: ...zard impeller and auger stay away from moving parts keep all guards and shields in place remove the ignition key and read the instructions before servicing or performing maintenance 6 Auger impeller drive squeeze the lever to engage release the lever to disengage 112 6627 Models 38624W 38634 38644 and 38654 1 Left turn control 3 Warning read the Operator s Manual 5 Cutting dismemberment hazard imp...

Page 6: ...nhalation hazard 2 Warning fire hazard 4 Warning hot surface burn hazard Briggs Stratton Part No 277566 1 When starting a cold engine close the choke and press the primer two times 2 When starting a warm engine open the choke and do not press the primer Briggs Stratton Part No 277588 1 Primer 3 Ignition key out Engine Stop 2 Ignition key in Engine Run Briggs Stratton Part No 278866 1 Fuel On 2 Fue...

Page 7: ... Install the wheel clutch cable ends 3 No parts required Install the traction control linkage Carriage bolts 2 4 Locknuts 2 Install the chute control rod 5 Cable tie 1 Connect the wire to the headlight 6 No parts required Fill the engine with oil 7 No parts required Check the tire pressure 8 No parts required Check the skids and scraper 9 No parts required Check the operation of the traction drive...

Page 8: ...s and ensure that the cables and the wire for the headlight are not pinched between the handle sections Figure 3 1 Cables 2 Secure the upper handle with 4 handle bolts 4 curved washers and 4 locknuts from the loose parts bag Figure 4 Figure 4 2 Installing the Wheel Clutch Cable Ends No Parts Required Procedure Models 38624W 38634 38644 and 38654 only 1 Unwrap the cable ends from the lower handle F...

Page 9: ...ap between the bottom of the handle and the wheel clutch lever end Figure 9 Figure 9 Note The gap should be approximately the thickness of a pencil 1 4 inch or 6 mm If it is greater loosen the cable clamp nut slide the cable jacket up slightly tighten the cable clamp nut and check the gap again 6 Repeat steps 2 through 5 for the other cable 3 Installing the Traction Control Linkage No Parts Requir...

Page 10: ... control rod with the outer washer and a hairpin cotter you previously removed Note For easier installation look down through the opening in the speed selector Figure 13 Figure 13 1 Speed selector 4 Installing the Chute Control Rod Parts needed for this procedure 2 Carriage bolts 2 Locknuts Procedure 1 Unwrap the Quick Stick and rotate it so that it is upright and in the center 2 Hold the blue tri...

Page 11: ... deflector cable onto the forward carriage bolt and secure the carriage bolts with locknuts from the loose parts bag Figure 16 Figure 16 1 Cable clip 2 Deflector cable 7 Hold the blue trigger cap down and rotate the Quick Stick in a circle to ensure that the chute and deflector operate smoothly 5 Connecting the Wire to the Headlight Parts needed for this procedure 1 Cable tie Procedure All models ...

Page 12: ...ow 40 F 4 C will result in hard starting 2 Using 10W 30 at outdoor temperatures above 80 F 27 C may result in increased oil consumption therefore check the oil level more frequently in these circumstances Engine Oil Capacities Engine Oil Capacities cont d Model Engine Oil Capacity 38614 38624 38624W 38634 18 to 20 oz 0 53 to 0 59 l 38644 38654 26 to 28 oz 0 77 to 0 83 l 1 Remove the dipstick and s...

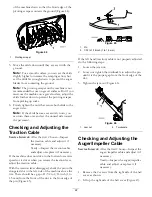
Page 13: ... the speed selector lever Figure 11 C Turn the trunnion downward clockwise on the speed control rod Figure 11 D Connect the trunnion to the speed selector lever Figure 11 4 Release the traction lever 5 Move the speed selector to the Position 1 refer to Operating the Speed Selector 6 Squeeze the left hand traction lever to the hand grip Figure 20 The machine should move forward If the machine does ...

Page 14: ... sides of the machine from the normal operating position Filling the Fuel Tank DANGER Gasoline is extremely flammable and explosive A fire or explosion from gasoline can burn you and others To prevent a static charge from igniting the gasoline place the container and or machine on the ground before filling not in a vehicle or on an object Fill the tank outdoors when the engine is cold Wipe up spil...

Page 15: ...ve 1 4 turn counterclockwise to open it Figure 25 Figure 25 3 Insert the ignition key Figure 26 Figure 26 1 Ignition key 4 Firmly push in the primer with your thumb 2 times 15 F or 9 C or above or 4 times below 15 F or 9 C holding the primer in for a second before releasing it each time Figure 27 Figure 27 5 Rotate the choke to the Choke position Figure 28 15 ...

Page 16: ... To prevent damaging the electric starter run it in short cycles 5 seconds maximum then wait one minute before trying to start it again If the engine still does not start take the machine to an Authorized Service Dealer for service 8 Disconnect the power cord from the power outlet first and then from the machine electric start only 9 Allow the engine to warm up for several minutes move the choke t...

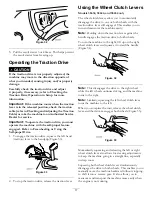
Page 17: ...8644 and 38654 only The wheel clutch levers allow you to momentarily disengage the drive to one or both wheels with the traction drive lever still engaged This enables you to turn and maneuver the machine easily Note Holding down the traction lever against the handle engages the traction drive to both wheels To turn the machine to the right lift up on the right wheel clutch lever and squeeze it to...

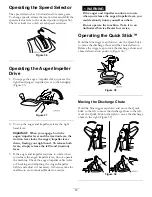
Page 18: ...te when you release the auger impeller lever do not operate the machine Check the auger impeller cable refer to Checking and Adjusting the Auger Impeller Cable and adjust it if necessary Otherwise take the machine to an Authorized Dealer for service WARNING If the auger and impeller continue to rotate when you release the auger impeller lever you could seriously injure yourself or others Do not op...

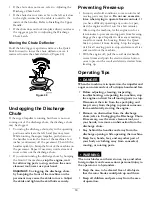
Page 19: ...Do not use excessive force when trying to operate frozen controls If you have difficulty operating any control or part start the engine and let it run for a few minutes After using the machine let the engine run for a few minutes to prevent moving parts from freezing Engage the auger impeller to clear any remaining snow from inside the housing Rotate the Quick Stick to prevent it from freezing Sto...

Page 20: ...ck the skids and the scraper and adjust them if necessary all models except model 38654 Check the skids and adjust them if necessary model 38654 only Inspect the traction cable and adjust or replace it if necessary Inspect the auger impeller cable and adjust or replace it if necessary Check the auger gearbox oil and add oil if necessary Lubricate the hex shaft Yearly or before storage Check the ai...

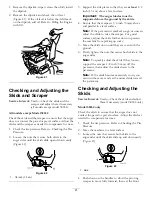
Page 21: ...mm above and parallel to a level surface Note If the pavement is cracked rough or uneven adjust the skids to raise the scraper For gravel surfaces adjust the skids further down to prevent the machine from picking up rocks 5 Move the skids down until they are even with the ground 6 Firmly tighten the nuts that secure both skids to the auger sides Note To quickly adjust the skids if they loosen supp...

Page 22: ...spect the traction cable and adjust or replace it if necessary If the machine does not drive in the forward or reverse speeds or it drives when you release the traction lever adjust the traction cable With the traction lever disengaged check the pin in the elongated slot in the left side of the machine above the tire There should be a gap of 1 32 to 1 16 inch 1 to 1 5 mm from the front of the slot...

Page 23: ...screws you previously removed on the belt cover 10 If the auger impeller cable is properly adjusted but a problem remains contact an Authorized Service Dealer Checking the Auger Gearbox Oil Level Service Interval Yearly Check the auger gearbox oil and add oil if necessary 1 Move the machine to a level surface 2 Clean the area around the pipe plug Figure 50 Figure 50 3 Remove the pipe plug from the...

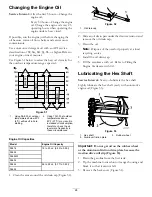
Page 24: ...circumstances Engine Oil Capacities Model Engine Oil Capacity 38614 38624 38624W 38634 18 to 20 oz 0 53 to 0 59 l 38644 38654 26 to 28 oz 0 77 to 0 83 l 1 Clean the area around the oil drain cap Figure 52 Figure 52 1 Oil drain cap 2 Slide an oil drain pan under the drain extension and remove the oil drain cap 3 Drain the oil Note Dispose of the used oil properly at a local recycling center 4 Insta...

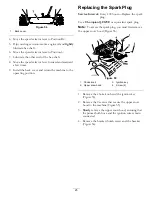
Page 25: ...lacing the Spark Plug Service Interval Every 100 hours Replace the spark plug Use a Champion QC12YC or equivalent spark plug Note To access the spark plug you must first remove the upper snow hood Figure 55 Figure 55 1 Choke knob 3 Ignition key 2 Upper snow hood 4 Screw 2 1 Remove the choke knob and the ignition key Figure 55 2 Remove the 2 screws that secure the upper snow hood to the machine Fig...

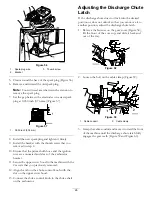
Page 26: ...ow hood to the machine with the 2 screws that you previously removed 12 Align the tab on the choke control knob with the slot on the upper snow hood 13 Connect the choke control knob to the choke shaft on the carburetor Adjusting the Discharge Chute Latch If the discharge chute does not lock into the desired position or does not unlock so that you can move it to another position adjust the dischar...

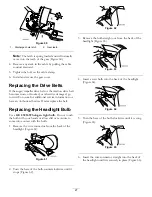
Page 27: ...Service Dealer replace the belt Replacing the Headlight Bulb Use a GE 892 16W halogen light bulb Do not touch the bulb with your hands or allow dirt or moisture to come into contact with the bulb 1 Remove the wire connector from the back of the headlight Figure 61 Figure 61 2 Turn the base of the bulb counterclockwise until it stops Figure 62 Figure 62 3 Remove the bulb straight out from the back ...

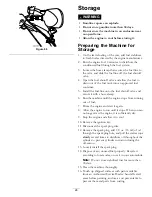
Page 28: ...6 Run the machine until the engine stops from running out of fuel 7 Prime the engine and start it again 8 Allow the engine to run until it stops When you can no longer start the engine it is sufficiently dry 9 Stop the engine and allow it to cool 10 Remove the ignition key 11 Disconnect the spark plug wire 12 Remove the spark plug add 1 2 oz 15 ml of oil through the spark plug hole and pull the st...

Page 29: ...w the engine to cool before storing it in any enclosure Removing the Machine from Storage 1 Remove the spark plug and spin the engine rapidly using the starter to blow the excess oil from the cylinder 2 Install the spark plug and tighten it firmly 3 Connect the spark plug wire 4 Perform the annual maintenance procedures as given in the Recommended Maintenance Schedule 29 ...

Page 30: ... too low or too high 9 Add or drain oil to adjust the oil level in the engine crankcase to the Full mark on the dipstick 1 The choke is in the On position 1 Move the choke to the Off position 2 The fuel shutoff valve is not completely open 2 Open the fuel shutoff valve 3 The fuel tank is nearly empty or contains stale fuel 3 Drain and fill the fuel tank with fresh gasoline not more than 30 days ol...

Page 31: ... Service Dealer Discharge chute either does not lock into place or does not move 1 The discharge chute latch is not properly adjusted 1 Adjust the discharge chute latch 1 The skids and or scraper are not properly adjusted 1 Adjust the skids and or the scraper The machine does not properly clear the snow off the surface 2 The pressure in the tires is not equal 2 Check and adjust the pressure in one...

Page 32: ...arranty except for special emission system coverage and engine warranty coverage on some products This express warranty does not cover the following Cost of regular maintenance service or wear parts such as rotor blades paddles scraper blades belts fuel lubricants oil changes spark plugs cable linkage or brake adjustments Any product or part which has been altered or misused and requires replaceme...

Reviews: