Setup
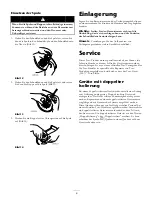
1.
Loosen the knob, then move the assist handle up or down the
shaft to your desired height (Figure 1).
Figure 1
2.
Pivot the assist handle to a comfortable position (Figure 1),
then tighten the knob.
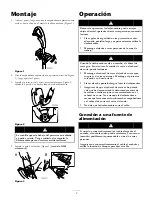
3.
Install the guard as shown in Figure 2, snapping it into both
sides of the trimmer.
Figure 2
The blade under the guard is sharp and can cut you.
Be careful when handling the trimmer so that you do
not accidentally cut yourself.
4.
Install the metal wire guide (Figure 3)
(model 51348 only)
.
Figure 3
Operation
During operation, the trimmer may throw objects in the
operator’s or a bystander’s direction, causing injury.
•
Wear safety goggles or other suitable eye protection,
long pants, and shoes while operating the trimmer.
•
Keep bystanders away from the work area.
When the trimmer is running the cutting head is spinning.
If you contact the cutting line or cutting head, you could
be injured.
•
Keep the cutting head away from your hands, feet,
and bystanders. Keep the guard in place and in
working order.
•
Wear shoes and long pants when using the trimmer.
•
Ensure that the cutting head has stopped and you
disconnect the trimmer from the power source before
you service or examine the cutting head. Do not start
the trimmer unless your hands are on both handles
and the cutting head is down near the ground.
•
Do not allow the trimmer to cut into the cord.
Connecting to a Power Source
If you do not fully seat the extension cord on the inlet
plug, the loose plug could lead to overheating and cause a
fire, possibly burning you or others.
Ensure that you fully seat the cord on the plug and use the
cord lock feature to secure the cord.
Figure 4
Important:
Do not use a damaged cord.
3


