background image

7

3350-660

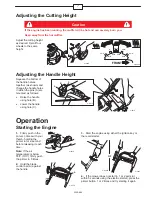
Adjusting the Cutting Height

Caution

If the engine has been running, the muffler will be hot and can severely burn you.

Keep away from the hot muffler.

Adjust the cutting height
as desired. Set all four
wheels to the same
height.

1-5/8

1-1/4

2

2-3/8

2-3/4

3-1/8

3-7/8

4-1/4

3-1/2

m-5629

m-5605a

FRONT

Adjusting the Handle Height

Squeeze the bottom of
the handle halves
together (as shown) and
change the handle holes
in which the pins (A) are
mounted, as follows:

Raise the handle
using hole (B).

Lower the handle
using hole (C).

m-5612

m-5614

A

B

C

Operation

Starting the Engine

1.

Firmly push in the

primer 3 times with your
thumb, holding the
primer in for a second
before releasing it each
time.

Note: If the air
temperature is below
55

°

F (13

°

C), firmly push

the primer in 5 times.

m-5572

2.

Hold the blade

control bar (A) against
the handle.

A

m-5578

3.

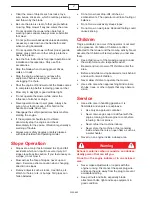
Start the engine using either the ignition key or

the recoil starter.

or

m-5606

m-5592a

4.

If the mower does not start in 1 or 2 pulls (or

within 5 seconds using the electric starter), press the
primer button 1 or 2 times and try starting it again.

Summary of Contents for 20051

Page 1: ... from this product contains chemicals known to the State of California to cause cancer birth defects or other reproductive harm Important This engine is not equipped with a spark arrester muffler It is a violation of California Public Resource Code Section 4442 to use or operate this engine on any forest covered brush covered or grass covered land Other states or federal areas may have similar law...

Page 2: ...a slope do not mow it Mow across the face of slopes never up and down Exercise extreme caution when changing direction on slopes Remove objects such as rocks tree limbs etc Watch for holes ruts or bumps Tall grass can hide obstacles Do not mow near drop offs ditches or embankments The operator could lose footing or balance Do not mow excessively steep slopes Do not mow on wet grass Reduced footing...

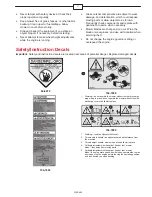
Page 3: ...n servicing them Do not change the engine governor setting or overspeed the engine Safety Instruction Decals Important Safety and instruction decals are located near areas of potential danger Replace damaged decals 94 8072 104 7403 104 7908 1 Warning donot operate the mower without the rear discharge plug or bag in place do not operate the mower without the side discharge cover or deflector in pla...

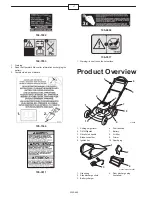
Page 4: ...106 5517 1 Warning do not touch the hot surface Product Overview m 6290 5 1 3 2 6 7 8 9 10 4 1 Cutting height lever 2 Oil fill Dipstick 3 Recoil start handle 4 Blade control bar 5 Ignition key 6 Fuel tank cap 7 Battery 8 Air filter 9 Primer 10 Spark plug m 5630 m 5637 m 5587 2 1 3 4 1 Grass bag 2 Side discharge chute 3 Battery charger 4 Rear discharge plug installed ...

Page 5: ...ype SAE 30W detergent oil with an API service classification of SF SG SH SJ SL or higher 1 Remove the dipstick m 5604 m 5571 2 Slowly pour oil into the oil fill tube to raise the oil level to the Full mark on the dipstick Do not overfill 3 Install the dipstick securely Important Change the engine oil after the first 2 operating hours change it yearly thereafter Refer to Changing the Engine Oil on ...

Page 6: ... for all moving parts to stop Do not put your fingers under the housing when adjusting the cutting height Filling the Fuel Tank Fill the fuel tank with fresh unleaded regular gasoline from a major name brand service station Important To reduce starting problems next season add fuel stabilizer to the fuel all season mixing it with gasoline less than 30 days old 1 2 in 1 cm m 5570 m 5604 Checking th...

Page 7: ... are mounted as follows Raise the handle using hole B Lower the handle using hole C m 5612 m 5614 A B C Operation Starting the Engine 1 Firmly push in the primer 3 times with your thumb holding the primer in for a second before releasing it each time Note If the air temperature is below 55 F 13 C firmly push the primer in 5 times m 5572 2 Hold the blade control bar A against the handle A m 5578 3 ...

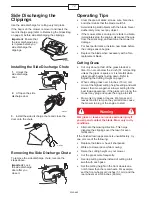
Page 8: ...ack into the lawn If the grass bag is on the mower remove it refer to Removing the Grass Bag on page 9 before recycling the clippings If the side discharge chute is on the mower remove it and lock the side discharge door refer to Removing the Side Discharge Chute on page 10 before recycling the clippings Important Ensure that the rear discharge plug is in place before you recycle the clippings m 5...

Page 9: ...the rear door 8 Return the handle to the operating position Removing the Grass Bag Warning The blade is sharp contacting the blade can result in serious personal injury Stop the engine and wait for all moving parts to stop before leaving the operating position 1 Go to the left side of the lawn mower 2 Step on the handle release lever m 6894 3 Raise the handle to the vertical position m 5602b 4 Rai...

Page 10: ...essary with a Toro replacement blade Cutting Grass Cut only about a third of the grass blade at a time Do not cut below the 2 inch 51 mm setting unless the grass is sparse or it is late fall when grass growth begins to slow down Refer to Adjusting the Cutting Height on page 7 When cutting grass over 6 inches 15 cm tall mow at the highest cutting height setting and walk slower then mow again at a l...

Page 11: ...the blade or have the blade sharpened replace it or have it sharpened more frequently if the edge dulls quickly Lubricate the wheel gears 4 Years 100 Hours 1 Replace the spark plug refer to your engine operator s manual Clean the cooling system refer to your engine operator s manual Annual Storage Empty the fuel tank before repairs as directed or before annual storage Charge the battery 1Whichever...

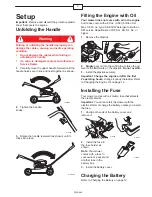
Page 12: ... a local recycling center Charging the Battery Warning Battery posts terminals and related accessories contain lead and lead compounds chemicals known to the State of California to cause cancer and reproductive harm Wash hands after handling battery Charge the battery for 24 hours initially then monthly every 25 starts or as needed Always use the charger in a sheltered area and charge the battery ...

Page 13: ...nning on a flat paved surface spray a stream of water in front of the right rear wheel 1093 The water will splash into the path of the blade cleaning out the clippings 2 When no more clippings come out stop the water and move the mower to a dry area 3 Run the engine for a few minutes to dry the housing to prevent it from rusting Storage Store the mower in a cool clean dry place Preparing the Mower...

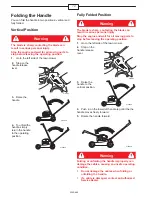
Page 14: ...b Fully Folded Position Warning The blade is sharp contacting the blade can result in serious personal injury Stop the engine and wait for all moving parts to stop before leaving the operating position 1 Go to the left side of the lawn mower 2 Step on the handle release lever m 6894 3 Raise the handle to the vertical position m 5602b 4 Push in on the lower left handle leg until the the handle move...

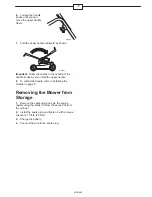
Page 15: ... handle knobs as you unfold the upper handle 8 To unfold the handle refer to Unfolding the Handle on page 5 Removing the Mower from Storage 1 Remove the spark plug and spin the engine rapidly using the starter to blow the excess oil from the cylinder 2 Install the spark plug and tighten it with a torque wrench to 15 ft lb 20 N m 3 Charge the battery 4 Connect the wire to the spark plug ...

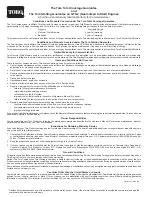
Page 16: ... failure to drain the fuel system prior to any period of non use over three months Special operational conditions where starting may require more than two pulls first time starts after extended period of non use over three months or seasonal storage cool temperature starts such as those found in early spring and late autumn improper starting procedures If you are having difficulty starting your un...

Reviews: