


g308757
Figure 6
1.
Nut (5/16 inch)
2.
Carriage bolt (5/16 x 3/4
inch)
4.
Tighten all fasteners.
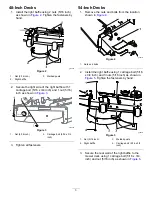
60-Inch Decks
1.
Remove the nut and bolt from the location
shown in
or
g219304
Figure 7
1.
Nut and bolt
2.
Install the right baffle using 3 nuts (5/16 inch)
as shown in
. Tighten the fasteners by
hand.
g219326
Figure 8
1.
Nut—5/16 inch (3)
3.
Welded post (3)
2.
Right baffle
3.
Tighten the fasteners by hand.
4
Installing the Discharge
Chute Cover
Parts needed for this procedure:
1
Discharge chute cover
3
Bolt (3/8 x 1 inch)—48-inch decks only
2
Bolt (3/8 x 1 inch)—54-inch and 60-inch decks only
3
Nut (3/8 inch)—48-inch and 54-inch decks only
2
Nut (3/8 inch)—60-inch decks only
1
Nut (5/16 inch)—60-in decks only
1
Bolt (3/8 x 1-1/4 inches)—54-inch decks only
1
Bolt (5/16 x 1-1/4 inches)—60-inch decks only
4


