27
Headlights
(Optional)
Specification: Bulb # 1156, automotive type
Removing the Bulb
1. Disengage the PTO, shift into neutral, set the parking
brake, stop the engine, and remove the ignition key.
2. Open the hood. Pull the wire connectors off of both of
the bulb holder terminals.
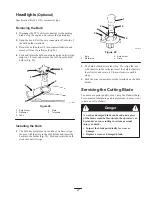
3. Rotate the bulb holder 1/4 turn counterclockwise and
remove it from the reflector (Fig. 28).
4. Push and rotate the bulb counterclockwise until it stops
(approx. 1/4 turn) and remove the bulb from the bulb
holder (Fig. 29).
m–1874
1
2
3
4
4
5
5
Figure 28
1.
Bulb holder
2.
Reflector
3.
Tabs
4.
Slots
5.
Terminals
Installing the Bulb
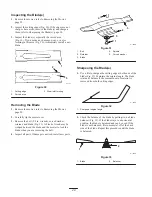
1. The bulb has metal pins on the side of its base. Align
the pins with the slots in the bulb holder and insert the
base into the holder (Fig. 29). Push and rotate the bulb
clockwise until it stops.
m–1875
1
2
3
4
2
4
Figure 29
1.
Bulb
2.
Metal pins
3.
Bulb holder
4.
Slots
2. The bulb holder has two tabs (Fig. 28). Align the tabs
with the slots in the reflector, insert the bulb holder into
the reflector, and rotate it 1/4 turn clockwise until it
stops.
3. Push the wire connectors onto the terminals on the bulb
holder.
Servicing the Cutting Blade
To ensure a superior quality of cut, keep the blade(s) sharp.
For convenient sharpening and replacement, you may want
to have an extra blade(s).
Danger
A worn or damaged blade can break, and a piece
of the blade could be thrown into the operator’s or
bystander’s area, resulting in serious personal
injury or death.
•
Inspect the blade periodically for wear or
damage.
•
Replace a worn or damaged blade.


