


Removing the Seats
1.
Remove the 8 socket-head bolts that secure the seat
rails of the seat to the chassis and remove the seats
(
Figure 9
1.
Socket-head bolts
3.
Seat
2.
Seat rail
2.
Repeat step
for the other seat (
).
4
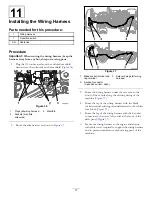
Removing the Coolant Tank
(non-HD models), ROPS
Shield, and Seat Shroud (HD
and HDX series models)
No Parts Required
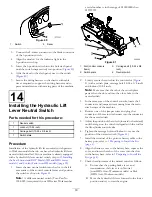
Removing the CVT Cooling Duct and
Coolant Tank
1.
For HDX-Auto Workman models, remove the CVT
cooling duct as follows:
A.
Remove the hose clamp that secures the CVT
cooling duct to the flange of the CVT intake at
the back of the ROPS panel on the passenger side
(
).
Figure 10
1.
CVT intake
3.
CVT cooling duct
2.
Hose clamp
B.
Remove the CVT cooling duct from the flange of
the CVT intake (
).
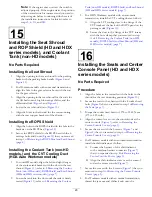
2.
For non-HD models, lift the coolant tank up and out
of the support bracket on the back of the ROPS shield
(
).
Figure 11
1.
Coolant tank
3.
Support bracket
2.
Coolant-tank bracket
3.
Set the coolant tank upright onto the engine/chassis.
7


