Adjusting the Height of Cut
(HOC)
Model 03192 Only
On Model 03192, adjust the height of cut (HOC)
by adding or removing the adjustment (slotted) rear
spacers below the side plate pad on the cutting unit.
Note:
Spacers installed above the side plate pad do
not affect HOC.
The adjustment (slotted) rear spacers are stored
above the side plate pad; to increase HOC, move
them below the side plate pad.
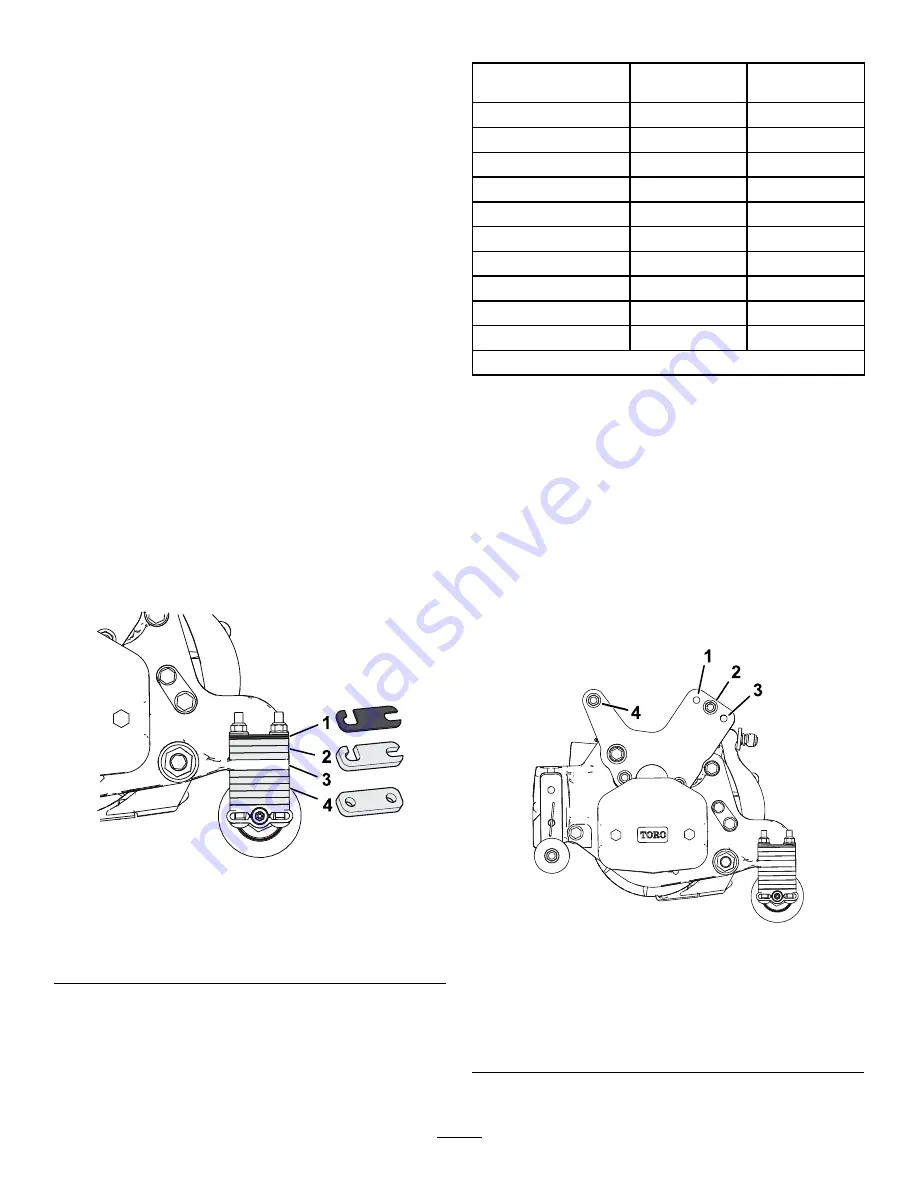
There are 2 types of slotted rear spacers used for
adjusting HOC on Model 03192 cutting units:
•
1/4 inch (6.4 mm) slotted rear spacers, up to 3 on
each side.
•
0.075 inch (1.9 mm) thin slotted rear spacers, up
to 2 on each side.
Additionally there are 5 fixed rear spacers (1/4 inch,
6.4 mm) always located below the side plate pad.
Important:
Do not remove or adjust the 5 lower
rear spacers; this cutting unit is designed to
operate at a HOC between 1.25 to 2.00 inches (32
to 51 mm) and removing the lower fixed spacers
causes the HOC to leave that range.
g341920
Figure 18
1.
Thin (0.075 inch)
adjustment spacers
3.
Side plate pad
2.
1/4 inch adjustment
spacers
4.
Lower fixed spacers (do
not adjust)
Height-of-Cut Chart (Model 03192)
HOC Setting
No. of 1/4 inch
Rear Spacers*
No. of Thin
Rear Spacers*
32 mm (1.25 inches)
5
0
34 mm (1.33 inches)
5
1
35 mm (1.38 inches)
5
2
38 mm (1.50 inches)
6
0
40 mm (1.58 inches)
6
1
42 mm (1.65 inches)
6
2
45 mm (1.75 inches)
7
0
46 mm (1.83 inches)
7
1
48 mm (1.90 inches)
7
2
51 mm (2.00 inches)
8
0
*Installed beneath the side plate pad.
To adjust the aggressiveness of cut on Model
03192 cutting units, proceed as follows:
•
Install the cutting unit onto the traction unit as
described in the traction unit
Operator's Manual
.
•
Loosen, but do not remove, the locknuts at the
front of the fixed plates and remove the carriage
bolts, spacers, and locknuts from the rear of the
fixed plates and adjust their position.
Note:
To achieve a
less
aggressive cut, mount
the cutting unit links in the number 1 position or
mount the links to the number 3 position for a
more
aggressive cut (
).
g341875
Figure 19
Left side shown
1.
Less aggressive
3.
More aggressive
2.
Production/Standard
4.
Just loosen these
locknuts before adjusting
aggressiveness of cut
14


