15
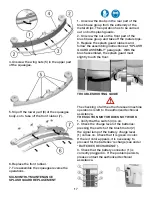
4. With the brush base in lifted position,
turn the brush in its rotating sense, until it is
released from the brush holder plate seat as
indicated in the figure.
The following figure shows the rotating sense
for brush release.
BRUSH CLEANING
Disassemble the brush and clean it with a
water jet (for the disassembly see under
“BRUSH DISASSEMBLY”).
SQUEEGEE CLEANING
Keeping the squeegee clean guarantees always
the best drying action.
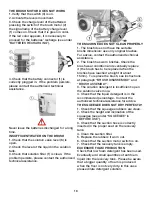
For the cleaning it is necessary to:
1. Take off the squeegee hose (3) from its
coupling.
2. Disassemble the squeegee from its support
by rotating the lever (2) counterclockwise and
sliding the stud bolts (1) in their slots up to their
release.
3. Clean with care the internal part of the
squeegee inlet eliminating dirt residue.
4. Clean with care the squeegee rubbers.
5. Reassemble all parts.
WEEKLY MAINTENANCE
REAR SQUEEGEE RUBBER REPLACEMENT
Check the squeegee rubber wear and
eventually turn or replace it.
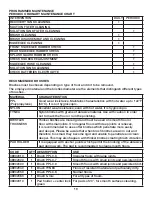
For the replacement it is necessary to:
1. Lift the squeegee acting upon the lever.
2. Uncouple the hook (1) of the rubber holder
blade, release the extremities (2) from the
squeegee body and take off the rubber (4).
3. Turn the rubber (4) to a new side or replace
it.
To reassemble the squeegee repeat reverse
the operations abovementioned, inserting
the rubber (4) on the guides (3), couple the
extremities (2) of the rubber holder blade onto
the squeegee body and finally block the hook
(1).
Summary of Contents for TS120-S53-U
Page 20: ...20...


