5
ASSEMBLY
1-
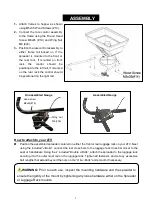
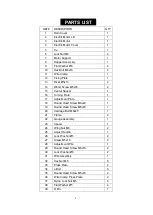
Attach frames to hopper as shown
using M5x35 Wood Screws (#14).
2-
Connect the rate control assembly
to the frame using the Round Head
Screw M6x45 (#19) and Wing Nut
M6 (#24).
3-
Position the rate control assembly to
either frame rail based on if the
spreader is mounted to the front or
the rear rack. If mounted on front
rack
the
control
should
be
positioned to the left rail, if mounted
on the rear rack the control should
be positioned on the right rail.
How to attach to your ATV
n
Position the assembled spreader centered on either the front or rear luggage rack on your ATV. Next
using the included “J-Bolts”, connect the rear cross bars to the luggage rack cross bar closet to the
seat or handlebars. Using the 2 included “Double J-Bolts”, attach the spreader to the luggage rack
securing it to the outer most rail on the luggage rack. Tighten all fasteners and cut any excessive
bolt lengths that extend beyond the nuts on the “U & J-Bolts” and smooth if necessary.
WARNING:
Prior to each use, inspect the mounting hardware and the spreader to
ensure the rigidity of the mount by tightening any loose hardware either on the Spreader
or Luggage Rack mounts.
Head screw
M6x45(#19)
Unassembled Gauge
Assembled Gauge
Wing nut
M6(#24)
Summary of Contents for 12V ATV 80LB
Page 7: ...7 EXPLODED DIAGRAM...


