

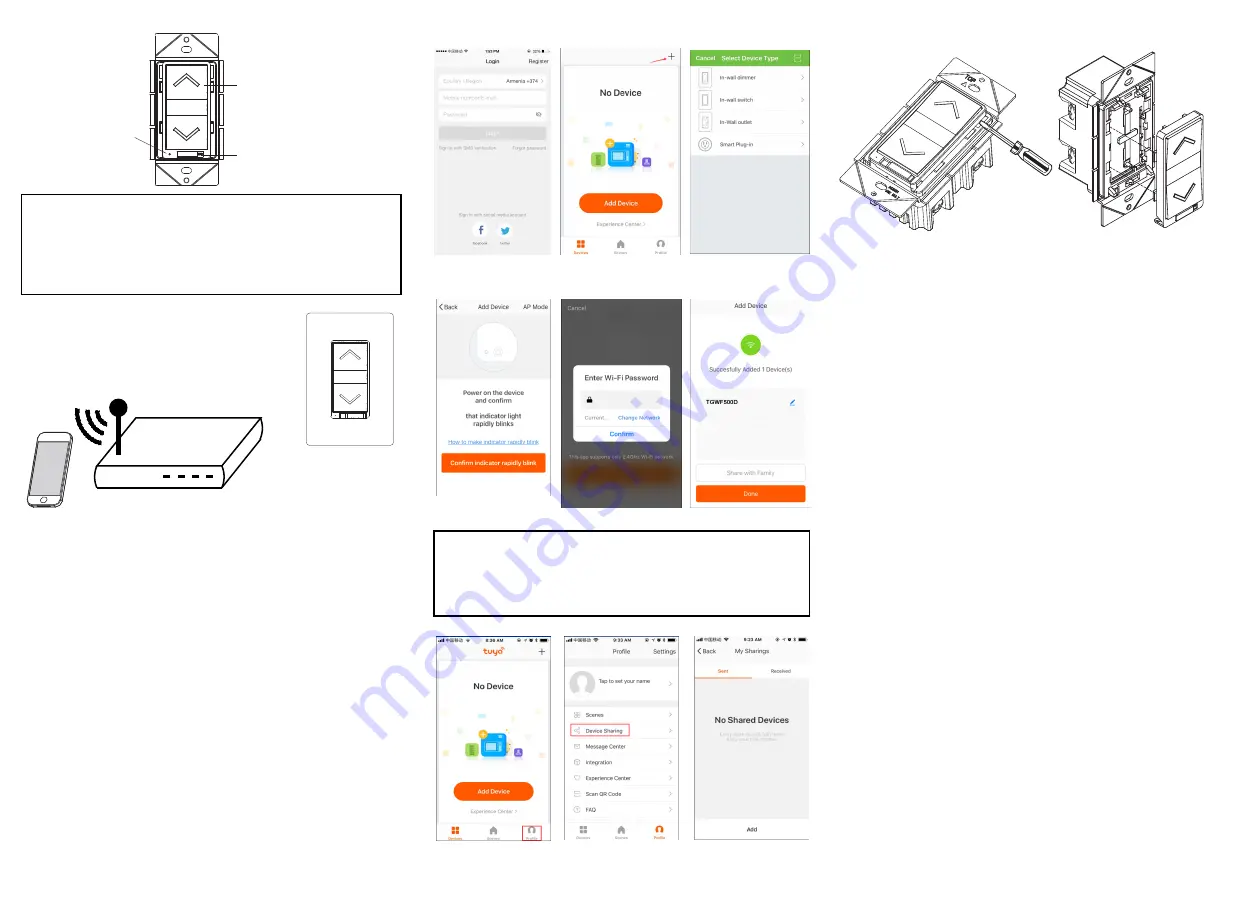
INITIAL SETUP FOR Wi-Fi CONTROL
1.
Connect
the
TGWF
500D, then
turn on the circuit breaker.
2.
Connect your Smart Device
(phone or tablet)
to the same 2.4GHz
Wi-Fi
network that your
TGWF
500D
outlet will
be
connect
ing
to.
2.4GHz Wi-Fi
3.
Use your phone to search
for
“
TOPGREENER
”
from App Store or Google Play
.
4.
Once installed, open the App and follow the on-screen instructions to register
then
login.
F
ollow the instructions in the
A
pp to connect the Smart Plug to your
network. Over time, the
A
pp may be updated for a better experience or added
features, so be sure to follow the in-
A
pp instructions closely:
a.
Login to the
A
pp
b.
Navigate to the Devices tab and click on "Add Device" or the "+"
button
c.
Select the device type "
In-wall dimmer
".
d.
When prompted to "power on the device and confirm", push and
hold the
bottom button
on the TGWF500D for 5 seconds and the
LED indicator on the device will start blinking rapidly.
•
When LED starts blinking, press "Confirm the indicator
rapidly blinking
"
e.
Enter your W
i-
F
i
password when prompted and click on confirm
f.
After successfully adding the device, you can change the name
of it as
desired
NOTE:
By default, the app will only allow one user to control the
Dimmer
.
To add users, go to your "profile" on the app and click on "Device
Sharing" and follow the on-screen instructions.
MANUALLY OPERATING THE DIMMER
•
To turn the lights ON to the last used brightness level, press and
release the top Dimmer Paddle
•
To brighten the lights, press and hold the top Dimmer Paddle and
release when the desired level is reached
•
To dim the lights, press and hold the bottom Dimmer Paddle and
release when the desired level is reached
•
To save the brightness level and turn off the lights, press and release
the bottom Dimmer Paddle
CHANGING THE FACE COVER
To replace the face cover, use a flat screwdriver and insert the tip at the gap
shown in the diagram above and pry cover off.
To re-install, simply align the cover and snap back on.
a.
b.
c.
d
.
e
.
f
.
LED INDICATOR ON DEVICE
•
Solid Green:
Device is plugged in to a power source, but it has not
been paired.
•
Slow Blinking Green:
Device is attempting to pair with the
controller
while in APN mode. When LED turns off, the device has
paired successfully
•
Fast Blinking Green:
De
vice is attempting to pair with the controller
while in Easy mode. When LED turns off, the device has paired
successfully
•
Solid Blue:
The device is paired and the power is turned ON
•
No Light:
The device is
paired and the power is
turned OFF.
Dimmer
Switch
Paddle
LED
Indicator
Air Gap
S
witch on
the TGWF500D
The
Air Gap Switch
located below the Dimmer Switch Paddle is
designed
for your safety
. With push buttons switches, it is difficult to know if the switch
is in the On or the Off position without having to use a tester. This switch
eliminates the hazard of having to change a light bulb on a possibly live fixture.
Use the Air Gap Switch to Power Off before you change the bulb.


