Topfield TF 7000 HT User Manual Download Page 42

38

Firmware Update

7.2

From your computer via RS-232 port

It is possible to transfer a new firmware to the digital receiver
from your computer by connecting them with a RS-232 cable.

You need

TFD-Down

, a firmware transfer utility for this, which

is available from the website,

http://www.i-topfield.com

.

To update the firmware with this method, perform the follow-

ing steps:

1. Download a new firmware applicable to

your digital receiver from the Topfield
website.

2. Turn off the digital receiver.

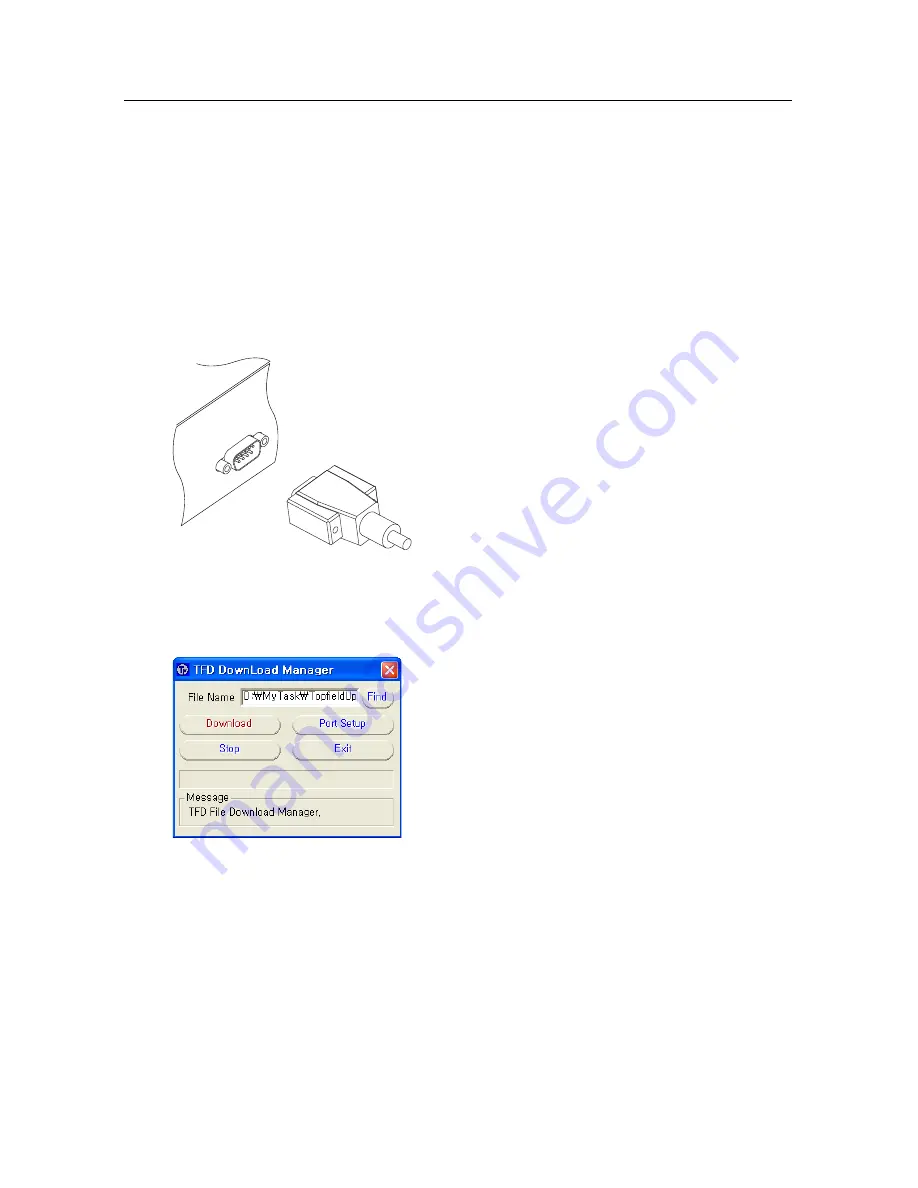
3. Plug one end of a RS-232 cable (9 pin D-

sub cable) into the

RS-232

port on the dig-

ital receiver, and the other end into the
matching port on your computer.

4. Run

TFD-Down

.

The instructions on how to use

TFD-Down

are as follows:

1. Press the

Find

button to select the new

firmware file.

2. Press the

download

button, and then turn

on the digital receiver to start the file trans-
fer.

3. A countdown will be displayed on screen

4. Restart the digital receiver when the file

transfer is complete.

Summary of Contents for TF 7000 HT

Page 1: ...TOPFIELD TF 7000 HT User Guide High Definition Digital Terrestrial Receiver...

Page 2: ......

Page 3: ...s 6 2 3 Rear panel connections 8 2 4 Connecting up your digital receiver 9 2 4 1 Connecting the antenna 9 2 4 2 Connecting to your television 10 2 5 Switching on for the first time 12 2 5 1 Inserting...

Page 4: ...list 24 5 2 2 The favourite services list 26 5 2 3 Viewing programme information 27 5 2 4 Selecting audio tracks 28 5 2 5 Selecting subtitle tracks 28 5 2 6 Viewing teletext 28 5 3 Viewing electronic...

Page 5: ...digital broadcasts are not all as signed to their own frequencies instead multiple television broadcasts are transmitted through a single frequency The fre quency in digital broadcasting is usually c...

Page 6: ...nufacturer 1 2 Controlling the digital receiver The digital receiver can be operated with the remote control and the buttons on the front panel NOTE When the digital receiver is off but plugged into a...

Page 7: ...mean STANDBY CH VOL STANDBY button switches the digital receiver between standby mode and operation mode CHANNEL c a buttons switch to previous or next service They are also used to navigate in menus...

Page 8: ...specify values for menu options 5 switches between the current service and the previously viewed one 6 displays teletext 7 is used to select an audio track and a sound mode or a video track of multife...

Page 9: ...s 15 switches between television services and radio ser vices 16 FAV displays the favourite lists 17 is used to select a subtitle track 18 is used to set a sleep timer 19 P P buttons switch to previou...

Page 10: ...eries for the remote control AAA 1 5 V One component cable RCA cable One composite cable RCA cable A copy of this user guide NOTE Accessories may vary according to your local area 2 2 Safety precautio...

Page 11: ...igi tal receiver When placed in a cabinet make sure there is a minimum space of 10 centimetres around it For the physical specification of the digital receiver refer to Table 2 2 Protect the power cor...

Page 12: ...Composite video output socket for the televi sion set yellow 4 AUDIO L R Stereo audio output socket for the television set or the audio system white red 5 Y Pb Pr Component video output socket for the...

Page 13: ...t S PDIF Dolby digital audio output RS 232 115 2 kbps at maximum 2 4 Connecting up your digital receiver There are several ways to set up the digital receiver Set up the digital receiver suitably to y...

Page 14: ...for detailed description To use the HDMI connector If you have a high definition television set you should use a HDMI cable for best re sults Plug one end of the cable into the HDMI socket on the digi...

Page 15: ...eo with the composite video connector You will need to obtain a composite video cable RCA cable to use the composite video connector Plug one end of the cable into the VIDEO yellow socket on the digit...

Page 16: ...for the damage resulting from leaking batteries NOTE Batteries including those which contain no heavy metals may not be disposed of with household waste Please dispose of used batteries in an environm...

Page 17: ...title track should be output Select the System Setting Lan guage Setting menu You should see a screen like the left figure Menu language The digital receiver supports many menu languages Dutch English...

Page 18: ...ny available language no subtitle will be displayed Apart from this setting you can select a subtitle track with the button See 5 2 5 for detailed description Audio language Set the 1st Audio Language...

Page 19: ...set the TV Aspect Ratio option to 4 3 You cannot fully enjoy wide screen programmes with your normal screen television as the above figures show The left figure shows a normal picture displayed in th...

Page 20: ...you have a high definition television With that setting the digital receiver will present a programme as it is without any resolution conversion While watching television you can change the resolution...

Page 21: ...tal audio system does not have a Dolby Digital decoder you have to set the Dolby Digital option to PCM Otherwise set it to Bitstream 3 3 Local time setting You should set your local time for timer eve...

Page 22: ...habi Muscat Baku Tbilisi GMT 4 30 Kabul GMT 5 00 Ekaterinburg Islamabad Karachi Tashkent GMT 5 30 Bombay Calcutta Madras New Delhi GMT 6 00 Almaty Dhaka Colombo GMT 7 00 Bangkok Hanoi Jakarta GMT 8 00...

Page 23: ...ying a programme classification Select the System Setting Parental Control menu You should see a screen like the left figure and you will be asked your Personal Identifica tion Number PIN The number i...

Page 24: ...fication number to override To change the number select the Change PIN Code menu then an input box appears You have to enter a desired number twice for confirmation You can also restrict uses of some...

Page 25: ...er pressing the button will display the information box If you set this option to Never Hide the information box will always be displayed In addition you can raise or lower the position of the informa...

Page 26: ...should see a screen like the left figure If you have an antenna booster you should set the Antenna Sup ply 5V option to On to supply power to it You should set the Search Mode option to Auto for the f...

Page 27: ...ss the OK button to save found services To stop at any time or to exit without saving press the EXIT button 4 2 Resetting to factory settings The digital receiver maintains the following data Services...

Page 28: ...e button Press it again to restore the sound to previous level 5 2 Watching television To change services press the P or P button Pressing the button switches to the previously viewed service In ad di...

Page 29: ...o delete the highlighted service press the F1 button then you are asked for confirmation If you select Yes it will be deleted If you want to restore it as before you have to perform service search aga...

Page 30: ...long ing to the highlighted group are listed on the right box For how to edit the favourite lists refer to 6 1 To select a favourite service put the hightlight bar on a desired group and press the V b...

Page 31: ...leted 5 2 3 Viewing programme information Pressing the button displays the information box on which you can see all of the following Service number and name Signal level and quality Programme name Pro...

Page 32: ...e you have to press the button once more to select an audio track 5 2 5 Selecting subtitle tracks Some programmes are provided with subtitle tracks in one or more languages If the current programme pr...

Page 33: ...press the button To switch to another service press the V or V button You can travel over previous days with the F2 button and can travel over next days with the F3 button To see the programme guide...

Page 34: ...the timer list to 5 4 4 To remove the marking press the OK button once again 5 4 Making timer events You can make your desired services to be presented at a specific time Even if the digital receiver...

Page 35: ...ramme is broadcasted at weekends and you wish to watch every episode of the programme set the Mode option to Every Weekend 4 Set the Date option to a desired date on which the digital receiver will tu...

Page 36: ...Favorites menu You should see a screen like the left figure There are three columns Group list left Favourite list centre Services list right The services list contains all available services whereas...

Page 37: ...in the group list and press the OK button to select it The high light bar then moves to the services list 2 To add a service to the selected group put the highlight bar on a desired service entry and...

Page 38: ...er put the cursor to the right of the desired letter on the input line and then select the Del key You must select the Save key to complete naming otherwise if you press the EXIT button it will not be...

Page 39: ...digital receiver 2 Turn on the source digital receiver 3 Select the Installation Transfer Firmware Transfer Data to Other IRD menu then you get asked for confirmation select Yes 4 To start the data t...

Page 40: ...an update utility which runs on most versions of Windows from the Topfield website http www i topfield com 7 1 Checking the firmware information You have to check the firmware information of your dig...

Page 41: ...7 1 Checking the firmware information 37 NOTE You can only update with firmwares of which system identifi cation is identical to that of yours Otherwise you will fail in firmware update...

Page 42: ...irmware applicable to your digital receiver from the Topfield website 2 Turn off the digital receiver 3 Plug one end of a RS 232 cable 9 pin D sub cable into the RS 232 port on the dig ital receiver a...

Page 43: ...end of a RS 232 cable 9 pin D sub cable into the RS 232 port on the dig ital receiver and the other end into the matching port on the other digital receiver 3 Turn on the source digital receiver if n...

Page 44: ...20 Button 4 Censorship 19 Center extract 15 Change PIN Code 20 Channel 23 Date 31 Daylight Saving Time 18 Dolby Digital 17 download 38 Duration 31 DVB 1 Electronic Programme Guide 29 Every Day 31 Ever...

Page 45: ...ch Mode 22 23 Service 31 Service Search 22 services list 24 Show Provider 25 Sound Mode 17 Space 34 specifications 7 9 Start Search 23 stereo 17 subtitle 28 System ID 36 System Setting 20 21 teletext...

Page 46: ......

Page 47: ......

Page 48: ...t either the retailer where they purchased this product or their local government office for details of where and how they can dispose this product for environmentally safe recycling Business users sh...

Reviews: