background image

5

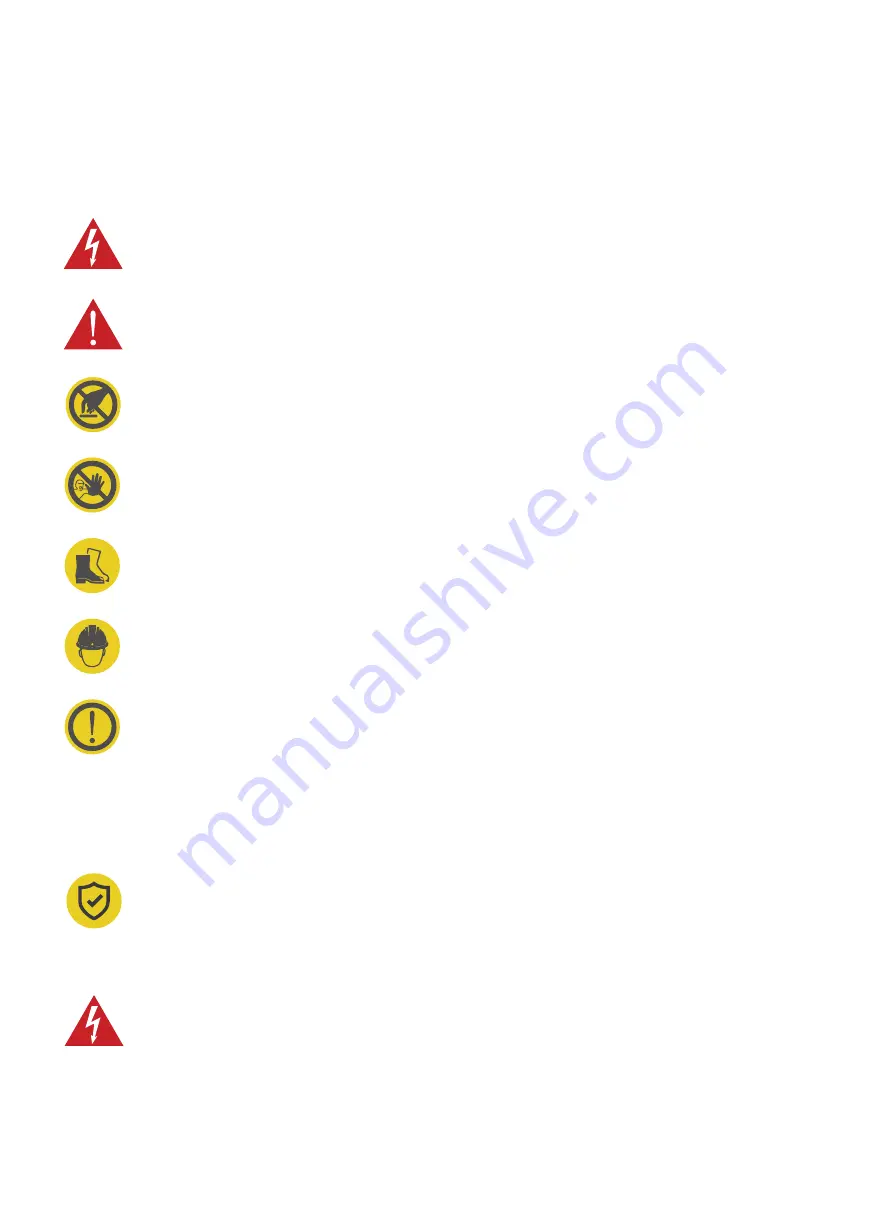
1.2.1 Safety signs used

The following warning signs, mandatory signs and information signs are used in this manual, on and in the AC EV 

Charger.

CAUTION: Warning of electrical hazards. 

This sign is intended to alert the user that severe personal injury or substantial property damage can 

result if the device is not operated as requested.

ATTENTION: Warning of a dangerous spot or dangerous situation. 

This sign is intended to alert the user that minor personal injury or material damage can result, if the 

device is not operated as requested.

CAUTION: Do not touch by hands in case of ESD. 

Indicates the possible consequences of touching electrostatically sensitive components.

No access for unauthorized persons.

Use protective footwear.

Must wear a safety helmet.

Indicates important texts, notes, or tips.

1.2 SAFETY NOTES

Safety protection must be done when installing the EV Charger.

Installation must be carried out by personnel with professional qualification, otherwise there is a risk 

of electric shock.


It shall be installed in the place without violent vibration and impact, and placed vertically to facilitate 

ventilation. 

It shall be installed on noncombustible materials, or there is a risk of fire.


Do not drop any foreign objects, especially metal objects, into the inside of the Charger or there is a 

risk of fire.


The lead nose of the Charger must be securely attached or there is a risk of damaging the equipment.

1.2.2 Safety Precautions for Installation

Summary of Contents for PulseQ AC Home

Page 1: ...AC EV Charger User Manual ...

Page 2: ......

Page 3: ...DUCT OVERVIEW INFO Section 4 What s in the Box Section 5 Installation Section 6 Network Configuration Section 7 LED Indicators Section 8 Fault Handling Section 9 Warranty 3 4 7 9 13 14 24 28 29 30 IEC EV EVSE OBC KW A V Hz LCD LED 1 2 3 4 5 6 7 8 9 10 Human Machine Interface HMI 13 Central Management System manages EVSE and has the information for authorizing users for using its EVSE CMS 11 Open C...

Page 4: ... vehicle connector Do not use this product if the flexible power cord or EV cable is frayed has broken insulation or has any other signs of damage Do not use this product if the enclosure or the EV connector is broken cracked open or shows any other indication of damage Indicate the ambient temperature rating 30 C to 55 C CAUTION and the following or equivalent To reduce the risk of fire connect t...

Page 5: ...ching electrostatically sensitive components No access for unauthorized persons Use protective footwear Must wear a safety helmet Indicates important texts notes or tips 1 2 SAFETY NOTES Safety protection must be done when installing the EV Charger Installation must be carried out by personnel with professional qualification otherwise there is a risk of electric shock It shall be installed in the ...

Page 6: ...r the charging cables is exposed If you find any please contact the supplier in time 1 2 4 Safety Precautions for Maintenance Personnel must always use protective footwear when maintenance work It is recommended that routine safety inspection visits to Charger be conducted at least once a week Do not put inflammable explosive or combustible materials chemicals combustible steam and other dangerous...

Page 7: ...is Mode 3 and charging connection is the Case C Mode 3 a method for the connection of an EV to an AC EV supply equipment permanently connected to an AC supply network with a control pilot function that extends from the AC EV supply equipment to the EV Case C Connection of an EV to a supply network utilizing a cable and vehicle connector permanently attached to the EV charger Vehicle inlet Vehicle ...

Page 8: ...PulseQ AC Home product meets IEC 62196 2 Type 2 PulseQ AC Home provides a Type 2 female plug with charging cable it only charging an EV with a Type 2 charging socket vehicle inlet Fig 2 3 1 Schematic diagram of Type 2 interface CP N PE L1 L3 L2 PP ...

Page 9: ...dimensions of PulseQ AC Home charger are shown as Fig 3 1 1 The block diagram of PulseQ AC Home charger is shown as Fig 3 2 1 LED RCMU type A 6mADC RFID reader PT CT RS 485 WiFi or Bluetooth Charging interface Fig 3 1 1 The shape Dimensions of PulseQ AC Home 220mm 310mm 95mm Main CPU ...

Page 10: ... That cord extension sets are not be used PULSEQ AC HOME Model Number Rated Voltage Rated Current Rated Power Safety Protection RCD Built in Charging Interface Mode 3 Remote APP controlled Local Plug and charge RFID Reader mode 4 LED lights Indicate 4 statuses include standby charging fault and network WiFi 2 4GHz 5GHz And support OCPP 1 6J Protocol Optional RS 485 with special communication proto...

Page 11: ...over Black PC IP65 IK10 2000m 40 75 30 55 95 RH no water droplet condensation 0 5G no acute vibration and impaction Indoor or outdoor good ventilation no flammable explosive gases Mounting Net Weight Dimension Color Material IP Code IK Code Altitude Storage Temperature Operation Temperature Relative Humidity Vibration Installation Location 11 ...

Page 12: ...z 32A 1 Phase 16A 3 Phase 32A 3 Phase 7kW 11kW 22kW IP 65 30 55 22 131 12 3 3 5 Nameplate This equipment should be reliably grounded before use Installation wiring and maintenance should be done by personnel with professional qualification Do not expose to flammable gas Failure to read user manual carefully before use may lead to improper operation 1 2 3 4 ...

Page 13: ...ll mounting Accessories User Manual Quick User Guide Quality Certificate Wall Installation Template M6 63mm Expansion Bolt M5 40mm Expansion Bolt Charging Dock Installation Template IC card 1 1 1 1 1 1 1 4 4 1 2 a b c d e f g h i j k a g d e f j k c b h i 13 User Manual IC card ...

Page 14: ...mal expansion and cold contraction Space requirement When the charger is fixed on the wall the minimum space requirements are shown in Fig 5 2 It is suggested that the charger should be installed in a place with good ventilation no direct sunlight and shelter from wind and rain In order to ensure good ventilation condition you should mount the charger vertically and leave enough space Fig 5 2 Mini...

Page 15: ...nnection and measure the voltage Multimeter 1 Fastening bolt Wrench 3 Peeling cables Wire stripper 5 Drill fixing holes in the wall Electric Impact drill 2 Cut the cable Diagonal plier 4 Pressed cable terminal Crimping plier 6 Fastening screw Cross screwdriver 7 No Tools Name Schematic Picture Main Uses 15 ...

Page 16: ...ere is WiFi signal available Refer to the Fig 5 4 2 to understand the dimensions of the wall bracket Please make sure the space on the wall is at least 5 62 5 98 143mm 152mm Fig 5 4 1 Fig 5 4 2 1 WARNING In areas with frequent thunderstorms add surge protection at the service panel for all circuits Ensure all power and ground connections especially those at the breaker and bus bar are clean and ti...

Page 17: ...ith the installation template See Fig 5 4 3 Drill the mounting holes on the wall with a depth of at least 1 97 See Fig 5 4 4 Hammer the expansion sleeve into the corresponding hole See Fig 5 4 5 2 3 3 Fig 5 4 3 Fig 5 4 4 Fig 5 4 5 1 97 17 ...

Page 18: ...Fix the bracket to the wall with the expansion screws See Fig 5 4 6 included in the package Attach the charger to the bracket See Fig 5 4 7 5 6 Fig 5 4 6 Fig 5 4 7 18 ...

Page 19: ...See Fig 5 5 2 2 Fig 5 5 2 5 5 Hardwire Installation The hardwire installation needs to be done by electricians and please strictly follow the safety precautions Unscrew the six screws on the back cover with a Phillips screwdriver and remove the front cover See Fig 5 5 1 1 Fig 5 5 1 19 L3 L2 L1 N PE ...

Page 20: ...flat blade screwdriver and fully insert the wire conductors into the connectors on the terminal block Tighten the screws and make sure each wire conductor is securely connected See Fig 5 5 4 4 Fig 5 5 4 20 L3 L2 L1 N PE L3 L2 L1 N PE 10 12mm Note For the model of PulseQ AC Home_7K_EU only connect the corresponding wire conductors to the L1 N PE connectors ...

Page 21: ...Reinstall the front cover and tighten the gland 5 21 ...

Page 22: ... 2 12 2 12 54mm 54mm Drill the mounting holes on the wall with a depth of at least 1 97 See Fig 5 6 2 Place the installation template on the wall and mark the mounting hole See Fig 5 6 1 5 6 Charging Dock Installation 54mm 54mm Fig 5 6 1 Fig 5 6 2 at least 1 97 ...

Page 23: ...socket into the charing dock See Fig 5 6 3 Fix the charging dock on the wall with the expansion screw in the package See Fig 5 6 4 4 5 Please put the charging plug back to the Charging Dock after each charge Fig 5 6 3 Fig 5 6 4 ...

Page 24: ...d install the app to your phone See Figure 6 1 1 Fig 6 1 1 Register an account with your email address and login See Figure 6 1 2 Open the app and tap the User Center select the charging station management See Figure 6 1 3 1 2 3 Section 6 Network Configuration Fig 6 1 2 Fig 6 1 3 6 1 Wi Fi Configuration ...

Page 25: ...Tap the cross at the bottom right to add your charging station See Figure 6 1 4 Select the Wi Fi network See Figure 6 1 5 4 5 Fig 6 1 4 Fig 6 1 5 25 ...

Page 26: ...Tap the TOPDON AC Home to connect the hotspot See Figure 6 1 6 Tap the Wi Fi Setting enter the Wi Fi name and password to set up the connection See Figure 6 1 7 6 7 Fig 6 1 6 Fig 6 1 7 26 ...

Page 27: ...Once the above steps have been done tap the Confirm to complete the procedure See Figure 6 1 8 8 Fig 6 1 8 27 ...

Page 28: ...ound fault status Twinkle Unconnected network OFF Fault status BLN control Exchange data with CMS via network ON Configure WiFi network status Twinkle Charging status 1 3 2 4 No Icon Indicator Color Indicator Status Connotation The LED indicators on the panel are used to indicate the status of the charger and the various combinations of indicators are described as below ...

Page 29: ...off and restart the device Check whether the charging connector and its cable are damaged or wet Recover after pulling out the adapter Check whether the charging adapter and its cables are damaged or wet Check whether the charging connector is correctly connected Check whether the OBC is normal Check the set of output current Battery of EV is full Or the charging connector is not properly connecte...

Page 30: ...ing cable from the date of purchase Warranty Period For the defects reported during the Warranty Period TOPDON will either repair or replace the defective part or product according to its technical support analysis and confirmation TOPDON shall not be liable for any incidental or consequential damages arising from the device s use misuse or mounting Some states do not allow limitation on how long ...

Page 31: ......

Page 32: ......

Reviews: