background image

ALADDIN

  - User manual    


Rev. 23 of  08/07/2016 


82 


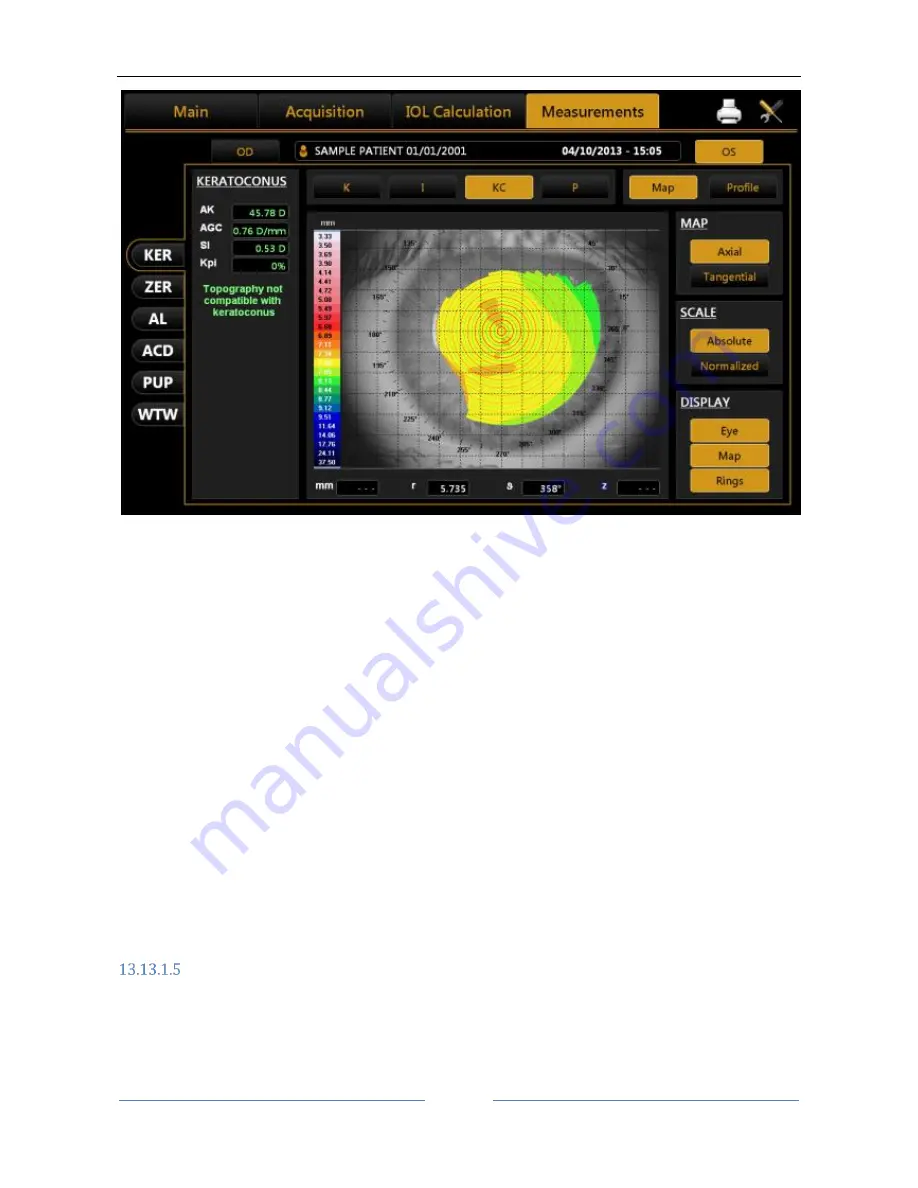
Figure 59 


AK: Apical curvature. 
Represents the power of the cornea in its apex 


AGC: apical gradient of curvature. 
Represents the average variations per unit of length of the corneal power, taking the apical power as 
reference. 


SI: difference between the average power of two circular zones centered in the vertical axis of the 
ruler and placed in the lower hemisphere and in the upper hemisphere of the cornea respectively. 


Kpi: Keratoconus diagnosis probability index. 

 
Based  on  the  combined  evaluation  of  the  first  three  indices  with  the  probability  index,  there  are  three 
different possibilities: topographic picture not compatible with keratoconus (green); suspected keratoconus 
(yellow); topographic picture compatible with keratoconus (red). 
If  the  topographic  picture  is  compatible  with  keratoconus  or  indicates  a  suspected  keratoconus,  the 
numerical values of the geometric parameters of the cone are shown at the bottom of the panel. These are: 


A: area of the keratoconus (mm²) 


D: average diameter of the keratoconus (mm) 


r, ø: polar coordinates (mm, °) of the  barycentre of the keratoconus in relation to the centre of the 
map 


RND: circularity factor of the keratoconus


Pupil 

Press the 

“P” 

button to open the pupil's indices: 


Summary of Contents for ALADDIN

Page 1: ...ALADDIN User manual Rev 23 of 08 07 2016 1 ALADDIN User manual 0123 Product cod 1240211 ALADDIN HW2 0 Rev 23 2016...

Page 2: ...of continuous improvement of its products so it is possible that some instructions specifications and pictures in this manual may differ slightly from the product you purchased The manufacturer also...

Page 3: ...afety instructions 18 6 1 General 18 6 2 Electrical safety 19 6 3 LED emission safety 19 6 4 Installation with external devices or IT Network 19 6 5 Transport and packaging 20 6 6 Cleaning 20 6 7 Pack...

Page 4: ...Selecting a patient from Server 45 Start an exam from the Waiting Room 47 13 4 Acquisition environment general instructions 48 13 4 1 Description of the Acquisition screen 50 Description of results 50...

Page 5: ...AL 88 13 13 4 ANTERIOR CHAMBER DEPTH ACD 89 13 13 5 PUPILLOMETRY PUP 89 Display 90 Sequences 90 Dynamic 90 Photopic Mesopic 91 Functions 91 Graphs 91 13 13 6 WHITE TO WHITE 94 13 14 EXAMINATION DATA S...

Page 6: ...ecifications 135 15 1 General 135 15 2 Electrical data 135 15 3 Optical radiation 136 15 4 Performance Testing 137 15 5 Information on measurements 139 15 6 Environmental conditions 139 15 7 Mechanica...

Page 7: ...ane It is measured with a low coherence interferometry system with a super luminescent diode The measuring range goes from 15 mm to 38 mm Keratometry is used to measure the corneal curvature It is bas...

Page 8: ...ADAY JT PRAGER TC CHANDLER TY MUSGROVE KH LEWIS JW RUIZ RS A three part system for refining intraocular lens power calculations J Cataract Refract Surg 14 17 24 1988 SRKII RETZLAFF J A new intraocular...

Page 9: ...lations After Myopic Laser In Situ Keratomileusis American Journal of Ophthalmology Impact Factor 4 02 10 2003 136 3 426 32 Shammas No history SHAMMAS H J SHAMMAS M C HILL W E Intraocular lens power c...

Page 10: ...Figure 1 It is necessary to tell the patient to look steadily at the fixation point in the center of the Placido disk The position of the device in relation to the patient s eye thus found is a starti...

Page 11: ...tions in a safe place close to the device The manual must be at hand at all times For best use of the instrument read the instructions carefully The purpose of this manual is to inform the user as to...

Page 12: ...the patient of approximately 6 200 points using a 24 ring Placido disk to show the description of the corneal surface This measurement also provides a Keratometry at 3mm 5mm and 7mm 7mm or at 2 4 6 m...

Page 13: ...plied with the instrument except cables sold by the equipment manufacturer as spare parts may lead to an increase in emissions and reduce the device s or system s immunity The eventual cables connecte...

Page 14: ...t is used only in such an environment Immunity issues Test level EN 60601 1 2 Compliance level Electromagnetic environment guide Electrostatic discharge ESD EN 61000 4 2 6kV on contact 8kV in air 6kV...

Page 15: ...etween portable and mobile radio communication devices and the ALADDIN device ALADDIN is intended for use in an electromagnetic environment in which radiated RF disturbances are under control The cust...

Page 16: ...STRUCTIONS FOR USE EN ISO 15223 1 MANUFACTURER Group 1 EN ISO 15004 2 PRODUCT CLASSIFIABLE AS GROUP 1 IN ACCORDANCE WITH EN ISO 15004 2 EN 62471 PRODUCT CLASSIFIABLE AS EXEMPT GROUP IN ACCORDANCE WITH...

Page 17: ...transport package This symbol is solely applicable for EC member countries To avoid potential negative consequences for the environment and possibly human health this instrument should be disposed of...

Page 18: ...upply mains using one of the cables supplied with the device Position the unit so that it is not difficult to disconnect the plug for connection to the supply main Perform all the control functions de...

Page 19: ...LADDIN is installed in rooms for medical use the PC and the connected printer must be powered by means of an IEC 60601 1 compliant insulating transformer If ALADDIN is installed in rooms for medical u...

Page 20: ...e the locking system is Completely unscrew the two transportation locks and the semi lock Figure 10 before use Lower the instrument to its minimum height using the joystick then lock ALADDIN using the...

Page 21: ...ng the mesopic data through dynamic pupillometry Contact lenses must not be worn by the patient during data acquisition 6 9 Cybersecurity When performing the installation of a new unit the user MUST s...

Page 22: ...d with its original accessories If the device is opened by unauthorized personnel the manufacturer is relieved of all responsibility and the warranty shall become null and void N B Modifications or re...

Page 23: ...er manual Rev 23 of 08 07 2016 23 9 Components 9 1 Main Body Figure 2 Figure 3 LCD display with touchscreen Joystick with acquisition button Semi lock Instrument locking devices for transportation Pla...

Page 24: ...contact with the patient applied parts are the forehead rest in Teflon and the chin rest in acrylonitrile butadiene styrene resin ABS ON OFF button Forehead rest Chin rest Locking pins for chin rest p...

Page 25: ...at the instrument has been handled without tipping If it is red the instrument may have been damaged during shipping If the white rectangle on the label shown above is red in the middle it means that...

Page 26: ...cessories from the dedicated spaces between the two pieces of cardboard see Figure 8 Figure 8 The accessories are Topcon box o calibration checking device o chin rest paper o chin rest pins o touchscr...

Page 27: ...ckage The steps are illustrated in Figure 9 Figure 9 Be careful when taking ALADDIN HW3 0 out of the box gripping it by the chin rest arch and the base beside the joystick Remove the Nylon cover Place...

Page 28: ...height using the joystick Lock the device using the instrument semi lock and the two instrument locking devices for transportation Figure 10 Figure 11 Place the Nylon cover over the instrument and in...

Page 29: ...ALADDIN User manual Rev 23 of 08 07 2016 29...

Page 30: ...of 08 07 2016 30 Figure 12 Put the accessories in the dedicated spaces Position the wood panel with the shock absorbers in the lower part Close the external box with strong packing tape or use extensi...

Page 31: ...ion checking device The calibration checking device shows the serial number of the instrument with which it is associated To properly check calibration the calibrator provided with the instrument must...

Page 32: ...ALADDIN User manual Rev 23 of 08 07 2016 32 12 Setting up the instrument 12 1 Connection modes Figure 13...

Page 33: ...hamber depth with the slit projection method White to White measurement Dynamic pupillometry acquisition recording of a sequence of images of the pupil in varying light conditions Acquisition of the s...

Page 34: ...reens displayed by the software there are symbols that provide access to certain functions available in several working environments Access to the Settings section described in detail in the dedicated...

Page 35: ...Rev 23 of 08 07 2016 35 CORRECT alignment WRONG alignment Figure 15 To check the calibration turn on the instrument and when asked to check the calibration press Start Figure 16 and then press Close...

Page 36: ...press OK By pressing ok the test patient is automatically created Now check and several times acquire the calibration checking device using the complete acquisition AL ACD K in check calibration is no...

Page 37: ...t least two or three times more with this tips improving the environmental conditions less light and no reflections on the sphere cleaning the sphere of the calibration tool make sure that the calibra...

Page 38: ...e instrument is turned on the software displays the following screen To continue the examination you always need to enter a patient or select one from those on file Figure 20 Figure 20 shows the secti...

Page 39: ...vitreous body Figure 22 An external keyboard or another input device compatible with keyboard wedge interface PS 2 such as barcode or card reader can be connected to the device to input text The user...

Page 40: ...uring mode selected Depending on the measuring mode selected Aladdin corrects the measurement with a constant defined as follows Aladdin device takes into consideration two conditions of the eye that...

Page 41: ...con Oil Phakic 0 74 APhakic 0 86 Pseudophakic Unknown material 0 75 Pseudophakic Silicone IOL 0 74 Pseudophakic PMMA IOL 0 75 Pseudophakic Acrylic IOL 0 76 Pseudophakic Memory IOL 0 75 All this inform...

Page 42: ...ALADDIN User manual Rev 23 of 08 07 2016 42...

Page 43: ...urname or whose surname contains the selected key same for patient ID By pressing the button on the right the patient list is ordered alphabetically A to Z or by last exam date most recent first Open...

Page 44: ...ction data Through this function the user can update the data related to a single exam of the chosen patient This means that if the patient has already undergone surgery the new refractive status can...

Page 45: ...ent Root Query search patient s details on enable patient s archive server DICOM Modality Worklist get the list of patients and tasks in the waiting room The user can search for a patient either by su...

Page 46: ...ALADDIN User manual Rev 23 of 08 07 2016 46 Figure 26 Figure 27...

Page 47: ...worklists for the current day The list can filtered by one or more of the other criteria Patient Name Patient ID Examination date range Scheduled Station Name default is Aladdin Modality default is O...

Page 48: ...adjust the instrument s height according to the patient s position On the chin rest there is also a knob for adjusting the height if the adjuster on the joystick is not enough to achieve the correct p...

Page 49: ...adjusting the chinrest height The position of the chin rest must be both comfortable and correct i e it must allow the person performing the measurement to center correctly on the fixation LED Make s...

Page 50: ...pillometry section The buttons at the bottom of the data frame for each eye serve to scroll the measurements as some of these are hidden if more than four acquisitions are made per eye When the acquis...

Page 51: ...eyelid tear film irregularity high standard deviation in multiple measurements movement measurement not in range Figure 32 The possible problems in acquisition are found in the software with the follo...

Page 52: ...ent is the distance between the corneal epithelium and the crystalline lens surface As shown in the figure above accessing IOL Calculation an error window will be shown warning the user to reacquire t...

Page 53: ...lation because of the high variability of this measurement The ACD measurement is the distance between corneal epithelium and the crystalline lens surface Pupillometry Selecting the Pupillometry butto...

Page 54: ...uired image and or measurements 4 Don t move the joystick in the few seconds during the acquisition Focusing and centering guidance system is composed of two aspects Centering Focusing distance Center...

Page 55: ...e centering aims assume different colors as follows The centering condition is out of tolerance Ideal Centering Marker is orange and Current Centering Marker is yellow The centering condition is in to...

Page 56: ...d and blue arrows until optimum acquisition conditions have been reached and the software will automatically capture the image for the measurement 13 6 Acquisition of axial length measurements AL Inte...

Page 57: ...measurements of the axial length are performed The information displayed is the same as in K AL ACD acquisition 13 7 Acquisition of the anterior chamber measurement ACD The anterior chamber depth may...

Page 58: ...y visible As a rule the image of the fixation point will lie between the images of the cornea and the crystalline lens It should be close to but not within the optical section of the crystalline lens...

Page 59: ...urvature It is based on the reflection of the Placido disk on the eye at a controlled working distance for high measurement precision Aladdin allows the user to acquire the corneal topography of the e...

Page 60: ...Concerning the calculation the software performs the standard calculation of 6 144 zero crossing points identified at the 24 RINGS along the 256 semi meridian In order to increase the measurement prec...

Page 61: ...ontrolled light conditions Mesopic In the case of the dynamic pupillometry recording of the state of the pupil is started first in mesopic conditions then photopic and then mesopic again The data on t...

Page 62: ...ALADDIN User manual Rev 23 of 08 07 2016 62 Figure 41 Acquisition in photopic controlled light conditions Acquisition in mesopic controlled light conditions Figure 42...

Page 63: ...directly to an external printer or a USB drive and also print to both simultaneously Figure 43 In addition to these two options you can select a network folder as destination of report to print For n...

Page 64: ...m is showing a list of available printers The available printers are the one installed on the Operating System Refer to Appendix Installing an external printer or ask to your technical support in orde...

Page 65: ...2016 65 13 10 2 Custom Reports If the unit has been provided with Customized Reports they will be available to be selected for printing or exporting in the Printing form In order to obtain custom repo...

Page 66: ...45 is show where you can select one or more destinations for exportation Figure 45 Currently available destinations are DICOM Storage SCP Server the selected reports are sent to the designed DICOM sto...

Page 67: ...Enet 6 PhacoOptics http www phacooptics net export biometry data in xml format to a network shared folder to be imported in PhacoOptics software Refer to section 13 15 5 and to PhacoOptics software in...

Page 68: ...n clinical practice and the type of device used for acquisition of the biometric data Figure 46 The screen has various sections which we will explore in detail below Data IOL Calculation Toric IOL cal...

Page 69: ...two sections Biometry detailing the data on the ocular biometry Keratometry detailing the patient s keratometric data From the Source field present in both the Biometry and Keratometry sections Figur...

Page 70: ...f the current index in this section In Figure 48 you can manually enter biometry data knowing that an external instrument does not always work in Optical mode you can also select acoustic measurement...

Page 71: ...es this factor into account refer to the following section In the Toric IOL Calculation section a surgeon who has established by means of a topography the need for an astigmatic correction can confide...

Page 72: ...t refractive value for the Post Op must be inserted The Measurements field summarizes the measurement data From the drop down menu select the IOL manufacturer and model as well as the preferred formul...

Page 73: ...a list of models whose calculation constants have been published by their manufacturer The user can in case insert new toric manufacturers and or models inside toric IOL settings section see 13 15 4...

Page 74: ...lation is performed using the Abulafia Koch Correction it is reported in the corresponding Toric IOL report As a result the Toric IOL frame immediately below details the best toric lens computed autom...

Page 75: ...efraction of the patient The simulator starts at the correct axis placement and displays in the left bottom table a series of misalignment angles close to the ideal one Selecting a different row you c...

Page 76: ...ret all IOL power recommendations with caution In this environment you need to manually enter certain fundamental data Figure 54 The first is the surgeon who performs the operation As in IOL calculati...

Page 77: ...mula is available and you need to insert the current Pachymetric data as well as the diameter of the optical zone to improve the accuracy of the final calculation Figure 55 The Unknown option must be...

Page 78: ...ALADDIN User manual Rev 23 of 08 07 2016 78 Figure 56 The final result of the Post Op calculation is shown in Figure 56 with the suggested lens highlighted in yellow...

Page 79: ...ollowing sections 13 13 1 TOPOGRAPHIC MAP KER Figure 57 The environment displayed is shown in Figure 57 Click on the OD or OS buttons to display the map of the right or left eye The R and L buttons ar...

Page 80: ...depending on the selected measure unit Refer to section 13 15 2 for more settings relative to the topographic map representation Topographic map indices The diagnostic indices can be selected with the...

Page 81: ...cornea area Curvature Irregularity Irregularity of curvature calculated on the standard deviation of the instantaneous readings for a 4 5mm diameter cornea area Asymmetry SAI Asymmetry between the mos...

Page 82: ...combined evaluation of the first three indices with the probability index there are three different possibilities topographic picture not compatible with keratoconus green suspected keratoconus yellow...

Page 83: ...tometry in diopters Avg Pupil Power Average pupil power for a pupil of 4 5 mm and 3 0 mm Photopic o Pupil Dec Pupil decentralization from optical axis o Avg Pupil Mean diameter of the pupil Mesopic o...

Page 84: ...ong the most curved meridian and the flattest meridian red and blue The difference is displayed in green Figure 61 By pressing the arrow buttons you can vary the flattest and the most curved meridians...

Page 85: ...Histograms of the Zernike expansion coefficients each histogram represents the weight of the corresponding polynomial Primary aberrations map Astigmatism the map the magnitude in diopters the axis an...

Page 86: ...contrast Figure 63 The data displayed refers only to the component induced by the anterior surface of the cornea not by the eye s entire optical system Press the Maps button to return to the maps dis...

Page 87: ...ALADDIN User manual Rev 23 of 08 07 2016 87 Figure 64 It is possible to switch between ETDRS and Landolt C Visus simulation view...

Page 88: ...ement and from the left and right columns the measurements performed for the right eye and left eye respectively The measurements highlighted in yellow are the ones used to calculate the average axial...

Page 89: ...lection has a high thickness and iris reflection The latter is also irrelevant for calculation purposes As for the axial length if the instrument does not record good quality reflections or if the dat...

Page 90: ...ts the pupil s edges Grid Shows an overlaid grid Rulers Shows calibrated rulers Sequences The user can select the sequence of images to be displayed using the buttons at the top Dynamic Photopic Mesop...

Page 91: ...ring the sequence The other information is the same as that already described for the dynamic pupillometry Functions Graphs Pressing the Graphs button displays the graphs relating to the pupil This fu...

Page 92: ...ization Figure 68 The green concentric circles identify the decentralization of the pupil center with respect to the fixation point The red dots on the other hand represent the coordinate variations d...

Page 93: ...in variable light conditions from mesopic to photopic and back to mesopic on the Settings screen you can set the acquisition times for each mode explained later The left column shows the key to the gr...

Page 94: ...d line represents the average value of the sample the blue frame the value interval between the 25 and 75 percentiles the green line the value interval between the 10 and 90 percentiles and the red ci...

Page 95: ...1 Clicking on the Open button in the Edit menu the user can manually reposition positional indicators in order to refine the diameter measurements Figure 72 Next to the image obtained by automatic whi...

Page 96: ...the center of the iris with respect to the fixation point By changing the indicators position also values of corneal diameter and offset of the visual axis x and y are updated The Reset button restor...

Page 97: ...e data from the examination click on the home button As shown in Figure 73 the software will ask the user to confirm the action Figure 73 If you want to save the data of the patients without doing an...

Page 98: ...ALADDIN User manual Rev 23 of 08 07 2016 98 13 15SETTINGS To access the Settings section press the button Figure 74 The settings screen is divided into the following categories...

Page 99: ...ress on the Set button You can also set the current system date and time by clicking on the Edit button Pointing Devices Toggles the mouse cursor on or off OD OS Notation Toggles between two different...

Page 100: ...Cylinder Notation Select the type of cylinder notation Positive Negative Figure 75 Refractive Index Select the refractive index to work with You can choose from 5 indices 1 3315 1 3320 1 3360 1 3375 1...

Page 101: ...value at your discretion Asphericity Select an asphericity unit of measure e SF p Q Acquisition Select the default Biometry sequence acquisition K AL ANT the default acquisition sequence is Keratomet...

Page 102: ...4 color scale by going to Measures section of the settings The color scale option selected affects any topographic map drawing in the Aladdin application and in the printed reports also the custom one...

Page 103: ...etric indices Sim K Meridians Emimeridians 3 5 7 mm or 2 4 6 mm selects the 3 Zones diameters to which the Meridians or Emimeridians values are displayed Pupillometry Select one or more items with whi...

Page 104: ...ate different user profiles Figure 76 Select the surgeon in the left column to display the data Press the Edit button to modify the data entered Press the Add button to add a new surgeon Once you have...

Page 105: ...o three different environments described in detail below General Preset IOL list General General environment Figure 77 displays the terms and conditions of use of the IOL calculation section and lets...

Page 106: ...L Calculation Under Post Refractive the preset for the Post Refractive IOL By clicking on Save the selected settings are saved This function will be particularly useful during the IOL calculation when...

Page 107: ...can decide to set the Incision Location at the Steep Axis of the Keratometry or at a Fixed Value to be specified The Toric Calculator Selection is to choose between Generic Toric Calculator that allo...

Page 108: ...you can display and edit the constants used in each formula The two main environments the Spherical and the Torical ones can be selected clicking on the corresponding button and have a similar layout...

Page 109: ...acturer not present in the current list o Insert the manufacturer name o Insert the model name o Insert the kind of formula and constant o Insert the value of the constant Hoffer Q pACD in the case be...

Page 110: ...constants will automatically be converted Figure 83 Edit edit the name of the current IOL Delete delete the selected IOL Calculation Constants History gives information on every change of calculation...

Page 111: ...ALADDIN User manual Rev 23 of 08 07 2016 111 Figure 84...

Page 112: ...pen 1 Insert the USB pen in the Aladdin device 2 Click on the Ulib button on the IOL list panel 3 Select which data to import among the list of source tables available in the downloaded package 13 15...

Page 113: ...spherical power of the lens o Choose the Cylinder Definition of the lens with Sub models or Cylinder Range Based If you select Sub models Figure 86 you can add a list of sub models each of them with a...

Page 114: ...he properties of the current IOL Delete delete the selected IOL View Properties visualize properties calculation constants and list of sub models of the lens or cylinder range Calculation Constants Hi...

Page 115: ...der for Aladdin to be able to connect to the remote network folder you must configure Aladdin setting the correct access credentials for the remote resource Configuration parameters Network folder pat...

Page 116: ...oftware Aladdin can receive and transfer data to Topcon IMAGEnet i base through a wireless or LAN network IMAGEnet i base is activated by clicking on the Enabled Option and by providing the IP address...

Page 117: ...e proper IP Aladdin is ready to exchange data with the IMAGEnet 6 Server machine Figure 91 Figure 91 Export to External Software settings In this panel it is possible to control two main aspects of th...

Page 118: ...ng the checkbox of an export destination this is included in the targets of the exportation function PhacoOptics http www phacooptics net In order to get exam data to exported to PhacoOptics software...

Page 119: ...The DICOM Store service is used to send images or other persistent objects structured reports etc to picture archiving and communication system PACS or workstation Storage Commitment The DICOM Storag...

Page 120: ...ection test is shown by the green or red icon In order to configure properly the full DICOM workflow it could be necessary to perform some operations or configurations on the server s side In order to...

Page 121: ...om one place to another and when it has suffered an impact or thermal shocks It is recommended to check the measurements every day when turning on the device The Application frame manages the behavior...

Page 122: ...your Aladdin unit Go to Settings Admin and press Remote Assistance Wait for the Teamviewer Window to open Communicate to the Remote Operator the ID shown under Your ID and wait for the incoming conne...

Page 123: ...rade procedure from one version to the following version To update the software perform the following operations 1 Unpack the update packet in the root main card of an empty FAT32 formatted USB extern...

Page 124: ...ALADDIN User manual Rev 23 of 08 07 2016 124 Figure 94 5 Click on the Admin tab Figure 95 Figure 95 6 Insert the USB stick with the Aladdin upgrade files in one of the USB ports Figure 96...

Page 125: ...ALADDIN User manual Rev 23 of 08 07 2016 125 Figure 96 7 Click on the Upgrade button Figure 97 Figure 97 8 Click on Ok to reboot the system and start the upgrade Figure 98...

Page 126: ...you will see the message of Figure 99 on the screen Figure 99 10 The system will reboot and starts the Aladdin application 11 After restart the software updates the system this operations could take...

Page 127: ...ALADDIN User manual Rev 23 of 08 07 2016 127 Figure 100 12 If you see the message of Figure 101 please switch off your Aladdin and turn it on again Your Aladdin should now works fine Figure 101...

Page 128: ...network shared folder to backup and restore data Backup Contents With this utility it is possible to backup Local Exams archive the complete list of patients and exams that are currently stored in the...

Page 129: ...ct the desired USB external storage device or switch to Network Folder option 1 Select the desired destination USB select the desired partition from the list of the available Network folder define if...

Page 130: ...ce or unplug the power supply and ethernet cable while performing this operation Do not unplug USB devices if USB is the backup destination This may take several minutes depending on the exam archive...

Page 131: ...in order to restore the calibration 1 Select the source of the backup image to restore USB or Network Folder Navigate the list of detected backup images available at the selected source 2 Select from...

Page 132: ...your distributor for assistance The machine calibration restore is skipped if the procedure is performed by the user 2 Restore Application User Settings The current content on the machine will be over...

Page 133: ...pen the fuse box cover using a screwdriver Step 2 Take out the red fuse box use a screwdriver to release it Step 3 Make sure the fuses stay in the correct position Step 4 Rotate the fusebox 180 so the...

Page 134: ...to the internal electronics of the device due to current overload for non interruption by fuses In this case you do not identify risks to the patient but on the user or damage to the device and then...

Page 135: ...15 1 General Corneal topography Keratometry conus 24 rings equally distributed in a 43D sphere Points analyzed Over 100 000 points Points measured Over 6 200 points Corneal coverage Up to 9 8 mm on a...

Page 136: ...graphic analysis Source Red LED Type1 Wavelength 633 nm Power on patient s eye 0 02 mW Source Red LED Type2 Wavelength 615 630 nm Power on patient s eye 0 02 mW 4 Pupilometric analysis Source White LE...

Page 137: ...for 0 75 cyl 1 50 77 48101266 115 8921525 76 05882353 114 2054185 0 9400949 3 261808332 5 5835217 7 46371159 ax for 1 50 cyl 40 82758621 92 30826382 39 96428571 103 2499472 0 8218912 2 093718248 3 36...

Page 138: ...ax for 1 50 cyl 75 94121105 1 728735737 4 978758923 2 276413179 4 843085162 13 94808527 6 377413653 ALADDIN k1 42 9413081 0 086388248 0 248798153 0 201177494 0 418268114 1 204612167 0 974046046 ALADDI...

Page 139: ...y resolution 0 01 mm Repeatability in live mode 0 02 mm Diopter Curve Radius D n 1 3375 Measuring range 9 0 101 5 D Display resolution 0 01 D Repeatability in live mode 0 12 D 4 Limbus WTW Measuring r...

Page 140: ...0mm 800mm Length 470mm 710mm Weight 18 kg 29kg 15 8 Other Specifications Onboard PC component specifications Hardware 1 0 Hardware 2 0 Operating system WINDOWS XP Embedded WINDOWS 7 Embedded Processor...

Page 141: ...declare that the aforementioned devices comply with Directive 93 42 EEC implemented in Italy by Legislative Decree no 46 97 and subsequent amendments and additions Directive 2007 47 EC implemented in...

Page 142: ...p it and keep the inf file somewhere easily accessible for example C Drivers Copy them to the root directory of an USB FAT32 formatted pen driver that will later be connected to the ALADDIN USB port N...

Page 143: ...rs to Aladdin 17 3 Installing a local printer USB The following instructions are for a Windows XP system On Windows 7 machines follow similar steps Close the software using the procedure explained bef...

Page 144: ...ect Local printer attached to this computer and make sure that the Automatically detect and install my Plug and Play printer checkbox is not checked Click Next Figure 106 You now need to identify the...

Page 145: ...er where you extracted the drivers inf file for this printer Once you ve done that click OK Figure 108 Select your printer model from the Printers list and then click the Next button Figure 109 Select...

Page 146: ...nal network through the LAN port using an Ethernet cable Figure 110 This time select A network printer or a printer attached to another computer Now select Create a new port then select Standard TCP I...

Page 147: ...Filter 1 Open the Aladdin application 2 The system will warn about the unsafe state 3 Wait for the automatic restart or press OK 4 The system will restart enabling the write filter 5 Once restarted th...

Reviews: