


Installing a Saw Blade
1. Use only a 7-1/4 in. (185mm) Saw Blade. The saw blade speed rating must be at
least 5800 RPM. Refer to the following table for saw blade applications and
types.
APPLICATION
BLADE
DESCRIPTION
NO. OF TEETH
TYPE OF CUT
Fine Trim Molding
Precision Trim
Carbide
60~100
Very smooth,
splinter free
Trim, Framing,
Pressure Treated
Decking
Combination,
multi-purpose
24~60
Smooth, fast cut
Aluminum
Non-ferrous metal
cutting
60~80
….
2. Unplug the circular saw from the electrical outlet.
3. Raise the Blade Guard as far as possible. See photo on the right.
4. Hold the Blade Guard up and press the Spindle Lock Button with one hand.
Rotate the Saw Blade until the Spindle Lock catches and the blade stops.
Blade pressure plate
spindle lock
Blade cover
5. Using the supplied Saw Blade Hex Key in the other hand, loosen (counterclockwise)
the left-hand threaded Hex Screw. Remove the Saw Blade Hex Screw, Blade
Pressure Plate, then the Saw Blade.
6. Clean out Blade Cover of any debris.
7. Place the new Saw Blade over the Spindle hole. The Saw Blade teeth at the
bottom of the saw blade should be pointing toward the back of the Circular Saw.
8. Place the Blade Pressure Plate over the Spindle hole, then insert the Hex
Screw.
9. Press the Spindle Lock Button with one hand and tighten the Blade Screw
(clockwise) using the Hex Key with the other hand.
Adjusting the Saw Prior to Cutting
CAUTION: Always make sure the Power Cord is unplugged from its electrical
outlet prior to making any adjustments to the tool.
1. To adjust the
angle
of blade from 0 to 45 degrees, loosen wing nut and move
base plate down, observing the degrees indicated on the Angle Bracket.
counter-
clockwise
Blade guard
Hex screw
Tighten wing nut.
(Fig. A)
2. To adjust the
depth
of the cut, lift depth lever and move base plate down
(or up) while observing the amount of saw blade exposed under base plate. Push
Down on the depth lever to lock in new depth setting.
(Fig. B)
Prepare Material Before Cutting
(Fig. C)
1.
Support large panels to minimize risk of blade pinching and saw kickback.
2.
Use the supplied guide fence when ripping material by sliding it into the base
plate, and tightening screw.
3.
Securely clamp material to be cut to work bench.
4.
Ensure the circular saw does not cut into supports or workbench.
5.
Use the appropriate type of blade for the material you are cutting.
General Cutting
Caution: Verify that Saw Blade is securely tightened and both angle and
height adjusting nuts and levers are tight. Read and understand all safety
precautions listed in this instruction manual.
1. Hold the circular saw by both handles. Always keep hands and fingers away from
the saw blade.
2. Push in and hold the lock-off button, then squeeze the trigger switch with
the index finger. Do this before the saw blade touches the material.
3. With the saw at full speed, move the saw slowly forward to complete the cut.
4. When the cut is complete, release the trigger switch. Do not set the saw down until
the blade stops turning.
Fig. A
Fig. B
6
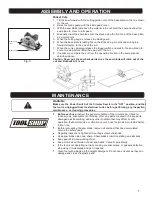
ASSEMBLY AND OPERATION
Handle Grip
Depth Lever
Trigger switch
Lock-off Button
spindle lock
Angle Adjust
Wing Nut
Base Plate


