


Page 13
1
3
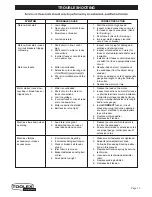
TROUBLESHOOTING
SYMPTOM
PROBABLE CAUSE
CORRECTIVE ACTION
Motor will not start.
1. Low voltage
2. Open circuit in motor or loose
connections.
3.
4.
Blown fuse or breaker.
Low temperature
1. Start the motor at high speed.
2. Inspect all lead connections on motor
for loose or open connections. (Send
for Servicing.)
3. Short circuit. (Send for Servicing.)
4. Improper match between tool and
circuit, fuse or breaker.
Motor will not start – fuses
or circuit breakers tripping
or blowing.
1. Short circuit in line, cord or
plug.
2. Short circuit in motor or loose
connections.
3. Incorrect fuses or circuit break-
ers in power line.
1. Inspect cord or plug for damaged in-
sulation and shorted wires.
2. Inspect all connections on motor for
loose or shorted terminals and/or worn
insulation.
3. Install correct fuses or circuit breakers
or switch tool to an appropriately sized
circuit.
Motor overheats.
4. Motor is overloaded.
5. Extension cord is too long and
6. Poor air circulation around the
motor
4. Reduce load on motor (pressure on
the sandpaper from the object being
sanded.)
5. Utilize an extension cord of appropriate
gauge and length or plug tool directly
into outlet.
6. Reduce the motor run time.
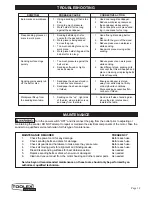
Motor stalls or runs slow -
resulting in blown fuses or
tripped circuit.
1. Motor is overloaded.
2. Short circuit in the motor or
loose connections.
3. Low line voltage.
4. Incorrect fuses or circuit break-
ers in the power line.
5. Motor capacitor has failed.
6. Belt tension is too tight.
1. Reduce the load on the motor.
2. Inspect connections on motor for loose
or shorted terminals or worn insulation.
3. Correct low voltage conditions (for ex-
ample: improper extension cord length
and/or wire gauge).
4. Install
CORRECT
fuses or circuit
breakers or plug tool into an appropri-
ate circuit, matched to an appropriate
fuse or breaker.
5. Replace motor capacitor.
6. Decrease belt tension.
Machine slows down when
operating.
1. Feed rate is too great.
2. Undersized circuit or use of
undersized extension cord.
1. Reduce the rate at which the work is
fed into the sandpaper.
2. Ensure circuit wires or extension cords
are proper gauge, or eliminate use of
extension cords.
Machine vibrates
excessively or makes
excess noise.
1. Incorrect motor mounting.
2. Incorrect sanding-belt tension.
3. Weak or broken belt tension
spring.
4. Idler roller is too loose.
5. Broken/defective sanding belt
or disc.
6. Drive belt is too tight
1. Make sure all fasteners are tightened.
2. Adjust tension-adjustment knob.
Follow belt tensioning/tracking instruc-
tions in this manual.
3. Replace belt tension spring by service
technician.
4. Have service technician adjust idler
roller.
5. Replace sanding belt/disc.
6. Decrease belt tension.
Summary of Contents for 598557
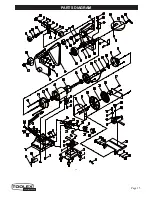
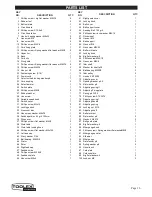
Page 15: ...Page 15 PARTS DIAGRAM 15 ...