■
Switch the soldering station on. The calibration menu
starts. The display shows the following:
■
Let go of both buttons.
☞
The calibration program starts with a heating up phase. This takes
approx. three minutes and is displayed with a countdown from 15 to
1 in the TMP line. After this time, the soldering tip temperature is
approx. 270 to 400°C.
■
The second stage starts automatically.
■
The temperature of the soldering tip is controlled.
This is once again indicated by a countdown from 24
to 0.
■
The soldering tip temperature is stable after approx.
five minutes. The temperature is below 220°C here.
Avoid drafts of air under all circumstances during the calibration phase.
This could have a negative impact on the calibration process.
■
The third stage also starts automatically. Now you have to measure and set the
temperature values.
■
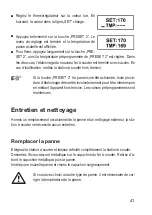
The display shows the following image. The „TMP“
line shows three dashes, the „SET“ line shows the
value of the temperature control depending on its cur-
rent position.
■
Now measure the temperature on the soldering tip with a precise measuring probe
and read off the actual temperature on the thermometer.
☞
Use a small measuring probe for measuring, as a large one may fal-
sify the measuring result. K-type thermal probes are well suited.
26


