TonerRefillKits brother ReChargX RX350 Instructions Manual Download Page 2

TonerRefillKits.com

   ReChargX

 RX350


8am - 5pm ET  Mon - Fri 

© 1995-2016 ReChargX, EmptyX, TonerRefillKits, TonerRefillKits.com, the TonerRefillKits logo, the 


V2.00 - 2016.05.09

800.527.3712 or 352.343.7533 

ReChargX and EmptyX logos are trademarks owned by TonerRefillkits.com, LLC. All rights reserved. 

Page 2 of 15

Note

: Please make certain the printer is powered 

“ON” throughout the entire refill procedure. Failure to 

do so may cause the printer to be unable to identify 

that the cartridge has been refilled.

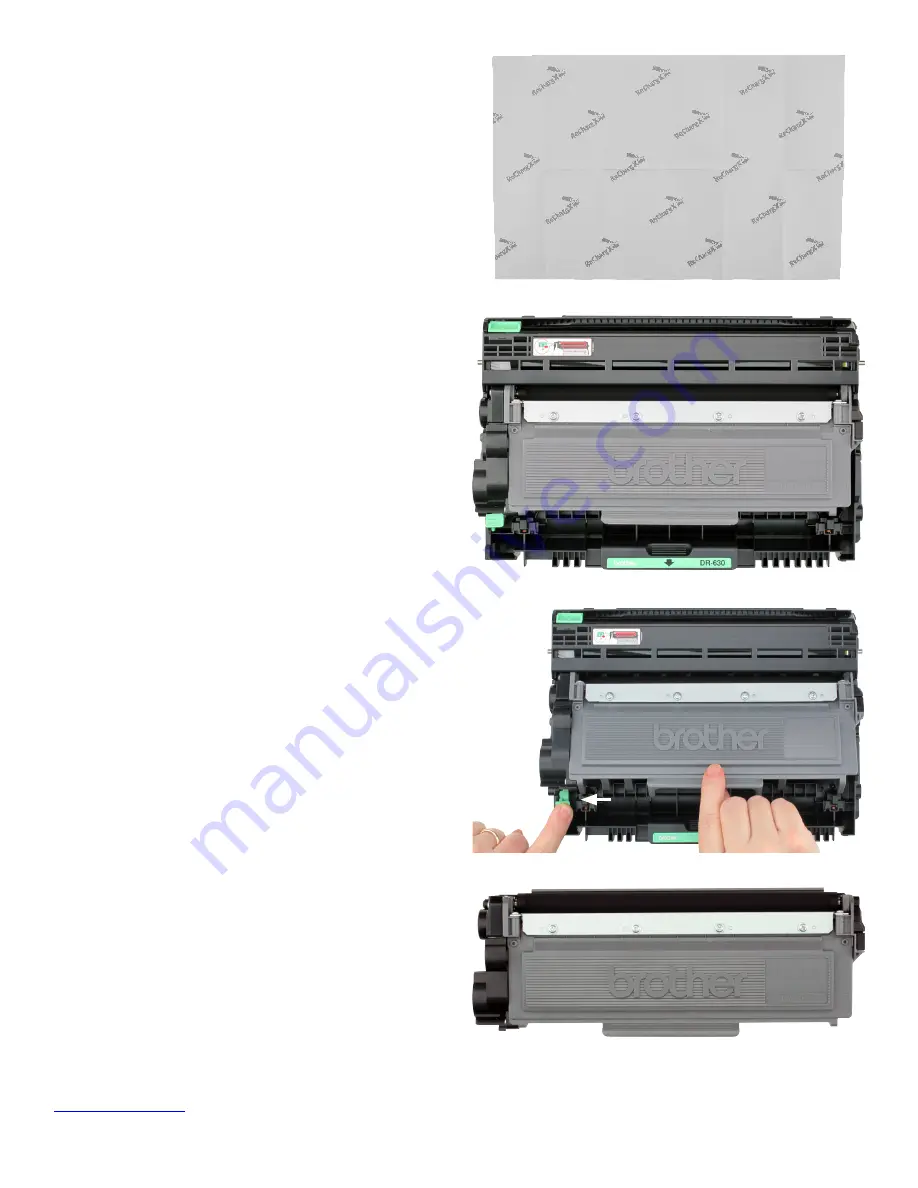
Step 1: Prepare your work surface

Included in the ReChargX

TM

 RX350 premium print 

toner refill kit is a sheet of newsprint (Figure 1). 

Unfold the sheet and lay it across your work surface. 

The newsprint keeps your work surface clean and is 

discarded after completing the refilling process.

Step 2: Position the drum unit and toner 


cartridge assembly

When you remove the cartridge from your printer the 

drum unit will still be attached. 

Position the assembly on your work surface so the 

handle on the front of the toner cartridge (A) is facing 

you and the green or blue tab (B) is on the left-hand 

side (Figure 2).

Step 3: Separate the toner cartridge from the 

drum unit assembly

Press and hold down the green or blue tab (A) 

located on the left-hand side of the unit while lifting 

up on the handle of the front of the toner cartridge 

with your right hand (B) to separate the toner 

cartridge from the drum unit (Figure 3).

Lift the toner cartridge up and off of the drum unit.

Note

: Since the drum in the drum unit can be easily 

scratched or damaged, put it out of harm’s way until 

we are completely finished with the refilling operation.

Step 4: Prepare the cartridge for refilling

Position the cartridge on your work surface so the 

handle (A) is facing toward you and the developer 

roller (B) is facing away from you (Figure 4).

Figure 1: 

ReChargX™ newsprint work surface protector

A

B

Figure 2: 

Positioning the drum unit and toner cartridge assembly

A

Figure 3: 

Removing the cartridge from the drum unit

Figure 4: 

The toner cartridge in the correct orientation

B

B

A

Summary of Contents for brother ReChargX RX350

Page 1: ...ridges frequently found in the following Brother printer models and all other machines using the same engine DCP L2500d DCP L2520dw DCP L2540dn DCP L2540dw HL L2300d HL L2320d HL L2340dw HL L2360dn HL...

Page 2: ...ttached Position the assembly on your work surface so the handle on the front of the toner cartridge A is facing you and the green or blue tab B is on the left hand side Figure 2 Step 3 Separate the t...

Page 3: ...again being careful not to touch the roller with your fingers and tape the other edge of the paper to the bottom of the cartridge Figure 5 2 Step 6 Remove the cartridge end cap Position the cartridge...

Page 4: ...printer as being empty resulting in a false toner low or toner empty message Although the starter standard yield and high yield toner cartridges are fundamentally the same each requires a slightly di...

Page 5: ...machine when it was new with the end cap removed The components you will be removing are the drive gear A actuator gear B and toner hopper plug C Step 7a Remove the drive gear To prepare for the reset...

Page 6: ...ponents Figure 8 1 shows the gear end of the standard yield toner cartridge with the end cap removed The components you will be removing to be replaced with the new components which came with the RX35...

Page 7: ...B E Step 8c Remove the drive gear With the reset gear removed we will now remove the drive gear A from the gear train Before Figure 8 3 After Figure 8 4 Step 8d Remove the actuator gear With the drive...

Page 8: ...Preparing the high yield cartridge for refilling and resetting A B C D Remove the components Figure 9 1 shows the gear end of the high yield toner cartridge with the end cap removed The parts you wil...

Page 9: ...Remove the drive gear With the reset gear out of the way we will now remove the drive gear A from the cartridge gear train Before Figure 9 3 After Figure 9 4 Step 9d Remove the actuator gear With the...

Page 10: ...oner that remains in the hopper Failure to remove the remaining toner will result in splotching smudging hazing and other print defects Note This step does not need to be performed on subsequent refil...

Page 11: ...oner hopper Pour the toner slowly RESIST ALL TEMPTATION TO SQUEEZE THE BOTTLE to increase the flow of toner The likelihood of toner escaping under pressure greatly increases when the bottle is squeeze...

Page 12: ...ment toner hopper plug to seal properly the area around the toner hopper opening must be cleaned with the toner grabber cloth before the plug is inserted Figure 13 Step 14 Insert the toner hopper plug...

Page 13: ...oner low or out message Use your fingers to turn the actuator gear B in a clockwise motion 2 3 times so the middle opening attached to the post appears as a D when facing toward you Figure 15 Step 16...

Page 14: ...tridge verify your cartridge looks the same as Figure 19 Step 19 Secure the end cap to the cartridge Now that you have verified the gears and springs have been added to the cartridge and are in proper...

Page 15: ...g 48 54 in your pocket for only a few minutes work End of ReChargX RX350 Instructions TonerRefillKits com technical support and customer 100 satisfaction pledge Our number one goal is to earn your lon...

Reviews: