background image

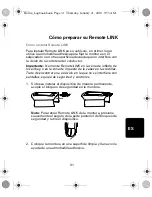
Preparazione di Remote LINK

26

IT

Installazione di Remote LINK

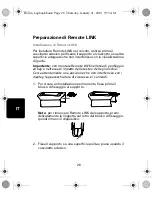
Per installare Remote LINK nel veicolo, utilizza prima il 

cuscinetto adesivo per fissare il supporto al cruscotto o su altra 

superficie adeguata che non interferisca con la visualizzazione 

di guida. 

Importante:

 non montare Remote LINK nell'area di gonfiaggio 

airbag o nell'area di impatto della testa o delle ginocchia. 

Cerca attentamente una posizione che non interferisca con i 

display, l'apparecchiatura di sicurezza e i comandi.

1. Per creare un'installazione permanente, fissa prima il 

blocco di fissaggio al supporto. 

Nota

: per rimuovere Remote LINK dal supporto, premi 

delicatamente la linguetta sul retro del blocco di fissaggio, 

quindi rimuovi il dispositivo.

2. Fissa il supporto su una superficie pulita e piana usando il 

cuscinetto adesivo.

Borna_Logbook.book  Page 26  Thursday, January 21, 2010  9:53 AM

Summary of Contents for LINK 300

Page 1: ...Remote LINK Logbook User Guide Connected Navigation Part no 6KG0 002 04 ...

Page 2: ...TomTom LINK 300 310 Press any key to turn on your Remote LINK and see Understanding your Remote LINK to check the status of the device If the device is not paired with a LINK 300 310 then do the following 1 Make sure the LINK 300 310 is properly installed in the vehicle 2 Turn on the ignition 3 Make sure there are no other vehicles installed with a LINK 300 310 located within a distance of 30 metr...

Page 3: ...he LED will switch off To establish a connection repeat steps 1 to 4 or visit www tomtomwork com connect remotelink for alternative connection methods Reset your Remote LINK If your Remote LINK is already paired but does not work correctly or it is paired with the wrong device you can reset the Remote LINK to the default factory settings 1 Press any key to switch on the device 2 Press any two butt...

Page 4: ...is searching for a LINK 300 310 Connection LED is on Remote LINK is connected to a LINK 300 310 Low Battery warning LED is flashing The battery power is low and the batteries need be replaced All the button LEDs are flashing Remote LINK is not paired with a LINK 300 310 Borna_Logbook book Page 5 Thursday January 21 2010 9 53 AM ...

Page 5: ...tion area of airbags or in the impact area of the head or knees Search carefully for a location that will avoid interference with displays safety equipment and controls 1 To create a permanent installation first attach the securing lock to the mount Note To remove your Remote LINK from the mount gently press the latch at the back of the securing lock and then remove the device 2 Attach the mount t...

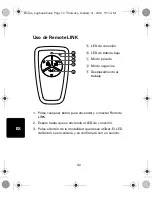
Page 6: ... Wait until the Connection LED is on 3 Press the button for the mode that you want to log The LED of the button goes on and your reporting is confirmed with a sound A Connection LED B Low battery LED C Private mode D Business mode E Commute to work A D E C B Borna_Logbook book Page 7 Thursday January 21 2010 9 53 AM ...

Page 7: ...NK 300 310 verbunden haben Drücken Sie eine beliebige Taste auf Ihrem Remote LINK und beachten Sie die Hinweise unter Ihr Remote LINK verstehen um den Status des Geräts zu überprüfen Wenn Ihr Remote LINK nicht mit einem TomTom LINK 300 310 verbunden ist gehen Sie folgendermaßen vor 1 Stellen Sie sicher dass der LINK 300 310 ordnungsgemäß im Fahrzeug installiert ist 2 Schalten Sie die Zündung ein 3...

Page 8: ...t werden konnte erlischt die LED Um eine Verbindung herzustellen wiederholen Sie die Schritte 1 bis 4 oder besuchen Sie www tomtomwork com connect remotelink um sich über andere Verbindungsmöglichkeiten zu informieren Zurücksetzen Ihres Remote LINK Falls Ihr Remote LINK bereits gekoppelt ist aber nicht richtig funktioniert oder mit dem falschen Gerät gekoppelt wurde können Sie ihn auf Werkseinstel...

Page 9: ... LINK sucht nach einem LINK 300 310 Die Verbindungs LED leuchtet dauerhaft Ihr Remote LINK ist mit einem LINK 300 310 verbunden Die LED für schwache Batterien blinkt Die Batterien sind schwach und müssen ersetzt werden Alle Tasten LEDs blinken Ihr Remote LINK ist nicht mit einem LINK 300 310 gekoppelt Borna_Logbook book Page 10 Thursday January 21 2010 9 53 AM ...

Page 10: ...ich für Kopf und Knie Wählen Sie sorgfältig eine Position aus die das Ablesen der Anzeigen die Nutzung der Sicherheitsausstattung und den Zugriff auf die Bedienelemente nicht behindert 1 Zur dauerhaften Installation befestigen Sie zunächst die Sicherungsarretierung an der Halterung Hinweis Um Ihren Remote LINK aus der Halterung zu entnehmen drücken Sie vorsichtig auf die Verriegelung auf der Rücks...

Page 11: ...tellen 2 Warten Sie bis die Verbindungs LED leuchtet 3 Drücken Sie die Taste für den Modus den Sie erfassen möchten Die entsprechende Tasten LED leuchtet auf und Ihre Meldung wird mit einem Ton bestätigt A Verbindungs LED B LED für schwache Batterien C Privatfahrt D Geschäftsfahrt E Arbeitsweg A D E C B Borna_Logbook book Page 12 Thursday January 21 2010 9 53 AM ...

Page 12: ...ais été connecté à un TomTom LINK 300 310 Appuyez sur n importe quelle touche de votre Remote LINK et consultez Découvrir le Remote LINK pour vérifier l état de l appareil Si l appareil n est pas déjà appairé avec un LINK 300 310 procédez comme suit 1 Vérifiez que le LINK 300 310 est correctement installé dans le véhicule 2 Mettez le contact 3 Veuillez vous assurer qu aucun autre véhicule équipé d...

Page 13: ...on n est établie le voyant s éteint Pour établir une connexion répétez les étapes 1 à 4 ou rendez vous sur www tomtomwork com connect remotelink pour prendre connaissance des autres méthodes de connexion Réinitialiser votre Remote LINK Si votre Remote LINK est déjà connecté mais qu il ne fonctionne pas correctement ou qu il n est pas connecté au bon appareil vous avez la possibilité de ré établir ...

Page 14: ...n LINK 300 310 Le voyant Connexion est allumé le Remote LINK est connecté à un LINK 300 310 Le voyant d avertissement du niveau de charge des piles clignote les piles sont faibles et doivent être remplacées Tous les voyants de bouton clignotent le Remote LINK n est pas connecté à un LINK 300 310 Borna_Logbook book Page 15 Thursday January 21 2010 9 53 AM ...

Page 15: ...dans la zone d impact de la tête ou des genoux Sélectionnez soigneusement un emplacement empêchant toute interférence avec les écrans les équipements de sécurité et les commandes 1 Pour une installation permanente commencez par fixer le dispositif de blocage sur le support Remarque pour enlever votre Remote LINK de la fixation appuyez doucement sur le dispositif de blocage de sécurité puis enlevez...

Page 16: ...on s allume 3 Appuyez sur le bouton correspondant au mode de journalisation à indiquer Le voyant du bouton s allume et la prise en compte du mode indiqué est confirmée par un bip A Voyant de connexion B Voyant de niveau de charge des piles C Mode privé D Mode professionnel E Trajet travail A D E C B Borna_Logbook book Page 17 Thursday January 21 2010 9 53 AM ...

Page 17: ...t tussen je Remote LINK en een TomTom LINK 300 310 Druk op een willekeurige toets om je Remote LINK in te schakelen en ga naar Hoe werkt je Remote LINK om de status van het apparaat te bekijken Als het apparaat geen verbinding heeft met een LINK 300 310 voer je deze stappen uit 1 Controleer of de LINK 300 310 op de juiste manier in het voertuig is geïnstalleerd 2 Schakel het contact in 3 Zorg ervo...

Page 18: ...ot stand is gebracht gaat het LED lampje uit Om een verbinding tot stand te brengen herhaal je stap 1 tot 4 of ga je naar www tomtomwork com connect remotelink voor alternatieve verbindingsmethoden Resetten van je Remote LINK Als je Remote LINK verbinding heeft maar niet naar behoren functioneert of verbinding heeft met het verkeerde apparaat dan kun je de Remote LINK naar de standaard fabrieksins...

Page 19: ... zoek naar een LINK 300 310 Het LED lampje voor verbinding brandt de Remote LINK heeft verbinding met een LINK 300 310 Het LED lampje batterij bijna leeg knippert de batterijen zijn bijna leeg en moeten worden vervangen De LED lampjes van alle knoppen knipperen de Remote LINK heeft geen verbinding met een LINK 300 310 Borna_Logbook book Page 20 Thursday January 21 2010 9 53 AM ...

Page 20: ...lek waar hoofd of knieën mee in aanraking zouden komen in het geval van een botsing Zoek zorgvuldig een plek uit waar de Remote LINK geen belemmering vormt voor beeldschermen veiligheidsapparatuur en bedieningsknoppen 1 Voor permanente installatie bevestig je eerst het veiligheidsslot aan de houder Opmerking om je Remote LINK uit de houder te verwijderen druk je zachtjes op het klepje aan de achte...

Page 21: ... Wacht tot het LED lampje voor verbinding aan is 3 Druk de knop in voor je gekozen modus Het LED lampje van de knop gaat aan en je keuze wordt bevestigd door middel van een geluid A LED lampje voor verbinding B LED lampje batterij bijna leeg C Privémodus D Bedrijfsmodus E Woon werkverkeer A D E C B Borna_Logbook book Page 22 Thursday January 21 2010 9 53 AM ...

Page 22: ...ato connesso ad un TomTom LINK 300 310 Premi un tasto qualsiasi per accendere Remote LINK e consulta la sezione Descrizione di Remote LINK per controllare lo stato del dispositivo Se il dispositivo non è accoppiato con un LINK 300 310 procedi come segue 1 Verifica che LINK 300 310 sia installato correttamente nel veicolo 2 Accendi il motore 3 Verifica che non vi siano altri veicoli con un LINK 300...

Page 23: ...nessione il LED si spegne Per stabilire una connessione ripeti le fasi 1 4 oppure visita il sito www tomtomwork com connect remotelink per metodi di connessione alternativi Ripristino di Remote LINK Se Remote LINK è già stato accoppiato ma non funziona correttamente oppure è accoppiato con il dispositivo sbagliato puoi ripristinare Remote LINK con le impostazioni predefinite di fabbrica 1 Premi un...

Page 24: ...o un LINK 300 310 Il LED di connessione è acceso Remote LINK è connesso ad un LINK 300 310 Il LED di avvertenza batteria in esaurimento lampeggia La batteria sta per esaurirsi e sarà necessario sostituirla Tutti i LED dei pulsanti lampeggiano Remote LINK non è accoppiato con un LINK 300 310 Borna_Logbook book Page 25 Thursday January 21 2010 9 53 AM ...

Page 25: ...ell area di impatto della testa o delle ginocchia Cerca attentamente una posizione che non interferisca con i display l apparecchiatura di sicurezza e i comandi 1 Per creare un installazione permanente fissa prima il blocco di fissaggio al supporto Nota per rimuovere Remote LINK dal supporto premi delicatamente la linguetta sul retro del blocco di fissaggio quindi rimuovi il dispositivo 2 Fissa il...

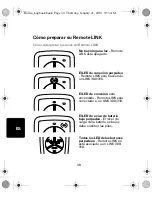
Page 26: ...nessione non si accende 3 Premi il pulsante per la modalità a cui desideri accedere Il LED del pulsante si accende e le segnalazioni saranno confermate con un segnale acustico A LED di connessione B LED batteria in esaurimento C Modalità privata D Modalità aziendale E In viaggio verso il lavoro A D E C B Borna_Logbook book Page 27 Thursday January 21 2010 9 53 AM ...

Page 27: ...mote LINK no se ha conectado a un TomTom LINK 300 310 Pulse cualquier tecla para encender Remote LINK y consulte Cómo interpretar las luces de Remote LINK para comprobar el estado del dispositivo Si el dispositivo no está asociado a un LINK 300 310 haga lo siguiente 1 Asegúrese de que el LINK 300 310 se ha instalado correctamente en el vehículo 2 Dé el contacto 3 Asegúrese de que no haya otros veh...

Page 28: ...xión el LED se apagará Para establecer una conexión repita los pasos del 1 al 4 o visite www tomtomwork com connect remotelink para obtener información sobre otros métodos de conexión Reinicie su Remote LINK Si su Remote LINK ya está asociado pero no funciona correctamente o si está asociado con el dispositivo equivocado puede reajustar Remote LINK a la configuración de fábrica predeterminada 1 Pu...

Page 29: ...está buscando un LINK 300 310 El LED de conexión está encendido Remote LINK está conectado a un LINK 300 310 El LED de aviso de batería baja parpadea El nivel de carga de la batería es bajo y debe sustituir las pilas Todos los LED de los botones parpadean Remote LINK no está asociado a un LINK 300 310 Borna_Logbook book Page 30 Thursday January 21 2010 9 53 AM ...

Page 30: ...n la zona de impacto de la cabeza o las rodillas Trate de encontrar una posición en la que no se interfiera con pantallas equipo de seguridad y controles 1 Si desea instalar el dispositivo de manera permanente acople el bloqueo de seguridad en la montura Nota Para retirar Remote LINK de la montura presione suavemente el seguro de la parte posterior del bloqueo de seguridad y retire el dispositivo ...

Page 31: ...sta que se encienda el LED de conexión 3 Pulse el botón de la modalidad que desee utilizar El LED del botón se encenderá y se confirmará con un sonido A LED de conexión B LED de batería baja C Modo privado D Modo negocios E Desplazamiento al trabajo A D E C B Borna_Logbook book Page 32 Thursday January 21 2010 9 53 AM ...

Page 32: ...aso o seu Remote LINK não tenha sido ligado a um TomTom LINK 300 310 Prima qualquer botão para ligar o seu Remote LINK e consulte Compreender o seu Remote LINK para verificar o estado do seu equipamento Se o equipamento não estiver emparelhado com um LINK 300 310 faça então o seguinte 1 Certifique se de que o LINK 300 310 está devidamente instalado na viatura 2 Ligue a ignição 3 Verifique que não ...

Page 33: ...da qualquer ligação o LED apagar se á Para estabelecer uma ligação repita os passos 1 a 4 ou vá a www tomtomwork com connect remotelink para obter métodos alternativos de ligação Reiniciar o seu Remote LINK Se o seu Remote LINK já se encontra emparelhado mas não funciona correctamente ou se está emparelhado com o equipamento errado pode repor as predefinições de fábrica no Remote LINK 1 Prima uma ...

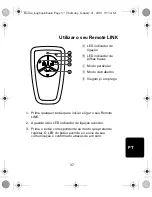
Page 34: ...e LINK está a procurar um LINK 300 310 LED indicador de ligação aceso o Remote LINK está ligado a um LINK 300 310 LED indicador de pilhas fracas a piscar as pilhas estão fracas e é necessário substitui las LEDs de todos os botões a piscarem o Remote LINK não está emparelhado com um LINK 300 310 Borna_Logbook book Page 35 Thursday January 21 2010 9 53 AM ...

Page 35: ...a de impacto da cabeça ou dos joelhos Procure cuidadosamente uma localização que não interfira com ecrãs equipamentos de segurança ou comandos 1 Para criar uma instalação permanente fixe primeiro o bloqueio de segurança ao suporte Nota para retirar o seu Remote LINK do suporte prima cuidadosamente a patilha de encaixe na parte posterior do bloqueio de segurança e depois retire o equipamento 2 Fixe...

Page 36: ...dor de ligação acender 3 Prima o botão correspondente ao modo que pretende registar O LED do botão acende e o envio da sua comunicação é confirmado através de um som A LED indicador de ligação B LED indicador de pilhas fracas C Modo particular D Modo de trabalho E Viagem p emprego A D E C B Borna_Logbook book Page 37 Thursday January 21 2010 9 53 AM ...

Page 37: ...shall not be liable for technical or editorial errors or omissions contained herein nor for incidental or consequential damages resulting from the performance or use of this material This document contains information protected by copyright No part of this document may be photocopied or reproduced in any form without prior written consent from TomTom N V FCC Information for the User This product c...

Page 38: ...USA the following booklet prepared by the Federal Communications Commission may be of help How to Identify and Resolve Radio TV Interference Problems This booklet is available from the US Government Printing Office Washington DC 20402 Stock No 004 000 00345 4 FCC Declaration of Conformity Tested to Comply with FCC Standards for Home or Office Use FCC ID S4L REMOTE This device complies with part 15...

Page 39: ...ieses Elektrogerät nicht als unsortierter Siedlungsabfall entsorgt werden Entsorgen Sie dieses Produkt bitte indem Sie es dort zurückgeben wo Sie es erworben haben oder bei einer kommunalen Recycling Sammelstelle in Ihrer Nähe Dieses Dokument Dieses Handbuch wurde mit größtmöglicher Sorgfalt erstellt Durch die fortlaufende Produktentwicklung kann es jedoch vorkommen dass einige darin enthaltene In...

Page 40: ...t électrique ne doit en aucun cas être mis au rebut sous forme de déchet municipal non trié Veuillez vous débarrasser de ce produit en le renvoyant à son point de vente ou au point de ramassage local dans votre municipalité à des fins de recyclage À propos de ce document Le plus grand soin a été apporté à la préparation de ce manuel Cependant en raison du développement continuel du produit certain...

Page 41: ...ankte elektrische en elektronische apparatuur AEEA mag dit elektrische product niet worden afgevoerd als ongesorteerd gemeentelijk afval Voor een correcte afvalverwerking moet dit product worden teruggebracht naar het verkooppunt of naar het lokale gemeentelijke inzamelpunt voor recycling Dit document Deze handleiding is met de grootste zorg samengesteld Het kan zijn dat door de continue producton...

Page 42: ...ti di apparecchiature elettriche ed elettroniche RAEE questo prodotto elettrico non deve essere smaltito fra i rifiuti di raccolta indifferenziata Questo prodotto deve essere smaltito tramite restituzione al punto vendita o al punto di raccolta locale per il riciclaggio Questo documento Nella preparazione di questo manuale è stata posta estrema attenzione A causa del continuo sviluppo dei prodotti...

Page 43: ... Directiva UE 2002 96 CE para residuos de dispositivos eléctricos y electrónicos WEEE este producto eléctrico no debe eliminarse como residuo municipal común Para deshacerse de este producto devuélvalo al punto de venta o a su punto de recogida municipal local para reciclaje Este documento Se han tomado muchas precauciones al redactar este manual Debido al constante desarrollo del producto es posi...

Page 44: ...s de equipamentos eléctricos e electrónicos REEE este produto eléctrico não deve ser eliminado junto com os resíduos indiferenciados No final da vida do produto entregue o no ponto de venda ou nos pontos próprios de recolha municipal para ser reciclado Este documento Foi empregue um grande cuidado na preparação deste manual No entanto o desenvolvimento contínuo dos produtos poderá significar que a...

Page 45: ... onderdeel uit van de handelsmerken applicaties of geregistreerde handelsmerken in eigendom van TomTom International B V Op dit product zijn onze beperkte garantie en licentieovereenkomst voor de eindgebruiker van toepassing beide zijn te vinden op www tomtomwork com legal 2010 TomTom International BV The Netherlands TomTom e il logo delle due mani fanno parte dei marchi delle applicazioni e dei m...

Page 46: ...nen die Fahrer ein Fahrtenbuch über den in ihrem Fahrzeug installierten TomTom LINK 300 310 führen FR Remote LINK Logbook permet aux chauffeurs de tenir un carnet de route via le TomTom LINK 300 310 installé dans leur véhicule NL Met de Remote LINK Logbook kunnen bestuurders een logboek bijhouden via de TomTom LINK 300 310 die in hun voertuig is geïnstalleerd IT Con Remote LINK Logbook gli autisti...

Reviews: