background image

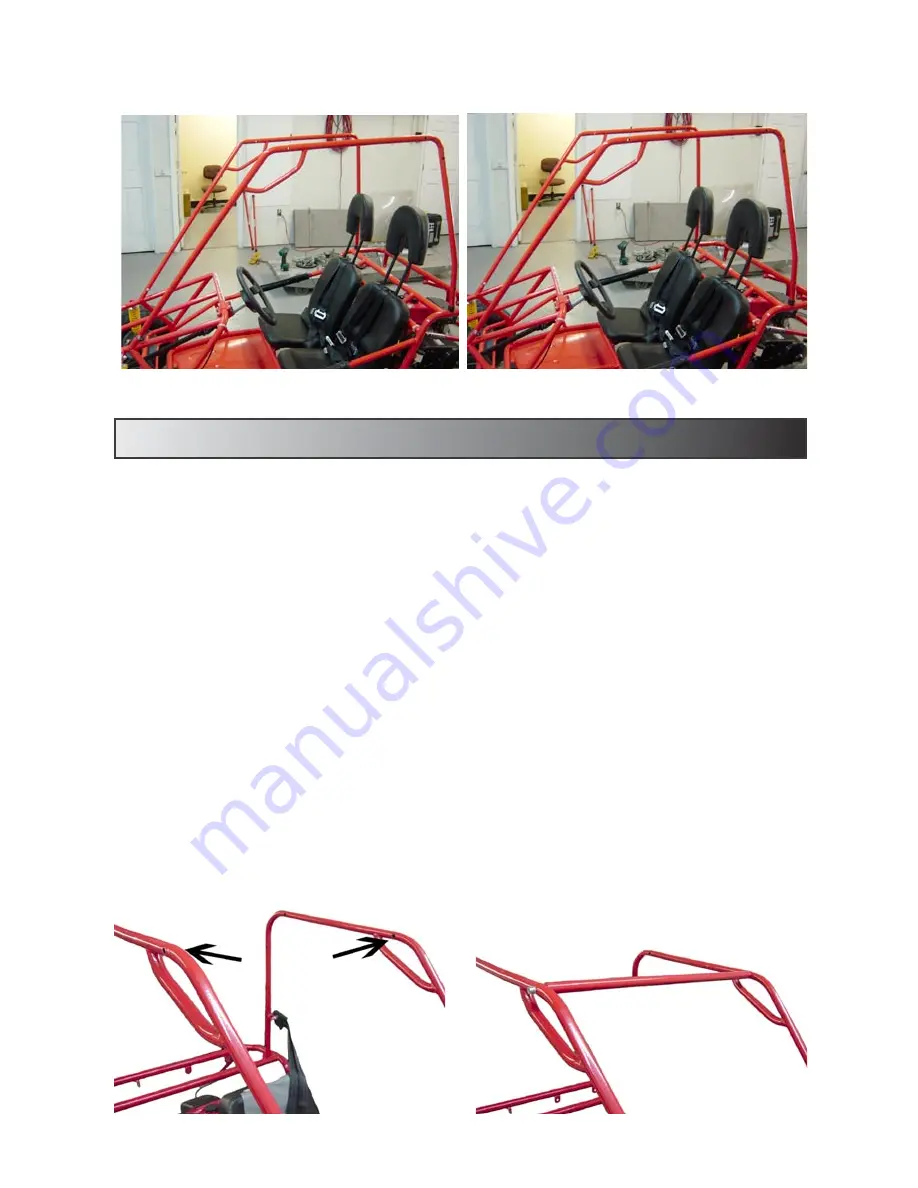
Front Support

1.  Locate the shorter, straight tube from the loose parts. 

2.  Remove the bolt and washer from each end of the tube. 

3.  Align the pre-drilled holes in each end of the tube with the pre-

     drilled holes in each side support.  

4.  For each side, place a washer on each bolt, and insert a bolt 

     through all pre-drilled holes and tighten.   NOTE:  Do not tighten 

     the bolts all the way.  Leaving slight movement in the supports   

     will allow for easier assembly.  

14

Summary of Contents for FireFox 620

Page 1: ...efore attempting to start the engine be sure to place oil in the vehicle according to the specifications in the engine owner s manual Minimum Recommended Operating Age 16 1 877 855 0196 or www tpg info com 081806 ...

Page 2: ...istration insert in this manual registering online at www tpg info com or telephone at 1 877 855 0196 Please have the following information ready when registering your product ENGINE NUMBER VIN NUMBER Located on the engine Below Driver s seat on frame __________________________ _________________________ DATE STORE NUMBER See Receipt __________________________ _________________________ ...

Page 3: ...ads or any other components that wear under normal use This warranty also does not cover items that the seller deems defective due to improper care improper assembly modifications abuse or accidents All warranties are voided if the vehicle has been altered in any way or meets any of the following criteria 1 Contains parts deemed non original replacement parts 2 The vehicle serves as a rental unit 3...

Page 4: ...s manual may result in severe injury or death to drivers and or passengers Tomberlin Product Group wishes all drivers a safe enjoyable experience with the FireFox 620 Carefully read the section dealing with maintenance and be sure to fill in the chart showing scheduled maintenance and service Servicing and maintaining this vehicle using the provided schedule will improve longevity and allow for a m...

Page 5: ...ings 1 Warning Decals 2 Safety Operation Guidelines 3 Assembly 7 Parts 8 Before Each Ride 20 Driving 24 Starting the Engine 26 Maintenance 27 Important Information 29 Service Intervals 30 California Emissions 31 Notes 33 iii ...

Page 6: ...perating this unit WARNING Do NOT attempt to start the engine if the driver is not correctly seated with his her seatbelt properly fastened WARNING To avoid serious burns or injury always use caution when working with gasoline The engine should only be refueled while it is not running and outdoors in a well ventilated area Avoid spilling gasoline anywhere If gasoline comes in contact with skin or ...

Page 7: ...2 ...

Page 8: ...hot areas around the engine 4 Use extreme caution when working on an engine that has been in use Engine components will be extremely hot 5 Do NOT attempt to modify or change any of the original equipment on the FireFox 620 The removal of any parts or components could render the vehicle unsafe or in violation of state laws 6 Before each use check all hardware on the vehicle to ensure that it is saf...

Page 9: ...idelines in this manual 12 ALWAYS check the fuel level before starting the FireFox 620 Do NOT fill the gas tank while the motor is running or still hot While filling the tank avoid enclosed places and open flames 13 Tire pressure should be checked before each use Improper tire pressure may cause unstable conditions while operating the FireFox 620 14 The FireFox 620 should NEVER be started unless the ...

Page 10: ...arness securely fastened 20 If driving without a passenger fasten the passenger safety harness to prevent it from getting caught in moving parts 21 Do NOT operate this vehicle unless wearing proper clothing Proper clothing includes but is not limited to helmets approved by the proper agencies face guards goggles closed toe shoes and other protective clothing 22 The recommended minimum age for driv...

Page 11: ...e 26 Slow speeds are necessary when operating the vehicle on wet slick rough or steep terrains WARNING Excessive speed in these conditions may cause bodily harm to the driver passenger or those nearby 27 Do NOT attempt to roll flip spin out or jump while operating the FireFox 620 Forcing the vehicle into these conditions may cause bodily harm and or damage to the vehicle 28 When the vehicle is not ...

Page 12: ...d will not be damaged It may be necessary to cut the zip ties to access all loose parts 2 After all loose parts are removed begin assembling the go kart 3 Loose parts are listed on the following page If you are missing any parts or require assistance in your assembly process please contact us toll free 1 877 855 0196 or visit our website www tpg info com 4 Please refer to the parts list on the fol...

Page 13: ... 1 Cross Support 2 Front Tires 2 Rear Tires 1 Rear Support Tube 1 Front Support Tube 1 Storage Compartment 1 Engine Guard 2 Headrest 8 2 Rear Shocks ...

Page 14: ...rough the holes and place the nut on the end of the bolt and tighten Repeat this process for the shocks on both sides of the kart Do NOT attempt to operate the FireFox 620 without install ing both rear shocks in their correct operating positions Rear Wheels Rear Tire Size 18 x 9 5 8 The rear of the kart needs to be raised in order to install the rear tires Be careful not to damage any kart compone...

Page 15: ... need to raise the front end of the go kart Be careful not to damage any kart components while raising the front end Locate the drivers side tire NOTE The spindle is already attached to the tire and needs to be attached to the go kart frame The drivers side tire will have the directional facing forward and the valve stem facing out while viewed from the drivers side of the kart Remove the nut and ...

Page 16: ...he spindle Place the castle nut on the tie rod end and tighten Slide the cotter pin through the opening in the tie rod end and bend each end of the pin in opposite ninety degree directions Repeat this process for both front spindles and tie rods IMPORTANT The air pressure in the front tires should register between 12 14 psi 11 ...

Page 17: ...n their appropriate position around the frame of the kart directly in front of the Driver s seat The position of the steering wheel should offer the driver the best possible control of the kart Tighten the bolts using the tools provided WARNING Do NOT operate this go kart without placing the steer ing wheel in the appropriate operating position The operating position should provide the driver the ...

Page 18: ...t with the pre drilled holes in the bracket on the main frame 4 Slide the bolt through all pre drilled holes Place the washer and nut on the bolt in that order NOTE Do not tighten the nut all the way on the bolt Leaving slight movement in the supports will allow for easier assembly 5 Align the pre drilled hole in the bottom of the side support with the pre drilled hole in the second contact point ...

Page 19: ...be 3 Align the pre drilled holes in each end of the tube with the pre drilled holes in each side support 4 For each side place a washer on each bolt and insert a bolt through all pre drilled holes and tighten NOTE Do not tighten the bolts all the way Leaving slight movement in the supports will allow for easier assembly 14 ...

Page 20: ...oles and tighten NOTE Do not tighten the bolts all the way Leaving slight movement in the supports will allow for easier assembly Cross Support 1 Locate the X shaped tube from the loose parts 2 Remove the bolts and washers from each of the four contact points 3 Align the pre drilled holes in each end of the X cross support with the pre drilled holes in each side support IMPORTANT The top half of t...

Page 21: ...Place a washer on the bolt for each side Insert a bolt through all pre drilled holes and tighten IMPORTANT After all brush guard components have been at tached to the main frame of the kart please tighten all bolts to ensure that the brush guard is held firmly in place Do NOT attempt to oper ate this go kart unless all bolts have been properly tightened 16 ...

Page 22: ...brackets with the pre drilled holes on the top of the storage compartment Place a washer on the bolt and slide the bolt through the pre drilled holes Place a nut on the bolt and tighten Repeat this process for both contact points 4 Tighten all nuts and bolts for each contact point securely in place WARNING The storage compartment is not designed to hold cargo in excess of 10 lbs Do not attempt to ...

Page 23: ... and washers from the three studs on the engine guard 3 Align the three studs on the engine guard with the three pre drilled holes in the kart main frame 4 Slide the studs through the pre drilled holes Place a washer and bolt over each stud Tighten each nut securely in place 18 ...

Page 24: ...s slide into the holes on the tops of the seats and the headrest is facing the correct position NOTE Be sure to hold the release button on the top of each seat while inserting the headrest into their appropriate locations WARNING Before attempting to operate this vehicle be sure to tighten all loose bolt connections Do NOT attempt to operate this vehicle with hand tightened or loose bolt connectio...

Page 25: ...should wear helmets at all times while operating this vehicle Helmets should be approved by an organization DOT SNELL and contain a label with said approval Goggles or a face shield should also be worn to protect operator s and passenger s eyes and help improve sight To protect the body all drivers passengers should wear boots or closed toe shoes gloves long sleeved shirt or jacket and long pants ...

Page 26: ...ded using a funnel proceed to add gas to the tank until it is full Do NOT overfill the tank doing so may cause damage to the kart or increased risk of fire Do NOT open the fuel cap while the go kart engine is running doing so may cause serious injury 93 octane fuel is recommended Be sure that the fuel is clean and fresh If the kart will not be used for 30 days or longer be sure to use a fuel stabili...

Page 27: ...ables are loose or hanging Check all connectors to ensure that they are firmly in place Brake Test On level ground with the driver passenger seated with their seat belts properly fastened release the handbrake and SLOWLY push the go kart from behind Have the driver apply the foot brake to ensure that the vehicle will stop Do NOT attempt to push the vehicle up or down any angle of slope doing so may...

Page 28: ...erate the FireFox 620 while under the influence of alcohol or any type of drug Choosing to operate this vehicle under these conditions may result in serious injury to the driver and or passenger If you have any questions about prescription medication please contact your physician WARNING Operating this vehicle after consuming alcohol or drugs can seriously impair your judgment cause you to react mo...

Page 29: ...m getting caught in moving go kart components Stop Engine Switch It is important to perform a test on the stop engine switch before riding With the engine running press the red engine stop button The engine should shut off If the engine does not shut off during the test Do NOT operate this vehicle and contact customer service immediately Safety Harness Do NOT operate or ride in this vehicle withou...

Page 30: ...ator The foot pedal on the RIGHT side is the accelerator pedal and controls the speed of the go kart The engine utilizes an automatic transmission and requires NO manual clutch or changing of gears Brake The foot pedal on the LEFT side is the brake pedal and controls the slowing stopping of the go kart Applying pressure to this pedal will slow the vehicle If the brakes are not functioning properly...

Page 31: ...nger should not exceed 180 kilograms or 400 pounds Exceeding this weight limit may create hazardous driving riding conditions While Driving This vehicle is intended for use on off road surfaces Driving on paved surfaces can affect the handling control and overall feel of the vehicle Do NOT drive the go kart on paved surfaces WARNING Operating this vehicle on paved surfaces may seriously effect han...

Page 32: ...hicle on unfamiliar terrain thoroughly check the terrain for dangerous conditions Do not use excessive speeds when dealing with new terrain It is possible for the driver to drive beyond his her ability while operating this vehicle Maintenance Engine Oil The engine oil must be changed after the first five 5 hours of use This will allow for an initial break in period for the engine After the first five ...

Page 33: ... 07mm wide WARNING If the spark plug appears to have too much carbon build up or excessive wear it should be replaced Storing Please reference your engine owner s manual for proper procedures regarding storage of the FireFox 620 WARNING Do NOT handle gas near an open flame or while smoking WARNING The pipe muffler and heat shields are extremely hot during and after operation Do NOT touch them until ...

Page 34: ...for fuel used in this go kart is 83 WARNING Use caution when handling gasoline to avoid injury Always refuel outside in a well ventilated area with the engine turned off Allow the engine to cool before adding fuel Do NOT spill any fuel while fueling and be sure to tighten gas cap when fueling is complete Do NOT smoke or expose flames to gasoline If fuel comes into contact with the skin rinse area i...

Page 35: ...m bolts and nuts 39 52 in lbs 4 5 6 Nm 6mm bolts and nuts 69 104 in lbs 8 12 Nm 8mm bolts and nuts 13 18 ft lbs 18 25 Nm 10 mm bolts and nuts 22 29 ft lbs 30 40 Nm 12 mm bolts and nuts 36 43 ft lbs 50 60 Nm 4 mm screws 22 30 in lbs 2 5 3 4 Nm 5mm screws 30 43 in lbs 3 5 5 Nm 6 mm hex bolts 87 121 in lbs 10 14 Nm 8 mm hex bolts 17 22 ft lbs 24 30 Nm 10 mm hex bolts 25 32 ft lbs 35 45 Nm 30 ...

Page 36: ...cheduled maintenance As the small off road engine owner you should however be aware that TPG may deny you warranty coverage if your small off road engine or a part has failed due to abuse neglect improper maintenance or unapproved modifications You are responsible for presenting your small off road engine to a TPG distribution center as soon as a problem exists The warranty repairs should be comple...

Page 37: ...section 4 above warranty services or repairs must be provided at all manufacturer distribution centers that are franchised to service the subject engines 6 The owner must not be charged for diagnostic labor that leads to the determination that a warranted part is in fact defective provided that such diagnostic work is performed at a warranty station 7 The engine manufacturer is liable for damages ...

Page 38: ...Notes 33 ...

Page 39: ...Notes 34 ...

Page 40: ...gton Road Augusta Georgia 30907 Toll Free 1 877 855 0196 www tpg info com Do not return this product to the retailer If you require assistance please contact customer support toll free 1 877 855 0196 or visit our website www tpg info com ...

Reviews: