background image

CS - 62

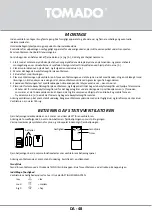
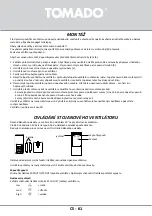
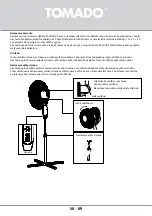
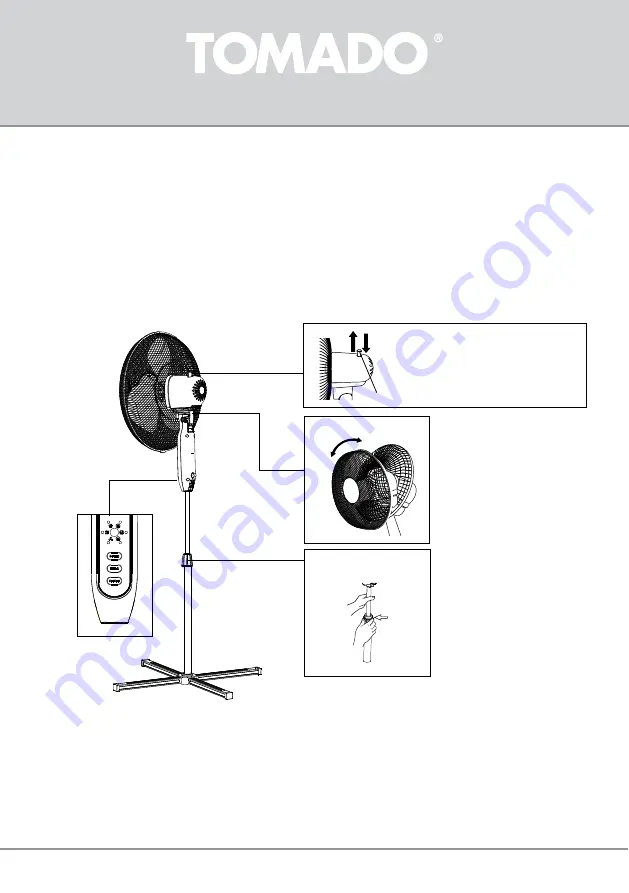
Nastavení časovače

Stisknutím tlačítka TIMER spustíte časovač. Pokud opakovaně stisknete toto tlačítko, doba trvání se bude prodlužovat o půl 

hodiny až na maximálně 7 hodin. 

Pokud například chcete nastavit ventilátor na 5 hodin, stiskněte toto tlačítko, dokud se nerozsvítí kontrolky 1 h + 4 h = 5 h. 

Po dokončení celého programu se ventilátor vypne. 

Pokud chcete ukončit funkci časovače nebo nastavit nový čas, držte stisknuté tlačítko TIMER, dokud nezhasnou všechny kontrolky.

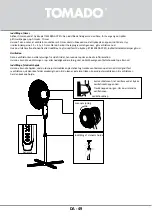
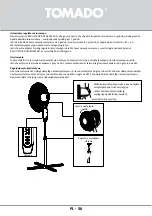
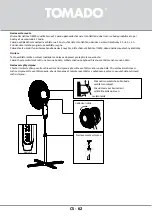
Oscilace

Tento ventilátor může oscilovat (naklápět se doleva a doprava) pro lepší přesun vzduchu. 

Pokud chcete změnit směr větru nahoru nebo dolů, můžete snadno pohybovat hlavou ventilátoru nahoru nebo dolů.

Stisknutím oscilačního kolíku bude 

ventilátor oscilovat. 
Pokud chcete oscilaci zastavit, 

vytáhněte kolík opět ven.

oscilační kolík

naklonění ručně

Nastavení výšky stojanu

obsluha

Nastavení výšky stojanu

Chcete-li změnit výšku, povolte seřizovací matici stojanu a přesuňte ventilátor nahoru nebo dolů. Při uvolňování seřizovací 

matice stojanu držte ventilátor pevně, aby náhle nespadl. Jakmile je ventilátor v požadované výšce, znovu utáhněte seřizovací 

matici stojanu.

Summary of Contents for TFS4005B

Page 1: ...strucciones de uso IT Istruzioni per l uso DA Instruktioner til brug PL Instrukcje użytkowania CS Návod k použití SK Návod na použitie Statiefventilator Pedestal fan Standventilator Ventilateur sur pied Ventilador de columna Ventilatore a piantana Stativventilator Wentylator na statywie Stojanový ventilátor Stojanový ventilátor TFS4005B ...

Page 2: ...2 ...

Page 3: ...tung Seite 17 23 FR Mode d emploi page 24 30 ES Instrucciones de uso página 31 37 IT Istruzioni per l uso pagine 38 44 DA Instruktioner til brug side 45 50 PL Instrukcje użytkowania strona 51 57 CS Návod k použití strana 58 63 SK Návod na použitie strana 64 70 TFS4005B 220 240V 50Hz 40W ...

Page 4: ...c Het apparaat op afstand houden van muren of andere objecten die vlam kunnen vatten zoals gordijnen handdoeken katoen of papier etc Zorg er altijd voor dat het apparaat op een effen vlakke ondergrond staat Gebruik het apparaat uitsluitend binnenshuis Laat het apparaat niet onbeheerd achter indien het apparaat in werking is Indien u het apparaat wilt verplaatsen dient u ervoor te zorgen dat het ap...

Page 5: ...ooit zonder toezicht met elektrische apparaten werken Houd het apparaat en het snoer buiten bereik van kinderen jonger dan 8 jaar Het apparaat kan worden gebruikt door kinderen van 8 jaar en ouder en door personen met beperkte fysieke zintuiglijke of mentale vermogens of gebrek aan ervaring of kennis wanneer zij het apparaat onder toezicht gebruiken of zijn geïnstrueerd over het veilige gebruik er...

Page 6: ...omgevingen in Bed Breakfast type omgevingen boerderijen Wanneer het apparaat oneigenlijk gebruikt wordt kan er bij eventuele defecten geen aanspraak op schadevergoeding worden gemaakt en vervalt het recht op garantie Als u besluit het apparaat vanwege een defect niet langer te gebruiken adviseren wij u nadat u de stekker uit de wandcontactdoos heeft verwijderd het snoer af te knippen NL 6 ...

Page 7: ...MONTAGE TEKENING NL 7 4 5 6 7 1 2 3 Beschermkorf voor Beschermkorf achter Ventilatorblad Borgring Bevestigingsdop Motor Statief Kruisvoet a d d d d d c boutje en moer Schroeven b ...

Page 8: ... de bevestigingsdop Draai de bevestigingsdop linksom vast tegen de klok in 7 Plaats de voorste beschermkorf op de ventilator en maak deze vast met de klemmen aan de achterste beschermkorf Plaats de voorste beschermkorf in lijn met de achterste beschermkorf met behulp van de positioneringsklem c aan de onderzijde om beide onderdelen goed aan elkaar te bevestigen Schroef met het boutje en het moertj...

Page 9: ...eze ventilator kan oscilleren naar links en rechts zwenken voor een betere luchtverplaatsing Wanneer u de windrichting naar boven of beneden wilt wijzigen kunt u de ventilatorkop eenvoudig naar boven of naar beneden bewegen Druk de oscillatiepin in om de ventilator te laten oscilleren Wanneer u het oscilleren wilt stoppen trekt u de pin weer uit oscillatiepin handmatig kantelen Statief in hoogte v...

Page 10: ...onmaakmiddelen om het apparaat te reinigen Dompel de ventilator nooit in water of een andere vloeistof onder Dit symbool betekent dat dit product niet bij het gewone huishoudelijke afval mag worden weggegooid 2012 19 EU Volg de geldende regels in uw land voor de gescheiden inzameling van elektrische en elektronische producten Als u het product correct afvoert voorkomt u negatieve gevolgen voor het...

Page 11: ...or other objects that could catch flame such as curtains towels cotton or paper etc Always make sure the appliance is placed on an even flat surface Only use the appliance indoors Do not leave the appliance unsupervised if the appliance is operational If you want to move the appliance make sure the appliance is switched off Do not use the appliance if the plug cord or appliance are damaged or if t...

Page 12: ...ed about its safe use and understand the hazards involved Children must not play with the appliance The appliance may not be cleaned or maintained by children unless this is done under supervision If the appliance is not being used or is being cleaned fully switch off the appliance by removing the plug from the socket Extension cords may only be used if the mains voltage see the information plate ...

Page 13: ...ASSEMBLY DRAWING EN 13 4 5 6 7 1 2 3 Protective guard front Protective guard rear Fan blade Lock ring Fastening cap Motor Pedestal Cross foot a d d d d d c bolt and nut Screws b ...

Page 14: ...ng cap Tighten the fastening cap by turning it to the left counter clockwise 7 Place the front protective guard on the fan and use the clamps to attach it to the rear protective guard Align the front protective guard with the rear protective guard using the positioning clamp c on the bottom side in order to attach both parts to each other properly Use the bolt and nut at the top of the guards to f...

Page 15: ...n is able to oscillate swerve to the left and right for a better air displacement If you want to change the wind to an upward or downward direction you can simply move the fan head upwards or downwards Push in the oscillation pen to allow the fan to oscillate If you want to stop the oscillation simply pull out the pen oscillation pen manual tilting Adjusting the height of the pedestal operation Ad...

Page 16: ...ive cleaning agents for cleaning the appliance Never submerge the fan in water or any other liquid This symbol means that this product should not be disposed of with regular household waste 2012 19 EU Observe the rules that apply in your country for the separated collection of electric and electronic products Correct disposal of the product prevents negative consequences for the environment and fo...

Page 17: ... des Kabels vorzubeugen Stellen Sie das Gerät nie in die Nähe von Wärmequellen wie Öfen Gasherden Herdplatten usw Halten Sie mit dem Gerät immer einen sicheren Abstand zu Wänden oder anderen Gegenständen ein die in Brand geraten können z B zu Gardinen Baumwoll oder Papierhandtüchern usw Sorgen Sie immer dafür dass das Gerät auf einem ebenen und glatten Untergrund steht Verwenden Sie das Gerät nur ...

Page 18: ...fährliche Situationen entstehen Sorgen Sie dafür dass das Gerät für Kinder unzugänglich ist Kinder verstehen die Gefahren nicht die beim Umgang mit elektrischen Geräten entstehen können Lassen Sie Kinder deshalb nie ohne Aufsicht mit elektrischen Geräten hantieren Sorgen Sie dafür dass das Gerät und das Kabel für Kinder unter 8 Jahren unzugänglich sind Das Gerät darf nur dann von Kindern ab 8 Jahr...

Page 19: ...brauch ausgelegt z B in Personalküchen in Geschäften Büros und anderen Arbeitsumgebungen von Gästen in Hotels Motels und anderen Unterkunftsbereichen in Bed and Breakfast Unterkünften auf bäuerlichen Anwesen Bei unsachgemäßer Verwendung des Geräts besteht bei eventuellen Defekten kein Anspruch auf Schadensersatz dies führt außerdem zum Erlöschen der Garantieansprüche Wenn Sie beschließen das Gerät...

Page 20: ...MONTAGEZEICHNUNG DE 20 4 5 6 7 1 2 3 Schutzkorb vorne Schutzkorb hinten Ventilatorblatt Sicherungsring Befestigungskappe Motor Stativ Kreuzfuß a d d d d d c Schraube und Mutter Schrauben b ...

Page 21: ...as Ventilatorblatt mit der Befestigungskappe Drehen Sie die Befestigungskappe links herum fest entgegen dem Uhrzeigersinn 7 Setzen Sie den vorderen Schutzkorb auf den Ventilator auf und befestigen Sie diesen mit den Klemmen am hinteren Schutzkorb Richten Sie den vorderen Schutzkorb mithilfe der Positionierungsklemme c an der Unterseite in einer Linie mit dem hinteren Schutzkorb aus und befestigen ...

Page 22: ...dem Luftstrom einen größeren Bereich abzudecken kann dieser Ventilator oszillierend verwendet werden das heißt das Gerät schwenkt automatisch nach links und rechts Wenn Sie die Windrichtung nach oben oder nach unten verändern möchten können Sie den Ventilatorkopf ganz einfach nach oben oder nach unten bewegen Drücken Sie den Oszillationsstift nach innen um den Ventilator oszillierend zu verwendet ...

Page 23: ...ggressiven oder scheuernden Reinigungsmittel Tauchen Sie den Ventilator nie in Wasser oder andere Flüssigkeiten ein Dieses Symbol weist darauf hin dass dieses Produkt nicht mit dem normalen Hausmüll entsorgt werden darf 2012 19 EU Befolgen Sie die in Ihrem Land geltenden Vorschriften in Bezug auf die getrennte Sammlung von Elektro und Elektronikgeräten Durch eine korrekte Entsorgung des Produkts b...

Page 24: ...e la chaleur comme les fours cuisinières à gaz plaques de cuisson etc Maintenez l appareil éloigné des murs ou d autres objets susceptibles de s enflammer tels que les rideaux serviettes coton ou papier etc Veillez à toujours poser l appareil sur un support stable et plat Utilisez l appareil uniquement à l intérieur Ne laissez jamais l appareil sans surveillance lorsqu il fonctionne Si vous souhai...

Page 25: ...ils électriques sans surveillance Tenez l appareil et le câble d alimentation hors de portée des enfants de moins de 8 ans L appareil peut être utilisé par les enfants à partir de 8 ans et par des personnes ayant des capacités physiques sensorielles ou mentales réduites ou un manque d expérience et de connaissances à condition qu ils utilisent l appareil sous surveillance ou qu ils aient reçu des ...

Page 26: ...otels et autres environnements résidentiels dans les environnements de type chambre d hôte dans les fermes Une utilisation inappropriée de l appareil annule tout droit à une indemnisation en cas d éventuels défauts et annule la garantie Si vous décidez de ne plus utiliser l appareil en raison d un défaut nous vous conseillons de retirer la fiche de la prise murale et de couper le câble d alimentat...

Page 27: ...DE MONTAGE FR 27 4 5 6 7 1 2 3 Cage de protection avant Cage de protection arrière Hélice de ventilateur Rondelle d arrêt Capuchon de fixation Moteur Support Pied en croix a d d d d d c Boulon et écrou Vis b ...

Page 28: ...e capuchon de fixation Tournez le capuchon vers la gauche dans le sens contraire des aiguilles d une montre 7 Placez la cage de protection avant sur le ventilateur et fixez la à l aide des pinces sur la cage de protection arrière Alignez la cage de protection avant avec la cage de protection arrière à l aide de la pince de positionnement c sur le dessous afin de bien les fixer entre elles Resserre...

Page 29: ...ns lumineux soient éteints Oscillation Ce ventilateur peut osciller pivoter vers la gauche et vers la droite pour un meilleur déplacement d air Lorsque vous voulez changer la direction du vent vers le haut ou vers le bas il vous suffit de relever ou d abaisser la tête du ventilateur Enfoncez le goujon d oscillation pour faire osciller le ventilateur Lorsque vous souhaitez arrêter l oscillation tir...

Page 30: ...de nettoyage agressifs ou abrasifs Ne plongez jamais le ventilateur dans de l eau ou dans un autre liquide Ce symbole signifie que ce produit ne peut pas être jeté avec les déchets ménagers ordinaires 2012 19 UE Veuillez suivre les règles en vigueur dans votre pays concernant la collecte sélective des produits électriques et électroniques La mise au rebut adéquate du produit permet d éviter des co...

Page 31: ...aratos que emitan calor como hornos cocinas de gas placas de cocina etc Mantenga el aparato alejado de paredes y otros objetos inflamables como cortinas paños de algodón o papel etc Asegúrese siempre de que el aparato esté sobre una superficie lisa y plana Utilice el aparato únicamente en interiores No deje nunca el aparato sin supervisión si está en funcionamiento Si quiere cambiar de lugar el ap...

Page 32: ...utilizar aparatos eléctricos Por esa razón no deje nunca a los niños que usen aparatos eléctricos sin supervisión Mantenga el aparato y el cable fuera del alcance de menores de 8 años El aparato lo podrán utilizar niños de 8 o más años y personas con capacidades físicas sensoriales o mentales limitadas o sin experiencia o conocimientos siempre que sea bajo supervisión o se les esté instruyendo ace...

Page 33: ...tes de hoteles moteles y otros entornos residenciales en alojamientos tipo pensión en granjas Si el aparato se usa de forma indebida en caso de avería no se podrán reclamar daños y perjuicios y la garantía perderá su validez Si decide no usar más el aparato por haberse averiado le recomendamos que corte el cable después de desenchufarlo ES 33 ...

Page 34: ...ONTAJE ES 34 4 5 6 7 1 2 3 Rejilla protectora delantera Rejilla protectora trasera Aspas del ventilador Arandela de seguridad Pieza de sujeción Motor Columna Pie en cruz a d d d d d c tornillito y tuerca Tornillos b ...

Page 35: ...del reloj para apretarla 7 Monte la rejilla protectora delantera en el ventilador y engánchela a la trasera con las abrazaderas Alinee la rejilla delantera con la trasera guiándose con la abrazadera de posición c situada en el lado inferior para que las dos piezas encajen bien Con el tornillito y la tuerca enganche las rejillas por arriba Presione las abrazaderas d hacia abajo para que las rejilla...

Page 36: ...tos Oscilación Este ventilador puede oscilar girar hacia la izquierda y hacia la derecha para distribuir mejor el aire Si quiere cambiar la dirección del aire hacia arriba o hacia abajo puede mover fácilmente la cabeza del ventilador según corresponda Presione la clavija de oscilación para que el ventilador empiece a moverse Cuando quiera detener la oscilación tire de la clavija hacia arriba clavi...

Page 37: ... para limpiar el aparato No sumerja nunca el ventilador en agua ni en otros líquidos Este símbolo indica que el producto no se puede tirar con la basura normal del hogar 2012 19 UE Siga las normas vigentes en su localidad para la recogida selectiva de aparatos eléctricos y electrónicos Si se deshace correctamente del producto evitará consecuencias negativas para el medio ambiente y la salud de las...

Page 38: ...me forni fornelli a gas piastre di cottura eccetera L apparecchio deve essere tenuto a distanza da muri o altri oggetti infiammabili come tende fazzoletti in cotone o carta eccetera Assicurarsi sempre che l apparecchio sia posizionato su una superficie liscia e piana Utilizzare l apparecchio esclusivamente in interni Non lasciare mai l apparecchio incustodito durante il funzionamento Prima di spos...

Page 39: ...lettrico fuori dalla portata dei bambini di età inferiore agli 8 anni L apparecchio può essere utilizzato da bambini di età superiore agli 8 anni da persone con capacità fisiche sensoriali o mentali limitate e da persone non esperte o con conoscenze limitate a patto che siano adeguatamente supervisionati o siano stati sufficientemente istruiti sull uso sicuro dell apparecchio e su tutti i pericoli...

Page 40: ... a disposizione degli ospiti l uso nei bed breakfast e in tipi di alloggio simili l uso nelle fattorie Se il dispositivo viene usato in modo improprio in caso di eventuali guasti non ci si può appellare al risarcimento danni e il diritto alla garanzia viene a cadere Qualora si decida di non utilizzare più l apparecchio a causa di un difetto si raccomanda di recidere il cavo dopo aver staccato la s...

Page 41: ...SEMBLAGGIO IT 41 4 5 6 7 1 2 3 Gabbia protettiva parte anteriore Gabbia protettiva parte posteriore Pale Rondella Dado di fissaggio Blocco motore Piantana Base a croce a d d d d d c Bullone e dado Viti b ...

Page 42: ...ado di fissaggio Ruotare il dado di fissaggio verso sinistra in senso antiorario 7 Posizionare la parte anteriore della gabbia protettiva e fissarla con i ganci alla parte posteriore Unire le due parti della gabbia protettiva e con l aiuto del profilo di posizionamento c presente sul lato inferiore allinearle correttamente Quindi fissarle l una all altra tramite il bullone e il dado situati sul la...

Page 43: ...ventilatore è in grado di oscillare orizzontalmente per fornire un migliore spostamento dell aria Qualora si desideri modificare la direzione dello spostamento dell aria in verticale basterà inclinare la testa del ventilatore verso l alto o verso il basso Premere il blocco oscillazione per avviare l oscillazione del ventilatore Per bloccare il ventilatore in posizione tirare il blocco oscillazione...

Page 44: ...utensili abrasivi per la pulizia dell apparecchio Non immergere mai il ventilatore in acqua o in altri liquidi Questo simbolo indica che il prodotto non può essere smaltito insieme ai rifiuti domestici indifferenziati direttiva 2012 19 UE Si raccomanda di attenersi alle norme in vigore nel proprio paese per quanto riguarda lo smaltimento degli apparecchi elettrici ed elettronici Uno smaltimento co...

Page 45: ...er køkkenrulle m m Sørg altid for at apparatet står på et plant og jævnt underlag Apparatet må kun bruges indendørs Efterlad ikke apparatet uden opsyn når det er tændt Hvis apparatet skal flyttes skal det først sikres at det er slukket Brug ikke apparatet hvis stikket ledningen eller apparatet er beskadiget eller hvis apparatet ikke længere fungerer korrekt er væltet eller på anden måde er blevet ...

Page 46: ...ermed forbundne farer Børn må ikke lege med apparatet Apparatet må ikke rengøres eller vedligeholdes af børn medmindre det sker under opsyn Når apparatet ikke skal bruges eller rengøres skal det slukkes helt og stikket skal tages ud af stikkontakten Forlængerledninger må kun bruges hvis netspændingen se typeskiltet og effekten er den samme som apparatets eller derover Brug altid en godkendt forlæn...

Page 47: ...MONTAGETEGNING DA 47 4 5 6 7 1 2 3 Beskyttelsesgitter for Beskyttelsesgitter bag Ventilatorvinge Låsering Låseknap Motor Stativ Krydsfod a d d d d d c bolt og møtrik Skruer b ...

Page 48: ... dvs mod uret 7 Placer det forreste beskyttelsesgitter på ventilatoren og fastgør det til det bageste beskyttelsesgitter ved hjælp af klemmerne Monter det forreste beskyttelsesgitter ud for det bageste gitter ved at anbringe det i positionsklemmen c forneden som sikrer at de to dele samles korrekt Spænd de to gitre sammen ved hjælp af den lille bolt og møtrik foroven Tryk klemmerne d ned så det fo...

Page 49: ... ud Oscillation Denne ventilator kan oscillere svinge fra side til side hvorved der opnås en bedre luftcirkulation Hvis du vil ændre vindretningen i op eller nedadgående retning skal du blot bevæge ventilatorhovedet op eller ned Sæt ventilatoren til at oscillere ved at trykke oscillationsknappen ned Træk knappen op igen når du vil standse oscillationen oscillationsknap manuel vipning Indstilling a...

Page 50: ...ngøringsmidler eller skuremidler til rengøring af apparatet Nedsænk aldrig ventilatoren i vand eller anden væske Dette symbol betyder at produktet ikke må bortskaffes sammen med almindeligt husholdningsaffald 2012 19 EU Følg de gældende nationale regler for sortering og indsamling af elektrisk og elektronisk udstyr Når du bortskaffer produktet korrekt er du med til at mindske belastningen af miljø...

Page 51: ...owe płyty grzewcze itp Urządzenie należy trzymać z dala od ścian lub innych obiektów które mogą zająć się ogniem np zasłony ręczniki bawełniane lub papierowe itd Zawsze dbaj o to aby urządzenie stało na równym i płaskim podłożu Korzystaj z urządzenia wyłącznie wewnątrz Nie pozostawiaj urządzenia bez nadzoru jeśli jest włączone Jeśli chcesz przemieścić urządzenie masz obowiązek zadbać o to aby było...

Page 52: ...nych Dlatego w żadnym wypadku dzieci nie powinny mieć kontaktu z urządzeniami elektrycznymi bez nadzoru W związku z tym trzymaj urządzenie i kabel poza zasięgiem dzieci poniżej 8 roku życia Urządzenie może być używane przez dzieci w wieku powyżej 8 lat i przez osoby o ograniczonych zdolnościach fizycznych umysłowych i mentalnych bądź osoby nieposiadające doświadczenia lub wiedzy kiedy używają one ...

Page 53: ...przez gości w hotelach motelach i innych obiektach rezydencyjnych w obiektach typu Bed Breakfast w gospodarstwach rolnych Jeśli urządzenie jest niewłaściwie użytkowane w razie ewentualnych defektów nie można rościć żadnych praw do odszkodowania a wszelkie prawa gwarancyjne wygasają Jeśli z powodu awarii zdecydujesz się zakończyć użytkowanie urządzenia zalecamy przeciąć kabel po wyciągnięciu wtyczk...

Page 54: ...YSUNEK MONTAŻOWY PL 54 4 5 6 7 1 2 3 Osłona ochronna przód Osłona ochronna tył Śmigło wentylatora Pierścień mocujący Zatyczka montażowa Silnik Statyw Noga krzyżowa a d d d d d c śrubka i nakrętka Śruby b ...

Page 55: ...ntażową w lewą stronę przeciwnie do kierunku ruchu wskazówek zegara 7 Umieść przednią osłonę ochronną na wentylatorze i zaciśnij ją przy użyciu zacisków z tylną osłoną ochronną Umieść przednią osłonę ochronną na równi z tylną osłoną ochronną przy użyciu zacisku pozycjonującego c na dole aby dobrze zamocować ze sobą obie części Przy użyciu śrubki i nakrętki skręć ze sobą osłony na górze Naciśnij za...

Page 56: ...tor może oscylować pochylać się od lewej do prawej strony na potrzeby lepszego przemieszczania powietrza Jeśli chcesz zmienić kierunek nawiewu z góry na dół możesz przemieścić z łatwością głowicę wentylatora do góry lub na dół Wciśnij przycisk funkcji oscylacji aby wentylator zaczął wykonywać ruch oscylacyjny Jeśli chcesz zakończyć oscylację wyciągnij przycisk funkcji oscylacji przycisk funkcji os...

Page 57: ...wać żadnych żrących ani ściernych środków czyszczących Nigdy nie zanurzaj wentylatora w wodzie ani jakichkolwiek innych cieczach Ten symbol oznacza że tego produktu nie można utylizować wraz ze standardowymi odpadami komunalnymi 2012 19 WE Przestrzegaj przepisów obowiązujących w danym kraju odnośnie do segregowania odpadów elektrycznych i elektronicznych Utylizując produkt prawidłowo zapobiegasz n...

Page 58: ...tál na pevném a rovném povrchu Spotřebič používejte pouze uvnitř Nenechávejte spotřebič bez dozoru když je v provozu Pokud chcete spotřebič přemístit jste povinni zajistit aby byl vypnutý Spotřebič nepoužívejte má li poškozenou zástrčku či kabel je sám poškozen funguje nesprávně spadl nebo je jinak poškozen V takovém případě se informujte u prodejce nebo naší technické podpory Pokud je síťový kabe...

Page 59: ...át Čištění ani údržbu spotřebiče nesmí provádět děti ledaže by přitom byly pod dozorem Pokud spotřebič nepoužíváte nebo nečistíte vypněte jej úplně odpojením zástrčky ze zásuvky Prodlužovací kabely se smí používat pouze v případě že síťové napětí viz typový štítek a výkon jsou stejné nebo vyšší než u přístroje Vždy používejte schválené prodlužovací kabely Spotřebič kabel nebo zástrčku nikdy nenořt...

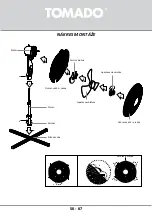
Page 60: ...MONTÁŽNÍ VÝKRES CS 60 4 5 6 7 1 2 3 Ochranný koš přední Ochranný koš zadní Lopatka ventilátoru Pojistný kroužek Upevňovací uzávěr Motor Stojan Křížová patka a d d d d d c šroub a matice Šrouby b ...

Page 61: ...cího uzávěru Utáhněte upevňovací uzávěr doleva proti směru hodinových ručiček 7 Umístěte přední ochranný koš na ventilátor a zajistěte ho svorkami na zadním ochranném koši Zarovnejte přední ochranný koš se zadním ochranným košem pomocí polohovací svorky c na dně abyste oba díly upevnili k sobě Přišroubujte koše nahoře pomocí šroubu a matice k sobě Svorky d stlačte dolů abyste k sobě připevnili pře...

Page 62: ...olky Oscilace Tento ventilátor může oscilovat naklápět se doleva a doprava pro lepší přesun vzduchu Pokud chcete změnit směr větru nahoru nebo dolů můžete snadno pohybovat hlavou ventilátoru nahoru nebo dolů Stisknutím oscilačního kolíku bude ventilátor oscilovat Pokud chcete oscilaci zastavit vytáhněte kolík opět ven oscilační kolík naklonění ručně Nastavení výšky stojanu obsluha Nastavení výšky ...

Page 63: ...né agresivní nebo abrazivní čisticí prostředky Ventilátor nikdy neponořujte do vody nebo jiné kapaliny Tento symbol znamená že výrobek nesmí být likvidován společně s běžným domovním odpadem 2012 19 EU Při odděleném sběru elektrických a elektronických výrobků se řiďte příslušnými předpisy vaší země Správná likvidace výrobku zabrání negativním dopadům na životní prostředí a lidské zdraví Obalový ma...

Page 64: ... ako sú závesy uteráky bavlnené alebo papierové atď Spotrebič vždy umiestnite na plochý a rovný povrch Spotrebič používajte výlučne v interiéri Zapnutý spotrebič nikdy nenechávajte bez dozoru Ak chcete spotrebič premiestniť zabezpečte aby bol vypnutý Spotrebič nepoužívajte ak je poškodená zástrčka kábel alebo samotný spotrebič Tiež ho nepoužívajte ak viac nefunguje správne spadol resp vykazuje iné...

Page 65: ...č používať deti od veku 8 rokov a osoby so zníženými fyzickými zmyslovými alebo mentálnymi schopnosťami ako aj osoby bez skúseností alebo potrebných znalostí Deti sa nesmú so spotrebičom hrať Deti smú spotrebič čistiť alebo vykonávať jeho údržbu len pod zodpovedajúcim dozorom Ak spotrebič nepoužívate alebo ho čistíte úplne ho vypnite tak že zástrčku vytiahnete zo zásuvky Predlžovacie káble smiete ...

Page 66: ...vnym spôsobom nie je pri prípadných poruchách možné požadovať náhradu škody a zaniká platnosť záruky Ak sa rozhodnete spotrebič pre poruchu viac nepoužívať odporúčame vám aby ste po vytiahnutí zástrčky z nástennej zásuvky odrezali kábel SK 66 ...

Page 67: ...NÁKRES MONTÁŽE SK 67 4 5 6 7 1 2 3 Ochranný kôš predný Ochranný kôš zadný Lopatky ventilátora Poistný krúžok Upevňovacia skrutka Motor Stojan Krížová noha a d d d d d c skrutka a matica Skrutky b ...

Page 68: ...tiahnite smerom doľava proti smeru hodinových ručičiek 7 Priložte na ventilátor predný diel ochranného koša a upevnite ho svorkami o zadný diel ochranného koša Predný diel ochranného koša umiestnite zarovno so zadným dielom ochranného koša pomocou polohovacej svorky c nachádzajúcej sa v spodnej časti aby sa oba diely dali k sebe správne pripevniť Pomocou skrutky a matice zmontujte vrchnú časť oboc...

Page 69: ...nuje funkciou oscilácie otáčanie doľava a doprava ktorá zabezpečuje lepšiu distribúciu vzduchu Ak chcete upraviť smer prúdenia vzduchu nahor alebo nadol jednoducho nakloňte hlavu ventilátora nahor alebo nadol Stlačte kolík oscilácie ak chcete aby ventilátor osciloval Na zastavenie oscilácie kolík opäť vytiahnite kolík oscilácie ručné nakláňanie Nastavenie výšky stojana obsluha Nastavenie výšky sto...

Page 70: ...oužívajte agresívne ani abrazívne čistiace prostriedky Ventilátor nikdy neponárajte do vody alebo inej tekutiny Tento symbol znamená že výrobok nesmie byť likvidovaný spoločne s bežným domovým odpadom 2012 19 EÚ Pri oddelenom zbere elektrických a elektronických výrobkov sa riaďte príslušnými predpismi svojho štátu Správna likvidácia výrobku zabráni negatívnym dopadom na životné prostredie a ľudské...

Page 71: ...stimmung mit den Anweisungen in der Gebrauchsanleitung und für den Zweck für den es hergestellt wurde verwendet wird Darüber hinaus muss der originale Kaufbeleg mit Kaufdatum Namen des Einzelhändlers und Artikelnummer des Produkts vorgelegt werden Die ausführlichen Garantiebestimmungen finden Sie auf unserer Webseite www tomado com support GARANTIEBESTIMMUNGEN DE Rendez vous sur www tomado com sup...

Page 72: ...AMAWIANIE AKCESORIÓW Ten produkt jest objęty 24 miesięczną gwarancją Gwarancja jest ważna kiedy użytkuje się produkt zgodnie z instrukcją obsługi oraz zgodnie z przeznaczeniem Oprócz tego należy przy tym przedłożyć dowód zakupu z widoczną datą zakupu nazwą sprzedawcy detalicznego oraz numerem artykułu dotyczącego produktu Szczegółowe warunki gwarancji można znaleźć na naszej stronie internetowej p...

Page 73: ...73 ...

Page 74: ...74 ...

Page 75: ...75 ...

Page 76: ...nd Druckfehler vorbehalten Sous réserve de modification Modifications and printing errors reserved Sujeto a cambios y errores de impresión Con riserva di modifiche ed errori di stampa Der tages forbehold for ændringer og trykfejl Zastrzega się prawo do zmian i błędów w druku Změny a tiskové chyby vyhrazeny Zmeny a tlačové chyby sú vyhradené TFS4005B 01 0420 TFS4005B ...

Reviews: