background image


26


7.  Installing Model Software 

*This procedure is for installing Model Software which is included in the CD. Latest Model Software is 

available on Tohatsu Distributor web site. Please ask about detail to your distributor. 


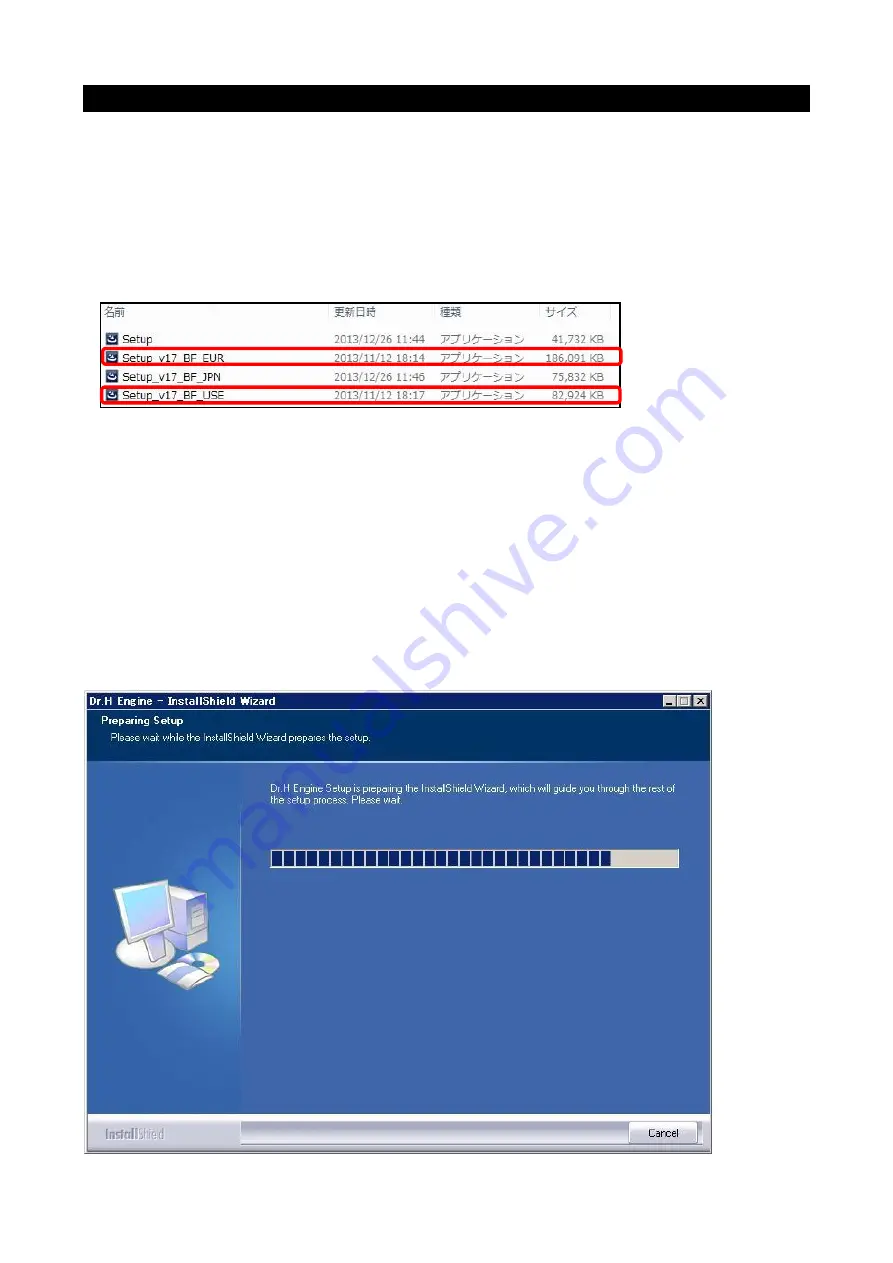
1.  Insert the software CD into the disk drive.   

2.  Double click 

“Setup_vXX_BF_EUR” or “Setup_vXX_BF_USE”. 

*EUR: European countries and the other 


*USE: United states 


3.  When the following message is displayed, wait a few moments. 


Summary of Contents for Dr. H

Page 1: ...1 User Manual ...

Page 2: ... 7 and Windows 8 13 5 2 2 How to set Sleep after and Hibernate after 15 6 Installing Base Software 21 7 Installing Model Software 26 8 USB driver installation 29 9 Communication unit settings 31 10 Connecting to products 32 11 Failure diagnosis 40 11 1 DTC 40 11 2 All history 41 11 3 Data list 42 Data list Procedures 43 Data list Sub windows function 44 Graph display function 45 Snapshot function ...

Page 3: ... what is written in sections with the mark displayed below and in the Warning and Caution sections The mark displayed below is to ensure the proper usage of this product to prevent the unlikely occurrence of faults or damage Danger Failure to follow these instructions may result in death or serious injury Warning There is a possibility of death or serious injury should these instructions not be fo...

Page 4: ... been firmly wrung Do not use organic solvents such as alcohol This may cause warping or discoloration The case satisfies IP65 regulations However it is not guaranteed to be waterproof Handling the AC adapter optional item Using an AC adapter outside the voltage range of 100 240V could result in fire or electric shock Connect the plug securely and fully into the socket When removing the plug from ...

Page 5: ...tion for making line graphs Snapshot Possible to record the existent values for items on the data list Simple diagnosis A mode that enables a simple diagnosis Function test Automatically runs each device to enable its condition to be tested Outboard Download PC Extension Harness Basic software Model software Tohatsu distributor Web site Latest model software available When the model software is up...

Page 6: ...ent Water free dirt free etc locations Input specifications Input voltage 5V Current 100mA Name and address of suppliers Tohastsu corp 3 5 4 Azusawa Itabashi ku Tokyo 174 0051 Japan 3 Compatible models BFT250A BFT90A BFT225A BFT75A BFT200A BFT60A BFT150A BFW60A BFT115A As of April 2015 Some models may not be sold depending on the region ...

Page 7: ...ware Model software User manual included 3 Instructions 4 Extension harness DLC cable extension Should the position of the marking for the waterproof case connector become misaligned realign using the specified torque value Failure to do so can result in water or dirt getting inside Tightening torque For USB cable 2 0N m 0 20kgfm Tightening torque On DLC panel 0 55N m 0 55kgfm ...

Page 8: ...gher Memory 512 MB RAM or higher Port USB port Disk device CD ROM drive Free space in hard disk 1 GB free space Display 1024 x 768 or 1280 x 1024 resolution The memory capacity and free space on the hard disk will vary between PCs Using models with only a small amount of free hard disk space can lead to deficient memory or similar memory problems Operations may be different depending on the model ...

Page 9: ...mory and free space on the hard disk 1 In the case of Windows 7 1 Right click on the start button and select Open Windows Explore If the My Computer icon is already on the desktop click this 2 Click Computer to check the free space on the hard disk Free space ...

Page 10: ...10 3 Click System properties to confirm your PC s operating environment OS CPU Memory ...

Page 11: ...11 2 In the case of Windows 8 1 Right click on the start button and select File Explore to check the free space on the hard disk Free space ...

Page 12: ...12 2 Right click on the start button and select System to confirm your PC s operating environment OS CPU Memory ...

Page 13: ...programs when installing If the PC s screen saver is activated or other applications are operating during the software installation the installation may fail and defects may appear when Dr H is run 5 2 1 Stopping the screen saver In cases of Windows 7 and Windows 8 Right click on the desktop select Personalize and click Screen Saver Communications unit settings Installing model software USB driver...

Page 14: ...tes the explanation for stopping the screen saver Proceed to the remaining steps Communications unit settings Installing base software System sleep hibernate Confirming PC environment Stopping screensaver Installing model software USB driver ...

Page 15: ...set Sleep after and Hibernate after Set the PC so that the PC does not sleep or hibernate when the Dr H application software is starting up 1 In the case of Windows 7 1 Select Start Control Panel 2 Click Power Options ...

Page 16: ...16 3 Click Change when the computer sleeps 4 Click Change advanced power settings ...

Page 17: ...17 5 Double click Sleep after Click On battery and Plugged in click the arrow and then click Never 6 Double click Hibernate after Click On battery and Plugged in click the arrow and then click Never ...

Page 18: ...18 2 In the case of Windows 8 1 Right click on the start button and select Power Options 2 Click Change when the computer sleeps ...

Page 19: ...19 3 Click Change advanced power settings 4 Double click Sleep after Click On battery and Plugged in click the arrow and then click Never ...

Page 20: ...then click Never This completes the explanation for the settings for system sleep and hibernate Proceed to the remaining steps Communications unit settings Installing model software USB driver Installing base software System sleep hibernate Confirming PC environment Stopping screensaver ...

Page 21: ...e Software Read included CD and install by following procedure 1 Double click Software folder 2 Double click Setup 3 When the following message appears select your preferred language from the pull down menu then click OK ...

Page 22: ...22 4 A message is displayed telling you that the system is preparing to begin installation Wait for a few moments 5 Click Next N on the screen telling you that installation is about to start ...

Page 23: ...the contents carefully Click Yes 7 Click the checkbox for the language option you will be using then click Next N Language options It is possible to choose languages other than the main language Select language which you use It s possible to select plurality ...

Page 24: ...name and store code then click Next N The store information you have put in will be printed on the diagnostic results 9 Wait for a few moments until installation is complete Dealer Your company s name Dealer No Phone number ...

Page 25: ...s been installed it continues on to commence installation of the USB drive When this message is displayed click Cancel Communications unit settings Installing model software USB driver Installing base software System sleep hibernate Confirming PC environment Stopping screensaver ...

Page 26: ...Model Software is available on Tohatsu Distributor web site Please ask about detail to your distributor 1 Insert the software CD into the disk drive 2 Double click Setup_vXX_BF_EUR or Setup_vXX_BF_USE EUR European countries and the other USE United states 3 When the following message is displayed wait a few moments ...

Page 27: ...27 4 Click Next N 5 When the following message is displayed wait a few moments ...

Page 28: ...sh F 7 A message is displayed telling you that the model software setup is in progress When the setup is complete the message will disappear automatically This completes the instructions for installing model software ...

Page 29: ...ver installation When the model software has been installed it continues on to commence installation of the USB driver When the screen shown below appears click Next When the screen shown below appears click Finish ...

Page 30: ...mpletes the instructions for installing USB driver Communications unit settings Installing model software USB driver Installing base software System sleep hibernate Stopping screensaver Confirming PC environment ...

Page 31: ...ication unit to the PC The software will be installed automatically Dr H start up can be prepared in this way Communications unit settings Installing model software USB driver Installing base software System sleep hibernate Confirming PC environment Stopping screensaver ...

Page 32: ...it DLC cable to the product s DLC The outboard motor DLC has a red connector DLCs other than for outboard motors have a blue connector 2 Turn on the ignition switch on the products 3 Double click the Dr H icon on the desktop and start up Dr H DLC Outboard motor ...

Page 33: ...33 4 The Dr H window opens up When the cursor is placed over the picture of the model it is possible to see which models have the Dr H model software installed 5 Click Start Communication ...

Page 34: ...BF60A BFP60A BFT75A BF75DK3 BFT90A BF90DK4 BFT115A BF115D BFT150A BF150A4 BF150AK0 BFT200A BF200AK3 BFT225A BF225AK3 BFT250A BF250A 2 Enter type 3 Enter serial number Frame number or engine number 4 Enter name and address of client 5 Click OK This information is saved in a file and is used in printouts indicates an obligatory item 1 2 3 4 5 ...

Page 35: ...35 7 Check that there are no problems with the confirm items window that follows and click OK 8 When the communication is successful an image of the product appears ...

Page 36: ...mmunication fails the following window is displayed The communication port setting shows No USB Connection 10 Check the communication port by following these steps Select communication setting and click Com port setting ...

Page 37: ...er on the pull down menu In the example the COM number is only COM3 so it has not increased Click Cancel 12 After canceling check the COM number with the USB cable inserted into the PC In the example it has increased to COM4 Click OK 13 In the next window check that the COM number has increased ...

Page 38: ...38 14 When the product is not turned on the red LED light on the communication unit flashes and the following message is displayed Click OK The following window appears The mark flashes ...

Page 39: ... properly connected Make sure that the cable connection has not come out and that the connector is fully attached 15 When the Communication is successful the red LED light on the communication unit goes off and the green LED light comes on When a picture of the products is shown click Next ...

Page 40: ...enews DTC from ECU inspection 2 DTC window Displays DTC from ECU inspection 3 Information window Displays the presumed cause of failure in the DTC selected in the DTC window 4 DTC details window Displays detailed information for DTC selected in DTC window Irregular signals are highlighted in yellow Sometimes there is no detailed information depending on the DTC 5 This is a link for troubleshooting...

Page 41: ...st recent history from the left 1 Reading button Displays and renews entire DTC histories saved in the ECU 2 DTC history window Displays DTC history starting with the most recent Highlights selected DTC histories 3 DTC details window Displays detailed information for the DTC selected in the DTC window Irregular signals are highlighted in yellow 1 2 3 ...

Page 42: ...h Also has a snapshot function 1 Start Communication Start Communication display data 2 Settings Set up snapshot graph display 3 ECM reset Delete ECU s ECM value 4 Start snapshot Record and save data list s Communication data 5 Graph Display Communication data graph 6 Parameter window Display signal information for sensors switches etc 1 2 3 4 5 6 ...

Page 43: ...cation button switches to Stop Communication Click the button again to stop the Communication The parameter window shows separate signals for sensors switches time information etc Irregular signals are highlighted in yellow 2 The units for the signals can be changed using the signal dropdown box 1 2 ...

Page 44: ... data list simultaneously in a separate window From the window menu select 1 sub window and then 2 data list In Example the data list and DTC are displayed in two windows In this example it is possible to check for irregular data by checking the data list as the DTC appear 2 1 ...

Page 45: ...tion before making changes to the Graph settings then click Communication Start button again Using this function time can be seen in conjunction with the changing value of variable data 1 Click on Graph 2 The graph window is displayed Click on Settings 1 2 ...

Page 46: ...you want for the graph 4 You can change the scale of the graph You can change the maximum value and minimum value Click on the variable box to highlight it Enter the value you wish to set Graph Put in a tick for each parameter you wish to display It is possible to display 6 parameters 6 parameters will appear at once 3 4 4 ...

Page 47: ...ssible to change the graph color style and width and place a marker in the graph When you click on the line the window for choosing line types is displayed Line types window_Changing style Select the line style from the dropdown menu ...

Page 48: ...lor Select the line color from the checkbox Line types window_Changing weight Select the line weight from the dropdown menu Line types window_Setting marker It is possible to choose whether to have markers or not and to set the style ...

Page 49: ...49 Example The set parameters are in the lower section of the window It is possible to confirm the line type and marker settings in the graph legend ...

Page 50: ...rameter trigger The initial setting is for a 30 second recording after the manual trigger 1 Click Communication Start 2 Click Start Snapshot When the Start Snapshot button is clicked the button s name changes to End Snapshot If the button is clicked twice the snapshot will be stopped so make sure to wait until the snapshot has ended When the snapshot is finished the following message appears Click...

Page 51: ...he parameters set for the standard trigger value are exceeded the recording starts DTC When a DTC appears the recording starts 4 Click on a trigger type box to select the trigger type 5 Total time Set data recording time Initial setting is for 30 seconds Enter desired value Enter seconds units For the BF225 when all parameters are selected and 30 seconds recorded it amounts to around 100 Kilobytes...

Page 52: ...eed has been selected in this sample window Next decide the trigger value for the watch parameter Enter the desired value into the Trigger value box using the PC keyboard 3000 rpm has been entered in the sample window 3000 rpm is now the standard trigger value Next set the trigger conditions box to a value above or below the standard value ...

Page 53: ...ng function This function makes it possible to shorten the sampling time by reducing the amount of data to be read Click the checkbox for Log in Check All in the next screen When the Log checkbox is clicked the ticks disappear from the parameters ...

Page 54: ...54 When ON is clicked for the high speed sampling the following appears The initial setting is for the two upper parameters When you want to save a parameter click on the Log checkbox ...

Page 55: ...ngs is clicked the following window is displayed Enter the required name in the name box The initial setting is to display Setting 1 When Load settings is clicked the following message appears The saved name is shown in the profile list When the name shown in the profile list is selected it is possible to record the snapshot under the same conditions that were used with this name 1 2 ...

Page 56: ...56 ECU reset function Click ECM Reset Delete ECM value When the following message appears click Yes to execute it ...

Page 57: ...ing periodic inspections and to provide information to clients in the form of reports 1 When the Read button is clicked the data is displayed to the right of the screen 2 You can enter the purchase date The initial setting is for the current date 2 Change this to the purchase date using the calendar function 1 2 ...

Page 58: ... Make Service Report button 3 to compile the service report The following Service Report message appears Select No when using for first time 4 You can choose the fonts and letter sizes to be used when writing the comments Check Save In Excel check box if you want to save Service Report in excel file 5 3 4 ...

Page 59: ...ge into the report click the Insert Image button 6 2 The image file is read when the Insert Image button is clicked 7 The Open File screen is displayed When the image is selected click Open Make sure you have already prepared the image 6 7 8 ...

Page 60: ...ng comments and inserting images click OK 7 The following profile list is displayed Enter name if desired It is possible to save the setting for the image and the comments that were entered Click OK Print image window comes up ...

Page 61: ...61 8 This is the print preview window 9 Save As window opens when you check Save In Excel check box ...

Page 62: ...the left area of the screen The test items are different for each model There is an explanation of each selected test item in the right area of the screen To perform the test items click the Execute button in the lower right hand corner of the screen A function test is performed to check the operation for each product device ...

Page 63: ...low you to configure Engine Instance for multiple engines The configuration is not required for a single engine Device Configuration tab is deactivated when ECM does not support this mode Clicking Reading Button will display the stored signal value ...

Page 64: ...ocedures Device Configuration Procedures Dealer Name and Dealer Code are the values entered by the user while installing the Dr H application Select signals to be changed and change the value if needed Select Engine Instance Number to be changed in drop down selection boxes ...

Page 65: ...r 7 digit Dr H Serial Number Enter 7 digit Frame Number Set the date using the calendar Once all selections have been made an Execute button will be available Click Execute button to change the device configuration ...

Page 66: ...66 Please do not turn off the combination switch Ignition Switch during configuration Clicking Reading Button will display the changed signal value ...

Page 67: ... memory for 3 seconds before and for 1 second after the trigger occurs Onboard Snapshot tab is deactivated when ECM does not support this mode Onboard Snapshot data is cleared when DTC is cleared Clicking Reading Button will display the stored data Irregular signals are highlighted in yellow The link for troubleshooting and the graph display function are also available ...

Page 68: ... This mode will allow you to set the maintenance notification for the periodical maintenance Maintenance Notification Setting tab is deactivated when ECM does not support this mode Clicking Reading Button will display the stored signal value ...

Page 69: ...69 Select signals to be set and click Execute button Please do not turn off the combination switch Ignition Switch during setting ...

Page 70: ...70 Clicking Reading Button will display the signal value ...

Page 71: ...t on the PC using a specific USB cable Operations functions related Q Which models are compatible with Dr H A When Dr H is started up the names of the installed models for each category are displayed in the start window Q How can the software version be checked A When Dr H is started up this can be seen at the bottom of the start screen Q Cannot communicate with the product A Setup the COM port A ...

Page 72: ...hat calculates electric signals input from each sensor in a microcomputer and outputs those electric signals to each type of actuator through an output processing circuit Function test Operates each device automatically in order to conduct tests Outboard motor only Installation Installing setting up software in a PC for actual use Interface unit A linking component connecting PC and products Simpl...

Reviews: