


7.
Run Tobii Studio and setup your test by using the scene camera feature. For details about how to connect the eye tracker
in Tobii Studio and further instructions on using Tobii Studio, please refer to the Tobii Studio documentation available on
www.tobii.com
.
6.4
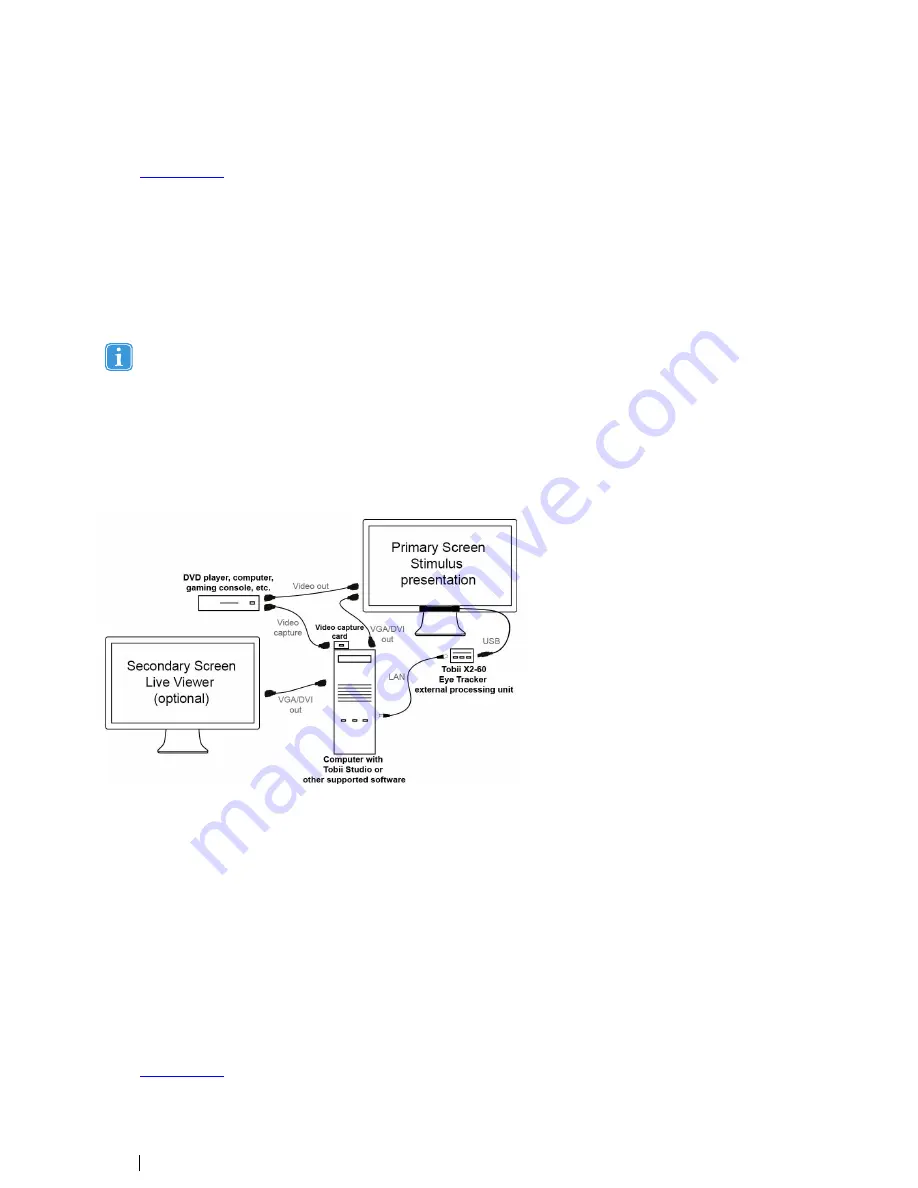
External Video Stimulus Recording
The stimulus presented on the screen is generated by an external device such as a DVD player, computer or gaming console.
This setup is suitable when using a Tobii Eye Tracking system for eye tracking data analysis when the stimulus is presented from
a separate computer or other RGB or VGA sources. This could include a computer game, a DVD player, or when stimulus is pre-
sented on a computer running a different operating system. The computer running Tobii Studio must be equipped with an addi-
tional video capture card.
Note that if the external application runs on the Windows operating system and it does not use 3D graphics accelera-
tion or it does not have a high processor load and high memory usage, it may be more suitable and less complex to run
this on the same computer as Tobii Studio and use the Screen Recording option in Tobii Studio instead.
For this setup, the image from the Tobii Studio computer has to be displayed on the screen during calibration (to display the cali-
bration points). The external stimulus computer, however, should be shown on the screen during the actual test. Both devices
must therefore be connected to the same screen. To switch between the inputs, use a switch or a screen that allows for multiple
input sources. The image shown on the screen must be sent to Tobii Studio to record the video stream and synchronize it with
the gaze data. If the stimulus is presented from an analogue video source, e.g., a VCR or an analogue video camera, a similar set-
up with slightly modified components can be used.
To configure this type of setup:
1.
Mount the eye tracker on the screen as instructed in
4.2.1 Mounting the Tobii X2 Eye Tracker to a Screen, page 6.
2.
Connect the eye tracker USB to the Tobii X2
–
60 external processing unit as instructed in section
4.3 Connecting the To-
bii X2-60 Eye Tracker external processing unit, page 9
3.
Connect the screens to the computer via VGA/DVI.
4.
Connect your external device used for generating the stimuli (DVD player, gaming console, etc.) to the video capture card
attached to the eye tracking computer and to the primary screen that is used for stimuli presentation.
5.
Run the Tobii Eye Tracker Installer and connect the external processing unit Ethernet cable to your computer. For instruc-
tions, please read
4.4 Tobii Eye Tracker Installer, page 9.
6.
When positioning the participant in front of the eye tracker, make sure to take into consideration the guidelines in section
5 Positioning.
7.
Run Tobii Studio and setup your test by using the external video feature. For details about how to connect the eye tracker
in Tobii Studio and further instructions on using Tobii Studio, please refer to the Tobii Studio documentation available on
www.tobii.com
.
24
6 Typical Setups
Tobii X2-60 Eye Tracker User
’
s manual v.1.0.3 - en-US


