


10
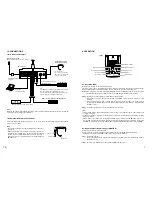
10. CONNECTIONS
10.1. Connection Example
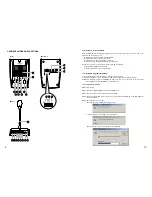
10.2. External Microphone Connections
MIC IN
EXT
LINE
OUT
USB
H
C
E
LINE OUT
BUSY
DC IN 24V 200mA
PC
USB cable
(supplied with unit)
[PM-20EV Rear]
To AC mains, 50/60 Hz
(When operating unit on AC power supply)
AD-246 AC adapter
(optional)
Unbalanced-phone plug cord
(supplied with unit)
* To avoid unit failure,
do not connect any equipment
other than the WH-4000A
microphone to this terminal.
Tip
The LINE OUT terminal on the terminal block outputs
the same signal as the LINE OUT phone jack.
It is recommended that the terminal block terminal be
used for permanent installation applications.
Power amplifier
Headset microphone
WH-4000A (optional)*
(When operating unit on DC power supply)
24 V DC
power supply
Remote control input of power amplifier, etc.
Note
When the AC adapter input terminal and the DC Power Input terminal are simultaneously used, the terminal
receiving the higher voltage takes precedence.
An optional WH-4000A headset microphone can be connected to the External microphone input terminal
located on the rear panel.
Notes
• Connecting the external microphone disables the unit's built-in
microphone.
• When using the WH-4000A headset microphone, position the
microphone set approximately 1 cm away from the mouth and
speak a bit louder. The WH-4000A microphone is fitted with a
plug lock, however a corresponding lock is not included with the
PM-20EV unit.
Plug lock
Microphone
ø3.5 mm
7
8. OPERATION
Sound Repeater
PM-20EV
REC
MONITOR
PLAY
USB
TALK
[Top]
Record Key
Monitor Key
Monitor Indicator
Playback Key
Playback Indicator
Talk Key
Talk Indicator
Monitor Speaker
Recording Indicator
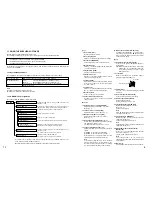
8.1. Recording (REC)
Messages are recorded on the internal flash memory.
The total recording time is approximately 3 minutes, including chime plays. Because the recording circuitry
features automatic gain control (AGC) function, the recording level does not need to be adjusted.
Note:
Chime tones are not recorded if the Chime setting switch is set to the OFF position. However, the chime
tones will still sound during recordings in order to precisely indicate the timing of the recording.
Step 1.
Press the Record key until the recording indicator begins to flash.
After indicator operation changes from flashing to steady ON, speak into the microphone to start
recording.
(The indicator begins to flash 1 second after the key is pressed. A chime tone sounds several
seconds after the indicator begins to flash, and the indicator switches from flashing to steady ON after
the chime sounds.)
Step 2.
To stop the recording, press the corresponding Record key again.
Tips
• The Recording indicator begins flashing when only 5 seconds of recording time remain, and continues until
recording is complete.
• To delete the recorded contents, press the Record key, then press the Record key again while the recording
indicator is flashing.
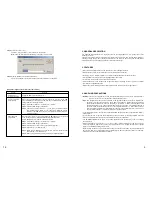
• Sample chime tones contained in the supplied CD-ROM can be transferred to the PM-20EV for use. It is
also possible to back up the messages using the data transfer software program contained in the supplied
CD-ROM. For details, please read the "EV20 Software Instruction Manual.pdf" file located on the CD-ROM.
8.2. Monitoring Recorded Messages (MONITOR)
Step 1.
Press the Monitor key.
The monitor indicator mode changes from flashing to steady ON, and the recorded message is played
back for monitoring.
Step 2.
To stop monitor playback, press the corresponding Monitor key again.
Recorded contents can be easily monitored.
Recorded messages are heard through only the unit's monitor speaker during monitoring operation.
This playback is not delivered through the Busy output and Line output terminals.