background image

7

2. Mount the optional camera mounting bracket to a ceiling or wall. 

Using an electrical box, fix the camera mounting bracket with its supplied screws. Run the coaxial cable
through the hole in the bracket. 

3. Set the camera mounting bracket securely in the threaded hole in the camera mount rotating the bracket’s

pedestal.

Notes
• The camera mount can be mounted to both the top and bottom of the camera. Attach the bracket to either

side depending on installation conditions. 

• Use the camera mount fixing screw to attach or detach the camera mount. 

4. Set the camera orientation, and secure the camera. 

After setting the camera orientation, rotate the lock lever to secure the camera. 

12V

24V

+

-

IRIS

L

H

OFF

ON

VIDEO OUT

FOUCUS ADJ
BLC
SHUTTER

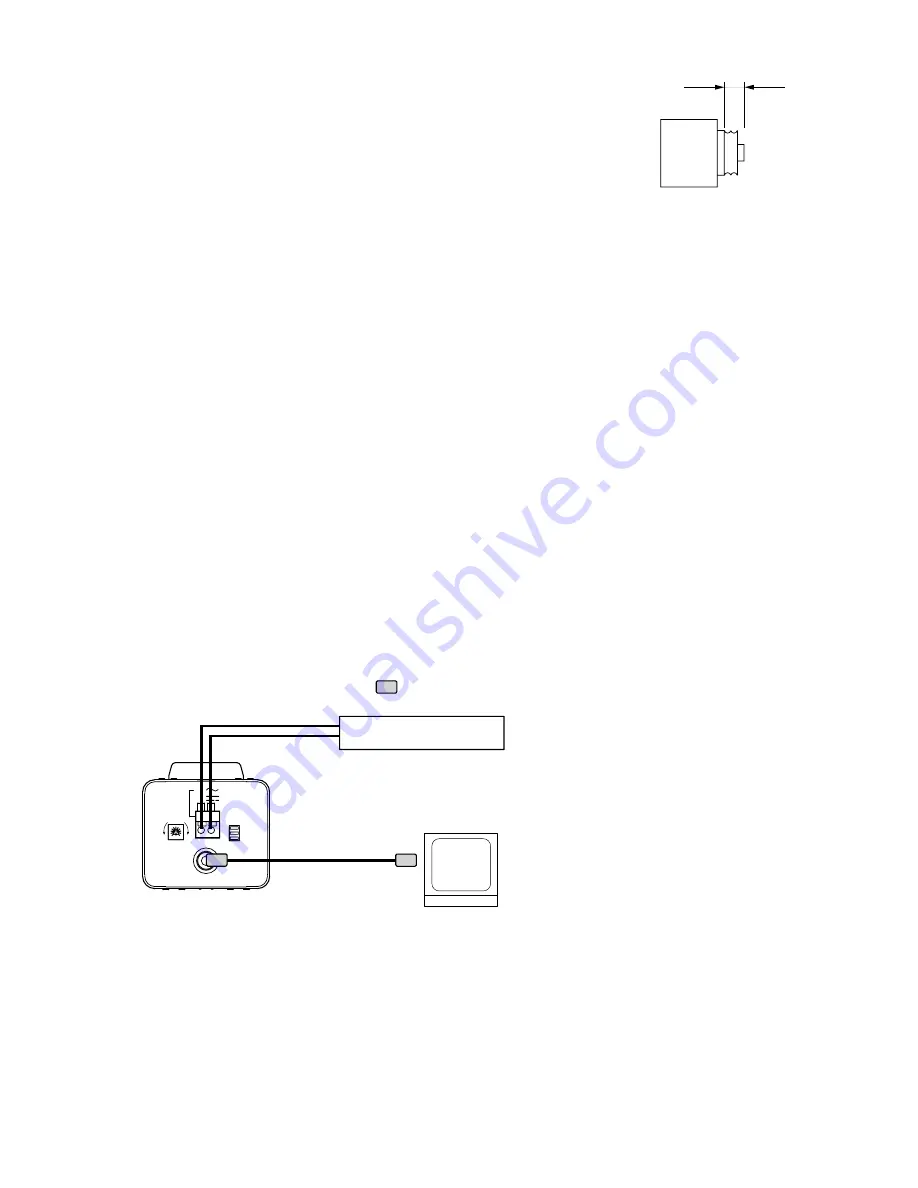
Video output

: BNC plug

24 V AC or 12 V DC

Use the external power supply unit of the following rating when the camera is operated on 12 V DC.
  12 V DC, over 1.0 A

Monitor

Video input

6. CONNECTIONS

Note: If the Video output is not terminated at 75 

, video pictures are not properly displayed. Make sure that

the output has been terminated at 75 

at the connected monitor or switcher.

Notes

• To avoid damaging the internal sections of the camera's lens mount, be sure

that the lens flange is less than 5 mm thick as illustrated on the right. 

• C-mount lenses must be used in conjunction with the Lens Mounting Adapter

CF-5 (optional).

• When used 1/3 type lens, an angle of view becomes narrow.

Lens

Under 5 mm

Summary of Contents for C-CV14-CS

Page 1: ...RA C CV14 CS NTSC C CV14 CS PAL INSTRUCTION MANUAL Thank you for purchasing TOA s Color Camera Please carefully follow the instructions in this manual in order to ensure long trouble free use of your color camera ...

Page 2: ...TIONS 4 4 NOMENCLATURE 5 5 INSTALLATION 6 6 CONNECTIONS 7 7 ADJUSTMENT 8 8 ABOUT THE MODE SETTING SWITCH 8 1 Adjustment Switch 9 8 2 Backlight Compensation Switch 9 8 3 Shutter Speed Switch 9 9 IF YOU THINK THERE IS A FAILURE TROUBLESHOOTING 10 10 SPECIFICATIONS 11 Optional Products 11 ...

Page 3: ...k may result If you detect smoke or a strange smell coming from the unit If water or a foreign object enters the unit If the unit falls or the unit case breaks If the power supply cord is damaged exposure of core or disconnection If no image is displayed on the screen Do not open nor modify the unit s case to prevent a fire or electric shock because there are high voltage components inside the uni...

Page 4: ...the security aspects of this product UL has only tested for fire shock or casualties as outlined in UL s Standard s for Safety UL Certification does not cover the performance or reliability of the security hardware and security operating software UL MAKES NO REPRESENTATIONS WARRANTIES OR CERTIFICATIONS WHATSOEVER REGARDING THE PERFORMANCE OR RELIABILITY OF ANY SECURITY RELATED FUNCTIONS OF THIS PR...

Page 5: ...cal length adjustment ring 6 Power input terminal 24 V AC or 12 V DC 7 Iris control 8 Video output terminal BNC 9 Mode setting switch 10 Camera mount fixing hole Note Fixing holes 10 are provided in both the top and bottom panels 12V 24V IRIS L H OFF ON VIDEO OUT FOUCUS ADJ BLC SHUTTER 1 2 3 4 5 6 7 8 9 10 4 NOMENCLATURE ...

Page 6: ...nit and the mounting bracket Doing otherwise may result in the unit falling down and causing personal injury WARNING Lens Optional Connector from the lens Lens connector 1 Attach the lens to the camera Insert the lens into the camera s lens mount and rotate to full stop Connect the connector from the lens to the lens connector Note DC drive type lenses can be used however Video type lenses cannot ...

Page 7: ... camera orientation rotate the lock lever to secure the camera 12V 24V IRIS L H OFF ON VIDEO OUT FOUCUS ADJ BLC SHUTTER Video output BNC plug 24 V AC or 12 V DC Use the external power supply unit of the following rating when the camera is operated on 12 V DC 12 V DC over 1 0 A Monitor Video input 6 CONNECTIONS Note If the Video output is not terminated at 75 Ω video pictures are not properly displ...

Page 8: ...Notes Since the Iris control for sensitivity adjustment is factory preset to an optimum position for general use avoid tampering with it in normal conditions Turning the control unnecessarily could cause reduced picture quality or equipment failure When the Iris control needs to be readjusted to match a specific subject first set both the Adjustment switch and the Backlight Compensation switch of ...

Page 9: ...ically vary under fluorescent lighting when the Adjustment switch is set to ON 8 2 Backlight Compensation Switch Set this switch so that the subject is not displayed in black when backlit Standard position Set to this position during normal use Backlight Compensation function does not operate when the switch is set to this position Backlight Compensation position when backlit This position prevent...

Page 10: ...nitor Pictures are not clear The color of the picture periodically varies Possible Cause The monitor s power switch is not set to ON Cables are not correctly connected The BNC plug is not correctly soldered Power is not supplied to the camera The lens is not properly focused The lens is dirty Monitor image black level is not correctly adjusted The Adjustment switch is set to the ON position 9 IF Y...

Page 11: ... 1 60 1 100 1 50 1 120 10 C to 50 C Under 90 RH no dew condensation Case Surface treated steel plate light gray paint Front cover Alminum light gray paint 63 4 W x 62 7 H x 102 5 D mm 300 g Model No Power Source Power Consumption Image Device Number of Effective Pixels Scanning System Scanning Frequency Video Output Synchronizing System Resolution S N Ratio Minimum Illumination White Balance Mode ...

Page 12: ...Printed in Vietnam 133 12 881 7D ...

Reviews: