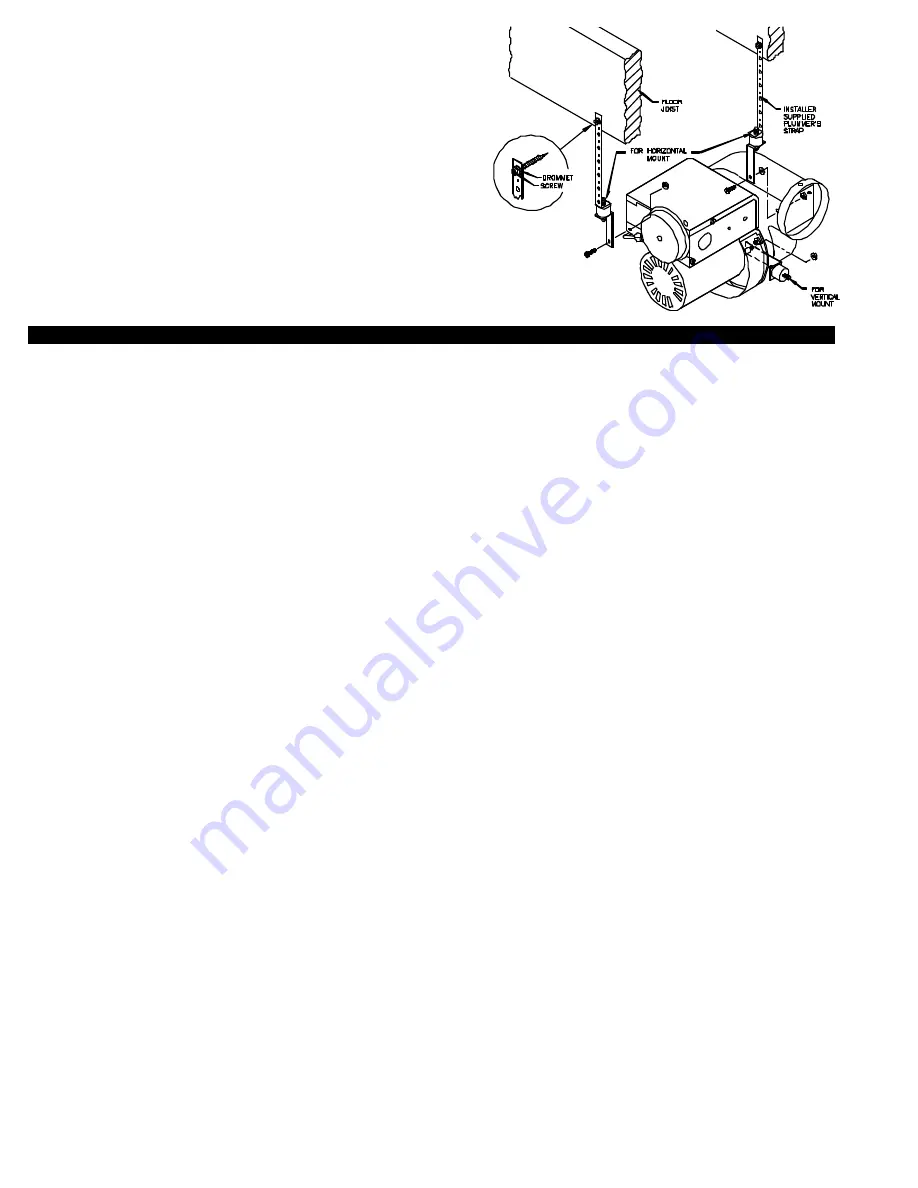
2. To facilitate installation and reduce vibration we have included 2 mounting
brackets, 2 rubber isolaters and 2 rubber grommets. One of the brackets
may be used temporarily as a third hand while positioning it for permanent
installation.
3. When installing the Power Venter for horizontal mount, install one of the
brackets to the electrical box using the nut/screw provided. Install the
other to the damper rod as shown to the right. When installing the Power
Venter for vertical mount, only one bracket is needed. This bracket
should be mounted to the motor as shown to the right. Temporarily
support the Power Venter using wire or a ladder and assemble the mount-
ing brackets,(See Diagram F).
4. Install plumbers strap from the Power Venter to the floor joist,(See
Diagram F).
5. Install 4 inch vent pipe from the Power Venter inlet to the appliance flue
outlet avoiding elbows when possible.
ELECTRICAL WIRING
INSTALLATION RESTRICTIONS
1.The installer must ensure that all electrical connections between the appliance and Power Venter are tight and that all wires are
positioned and secured so they cannot come in contact with high temperature locations. Use adequate conduit supports where
necessary.
2. The installer must ensure that the internal appliance transformer is rated no lower than 40VA..
3. The installer must ensure that the heat anticipator in the comfort thermostat is adjusted according to the thermostat manufacturers
recommendation.
4. All wiring From the Power Venter to the appliance must be appropriate Class 1 wiring as follows: installed in rigid metal conduit,
intermediate metal conduit, rigid non-metallic conduit, electrical metallic tubing Type MI, Type MC Cable, or otherwise be suitably
protected from physical damage.
5. The Fan Proving Switch is not suitable for loads which exceed the limitations below. The electrical contact ratings for the Fan
Proving Switch are as follows:
3 AMPS (full load) at 120VAC; 28VA Pilot Duty (1.16 Amps) at 24VAC; 125VA Pilot Duty at 120VAC
6. All 24V wiring must be at least 18 AWG. All 115V wiring must be at least 14 AWG.
7. All wiring must be in compliance with local codes or in their absence, with the latest Edition of the National Electric Code (NFPA #70).
8. Disconnect 115V power before attempting to wire the Power Venter to the appliance. Power may be disconnected by means of
the appliance circuit breaker/fuse.
GPAK-J/GPAK-1 SEQUENCE OF OPERATION WIRED TO GAS VALVE:
As the thermostat/aquastat senses a need for heat, the internal switch of the thermostat /aquastat will close. The switch closure com-
pletes the 24V electrical circuit to the internal controls of the appliance. Before the 24V signal reaches the appliance gas valve, it is
interrupted by the Power Venter Relay and Fan Proving Switch. When the Power Venter Relay coil receives the 24V signal, the con-
tact side closes completing the 115V circuit to the Power Venter motor. The air movement generated by the Power Venter closes the
Fan Proving Switch and completes the circuit to the appliance gas valve. The appliance gas valve will only receive power when the
appliance thermostat/aquastat is calling for heat and the Power Venter is operating.
GPAK-JT/GPAK-1T SEQUENCE OF OPERATION WIRED TO GAS VALVE:
As the thermostat/aquastat senses a need for heat, the internal switch of the thermostat/aquastat will close. The Switch closure com-
pletes the 24V electrical circuit to the internal controls of the appliance. Before the 24V signal reaches the appliance gas valve, it is
interrupted by the Power Venter Relay/Timer and Fan Proving Switch. When the Power Venter Relay/Timer receives the 24V signal,
the contact side closes completing the 115V circuit to the Power Venter motor. The air movement generated by the Power Venter
closes the Fan Proving Switch and completes the circuit to the appliance gas valve. The appliance gas valve will only receive power
when the appliance thermostat/aquastat is calling for heat and the Power Venter is operating. When the appliance thermostat/aquas-
tat is satisfied, 24V will be discontinued to the Relay/Timer and the Power Venter will continue to operate for a non-adjustable post
purge period of approximately 45 seconds.
NOTES:
While it is impossible to include every possible wiring scenario, the following diagrams represent the most common. If wiring the
GPAK to an appliance not equipped with the controls shown on the following diagrams, determine which terminals of the gas valve
are considered “HOT” and “COMMON” and follow the steps on the bottom of page 8 for GPAK-J/GPAK-1 or page 9 for
GPAK-JT/GPAK-1T.
When wiring Power Venter to the gas valve wire all thermostats, zones, circulators and limits as would normally be done if venting into
a chimney.
NAT
If you are unable to wire the GPAK as outlined in these instructions, call our Customer Service department toll free at 1-800-255-4208
for fast assistance.
7
DIAGRAM F
Summary of Contents for 1
Page 9: ...8 ...
Page 10: ...9 ...
Page 12: ...11 WIRING GPAK JT GPAK 1T WITH THERMOSTAT ...
Page 18: ...17 GPAK 1 GPAK 1T ...


