

!
!
!
!
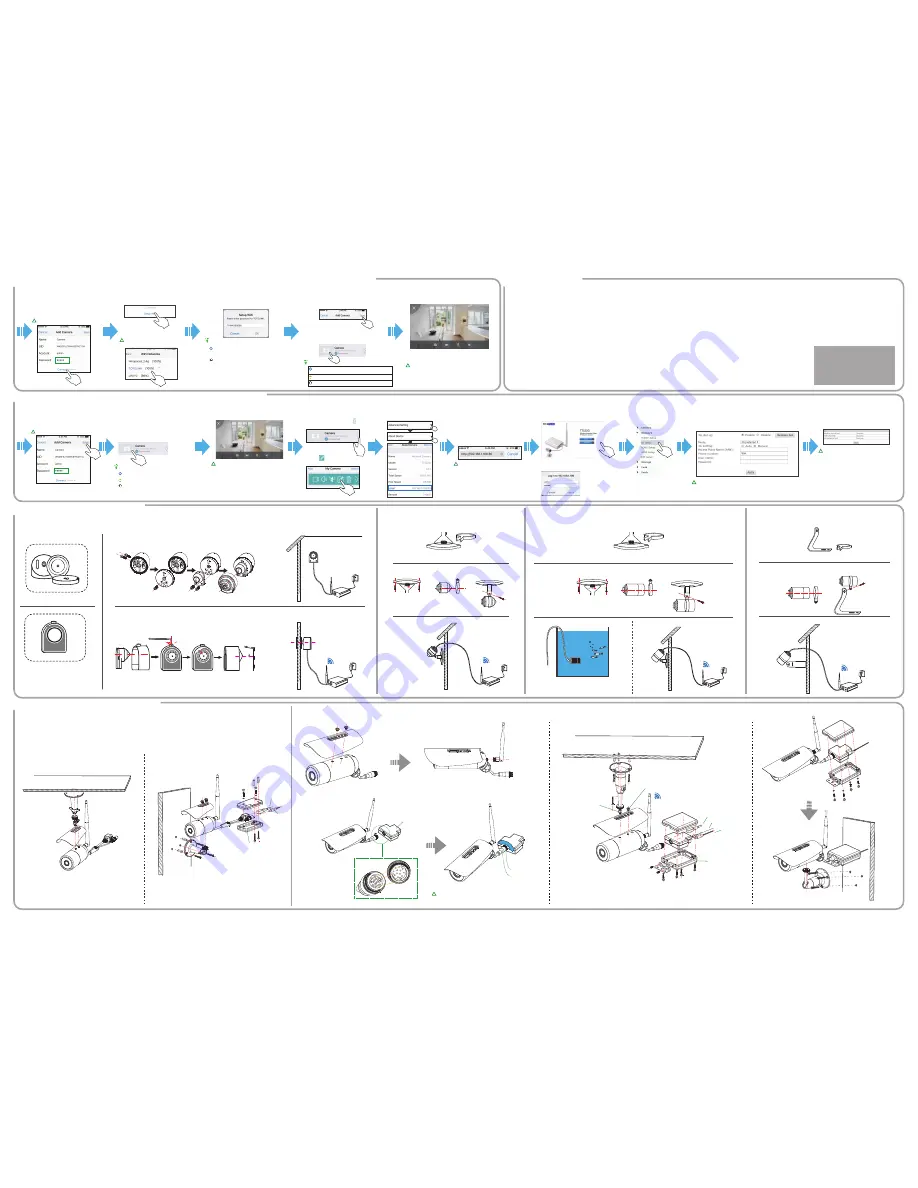
4-3. Quick Setup to Smartphone (For Cellular IP Camera TT52xG / TT8x0G)
4-2. Quick Setup to Smartphone (For WiFi IP Camera TT52xPW / TT6x0W/ TT6x0CW / TT7x0PW / TT7x0LPW)
4-4. The FAQ for Setup
Enter password and tap tap "Save" on the
right top of screen. Your camera is
successfully added to your phone.
The default password is "admin"
#5
Ensure it says "Connected", then tap
the camera the arrow left icon to
wake up the tool bar.
Tap the edit icon to access the
advanced setting page.
#8
Your camera now is listed on Anyscene app. Tap
the camera to view. Now the camera is working
on wired connection mode.
Ensure it says "Connected" or "Online", then tap
the camera to start watching the live footage.
Tips:
#6
You are now ready to watch the camera.
Warning: Don't disconnect the wired
connection between camera to router, or
you will lose the live footage.
Please follow next steps to set up camera to
connect to cellular network.
!
Warning:
The field of Phone number must be entered to *99#.
The 3G dial-up option must be turned on.
!
Warning:
If there is a failed message, please recheck if
your camera has been inserted a 3G SIM card.
And please move the camera nearer to open
areas like windowsill where can receive a good
signal.
#7
Connected / Online. The camera has connected to phone
successfully.
Connecting. The camera is trying to communicate to phone.
Disconnect. The camera lost connection to your phone.
Record the Local URL and type it to a
browser. This browser can be the phone
browser or PC browser.
For example, the local url is
192.168.106:80
Enter it to a browser:
Warning:
The browser can be Firefox, Safari,
Chrome, IE.
If you plan to use PC browser, please
make sure the PC is connected to the
same router.
#10
Go to About Device interface.
#9
You will go to welcome page. Please click
"Setting" button.
Please enter your camera username and password
(Default are both admin) to assigned field.
#11
Browse the right sidebar to
access "3G Setup" page.
#12
Enter your 3G SIM card information here. APN / Username /
Password should be provided by the carrier. The Phone number must
be
*99#
. Next, refer below screenshot to set up the rest of settings.
Then click "Apply" button to save.
#13
Click "Hardware Test" to test both the 3G
module of camera and 3G SIM card to check
if working properly.
You're done. After you disconnect the
Ethernet cable, your camera will be able to
work via cellular network.
#14
!
!
!
Enter password and tap "Connect". If it says
connected, your camera is successfully added to
your phone. If you want camera work on wired
mode, just tap "Save" and ignore next steps.
The default password is "admin"
#5
Tap "Setup WiFi" to setup WiFi connection.
Select the WiFi SSID you own.
Ensure the WiFi strength > 70% and
the WIFI SSID is not 5GHz WiFi.
#6
Enter your WiFi password carefully and note the
case sensitive.
Tips:
The blue dot indicates the camera has set up
WiFi successfully.
The red dot indicates the WiFi set up failed.
You have to check if the WiFi password is correct
or not. Make sure the WiFi password doesn't
include special characters like & ` #@, etc.
If you ensure the password is correct, please
make sure the WiFi is not 5G WiFi.
#7
Back to previous page, and tap "Save" to finish
the adding operations.
Your camera now is listed on Anyscene app. Tap
the camera to view.
Tips:
#8
You are now ready to use the camera.
Unplug the LAN cable then your camera will work
on WiFi mode.
Warning: If you got no video and black screen,
please replug the lens unit to main unit several
times. A poor contact may cause this issue.
Still need more helps, please see the provided manual
to get more information.
Or you can visit Titathink support website:
http://support.titathink.com
Or send us an email:
#9
Connected
/
Online
. The camera has connected to phone
successfully.
Connecting
. The camera is trying to communicate to phone.
Offline
. The camera lost connection to your phone.
Mounting instruction for TT520
Mounting instruction for TT7x0PW
Mounting instruction for TT7xLPW / TT8x0G / TT8x0-LTE
Wall Mounting Bracket
Pinhole Mounting Bracket
Wall Mounting Bracket
Fix the lens unit to a wall
Assemble the bracket for the lens unit
Mount the lens unit to the a pinhole of door plank
Mounting instruction for TT521
Wall Mounting Bracket
Assemble the bracket for the lens unit
The maximum depth of water
can reach up to 7 feet.
Mounting instruction for TT522
Mounting instruction for TT525PW
OUTDOOR
INDOOR
DOOR
Pinhole
OUTDOOR
INDOOR
OUTDOOR
INDOOR
Wall Mounting Bracket
Assemble the bracket for the lens unit
OUTDOOR
INDOOR
Roof gutter / Eave
Roof gutter / Eave
Wall
Wall
5. Mounting Instruction for Spy Series
6. Mounting Instruction for Outdoor Series
lock
open
Warning: Extension plug must inject first, then lock the metal ring.
If the extension box can not be connected properly, you may be
unable to use the camera.
Metal ring
(1). Assemble the rain-proof cover.
(2). Assemble the antenna.
(3). Connect to extension box.
(4). Lock the extension box.
Extension plug
Mounting nut
Mounting screw
LAN cable
Speaker line
Power line
Waterproof box
LAN cable
Power line
Waterproof box
Extension box
The hidden camera is black screen with a loading
icon after finished the setup.
This issue may be caused by two cases:
1. Please check what app says first. If it says "Connecting"
or "Offline", please check the connection between camera
to router to ensure the WiFi network or LAN cable
is good working. Or try to reboot the router and camera
once time.
2. If the app says 'connected' or 'online', the lens unit may
poor contact to main unit. Please shut down the camera
and replug the camera cable serveral times.
First of all, please make sure the selected WiFi network is
not belong to 5Ghz WiFi network, all of cameras are only
able to work with standard 2.4Ghz WiFi network. Next
make sure the signal intensity of received WiFi is not less
than 60%. You can retry to configure the WiFi setting. The
WiFi password is case sensitive.
Please make sure the SD card is plugged into the camera
properly. Then make sure the SD card is FAT32 format
system and its capacity doesn't exceed 128Gb, otherwise,
the camera will be unable to recognize the SD card to
cause the camera can not read-and-write to the SD card.
The camera can not work with following kinds of WiFi SSID:
1). 5Ghz WiFi network.
2). WiFi SSID is invisible network that requires manually
enter the WiFi name.
3). The WiFi is network portal that requires a phone
registration.
If you are sure the WiFi is not belong to the above kinds,
Please move the camera closer to the router and try again.
It requires that the camera connects to a router via a LAN
cable. Then make sure the end of LAN cable is plugged to
the LAN(RJ45) port, and the other end of the LAN cable is
plugged to the LAN port of the router.
If the problem still remains, please ensure the router you
used doesn't limit the MAC address.
This issue may be caused by two cases:
1. the lens unit may poor contact to main unit. Please
shut down the camera and replug the camera cable
serveral times.
2. If you have tried to replug the lens unit, but the issue
still remains, the lens unit may be broken. Please
find the contact information in the manual to contact
us.
Please check if your router has Internet access
first, then check if the camera can be viewed in
local area network, if not, please re-follow the
quick guide to set up the camera again.
When night vision feature is turned on, the picture
will be showed with black-and-white mode.
In default setting, the camera will automatically
switch the night vision to on or off by depending on
the light around the camera. So you can move the
camera to a bright area then it will back to color
mode.
Just disconnect the LAN cable from the camera then
camera will automatically switch on the WiFi mode.
The WiFi module will standby when camera is working on
wired connection.
If your camera is not TT525PW, you need to connect
an external microphone for the camera to pick up the
sound. It's plug and play, you don't need to set up any
setting for the external microphone.
Please go to
http://support.titathink.com
to learn more
about which kind of microphone you should purchase.
If you get the camera recording continuously to the memory card,
and the memory card is a true 128 GB memory card (131,072 MB),
the camera should be able to record for roughly 72 hours.
The highest quality setting is
4096 Kb(bit)/second video + 40 Kb(bit)/s sound = 517 KB(Byte)/second,
which calculates to 30.3 MB/minute. If you get the camera recording
only when it senses motion, then the number of hours of monitoring
will depend on both the number of motion detection events and the
length of recording that you select when motion is detected.
According to the above, a 128 GB card might be sufficient for a month
of motion detection recording, or just over 72 hours depending on the
environment where the camera is located.
In default, the camera uses secondary stream as the
live viewing streaming and records primary stream
onto SD card. You need to go to the Advanced setting"
in the app to turn on "HD viewing" option.
please refer the provided manual to find this option.
Sometimes, the cellular network may be blocked by
walls, buildings so the camera can not receive a stable
cellular network.
Please move the camera body closer to an open area
like window which that camera can receive stronger
cellular signal.
The hidden camera shows you a green screen.
There is no video file recorded onto SD card.
How much time can you record onto 128Gb SD card.
The camera can not pick up the WiFi SSID.
The Anyscene app can not discover the camera
when adding camera to the app.
After you entered the WiFi password, the camera
always prompts error.
How the camera works on WiFi mode
after completed the setup.
The picture is in black and white mode.
The TT8x0G / TT52xG camera can not work via
cellular network although you get 'success'
for "Hardware test"
Could not view the camera remotely
You can not hear sound from hidden camera.
The quality of live footage is not as same as
the recordings on SD card.


