background image


7

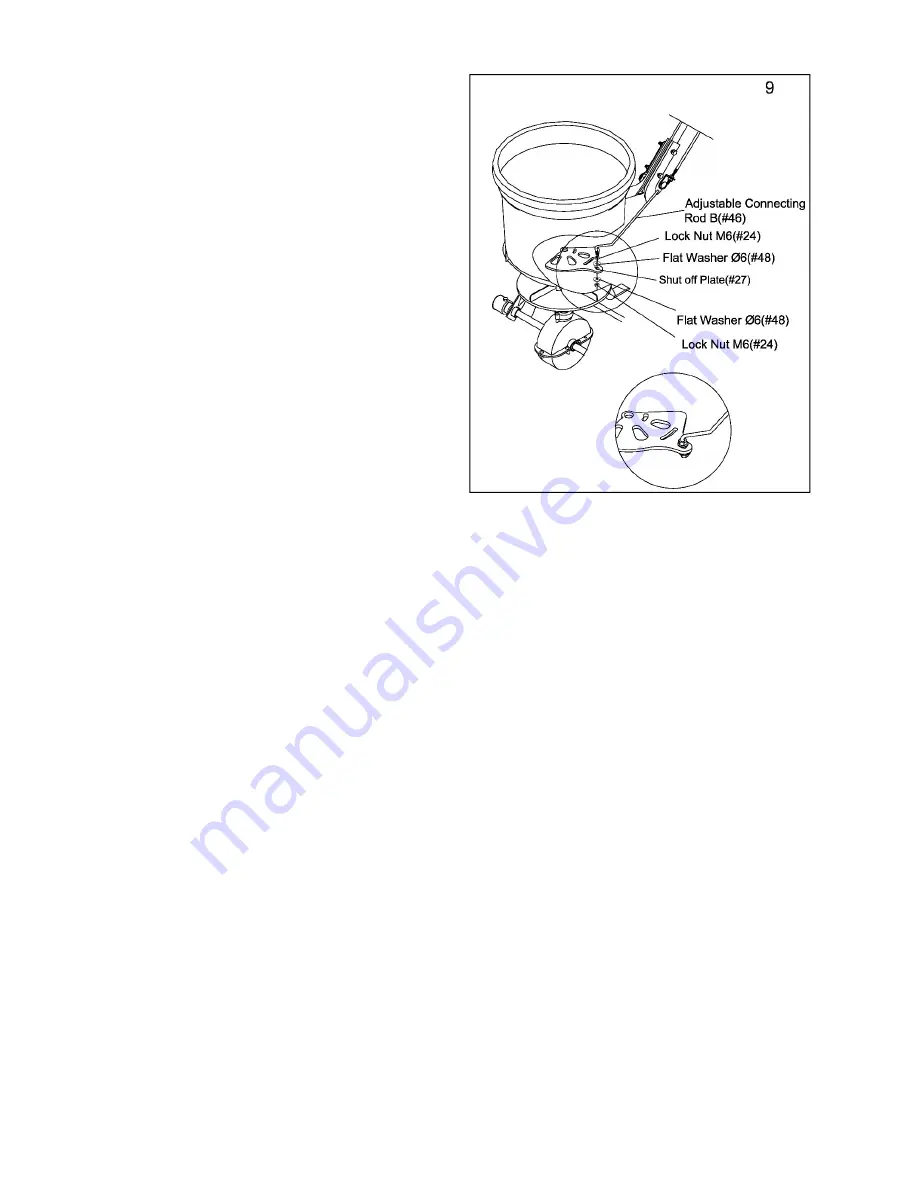
9. 

Slip the threaded end of Adjustable 

Connecting Rod (#46) into the Shut Off Plate 
(#27) with a Flat Washer Ø6

#48

, then fasten 

with Flat Washer Ø6

#48

and Lock Nut M6 

(#24).   


10. 

a)  The  three  large  holes  at  the  bottom  of  the  hopper  should  match  the  three  holes  in  the 

adjustable plate. If they match, do nothing. If they do not match, push the  handle  down to the 
lowest position and adjust the positions of the two nuts on the threaded control bar until the three 
holes match up. If the holes are not properly aligned, the hopper will not close completely. 

b)  To  operate  the  spreader,  push  the  handle  up  to  the  top  position.  Adjust  the  wing  nut  as 

needed to regulate the flow of material passing through the spreader. 

c) Insert R Pin (#17) into the hole at the top of the axle spindle at the bottom of the Hopper 

(#16) as shown. Make sure impeller is turning in the right direction as indicated by the arrow. 

d

)

Place Screen (#14) into the Hopper (#16). 


Summary of Contents for 50SPREAD

Page 1: ...50lb Walk Behind Spreader OWNER S MANUAL MPN 50SPREAD SKU 890011 Titan Mfg and Dist Inc 3839 Forest Hill Irene Rd St 100 Memphis TN 38125...

Page 2: ...er is designed to be pushed at three miles per hour which is a brisk walking speed Slower or faster speeds will change the spread patterns Wet fertilizer will also change the spread pattern and flow r...

Page 3: ...n Hopper 16 upside down and attach Frame 30 using four screws ST6 3 x 40 43 2 a Slide the Impeller 42 onto the spindle of the Gear Box Assembly 39 b Insert Screw M4 x20 41 through the Impeller and the...

Page 4: ...ave to be completely tightened yet 4 a Attach one end of each Frame Brace 31 to the outside of the Hopper Frame Assembly 30 using bolt M6 x 35 33 and M6 lock nut 24 b Push a M6 x35 bolt 33 through the...

Page 5: ...o be completely tightened yet Note Insert the Inner axle bushing into the outer axle bushing and make sure they are tight 6 Insert Handle Shaft 26 between the top ends of the Wheel Assembly Frames 20...

Page 6: ...Assembly 4 onto the bolts and fasten with Lock Nut M6 24 b Tighten lock nuts securely 8 a Push the Adjustable Handle 6 7 to the lowest position b Insert the upper end of the Control Rod 25 into the h...

Page 7: ...tion and adjust the positions of the two nuts on the threaded control bar until the three holes match up If the holes are not properly aligned the hopper will not close completely b To operate the spr...

Page 8: ...8...

Page 9: ...9 DRAWING...

Page 10: ...013 000 Hopper 1 17 N578 00001 000 R Pin 1 18 N570 00019 000 Hopper Bushing 1 19 N570 30000 000 Pivot Bracket Assembly 1 20 N570 00007 000 Wheel Assembly Frame 2 21 9201 06000 DG Hex Nut M6 2 22 T680...

Page 11: ...03 000 Impeller 1 43 9199 06040 DG Screw ST6 3X40 4 44 9206 05000 DG Lock Nut M5 1 45 N570 00021 000 Cross Brace 1 46 N570 00004 000 Adjust Connect Rod B 1 47 9101 05045 DG Hex Bolt M5X45 1 48 9301 06...

Page 12: ...oadcast width 6 Make sure the drive pin is in stalled in the axle before starting the spreader 7 Always start the spreader in motion before opening closure plate 8 Always shut the closure plate before...

Reviews: