Timex Waterbury Regulator 61 Instruction Manual Download Page 13


10

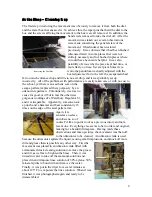
Polishing the Pivot Holes – Everything’s so Shiny!


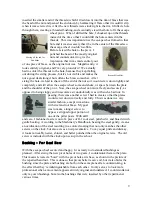
Since most of the hard part was completed, I was happy to move on to polishing pivot 
holes, as it meant the pivots would soon be in them and turning again.  Unfortunately, the 
pivot holes take a little while to clean, though they go much faster if the bushings are 
done right.  To polish a pivot hole, one takes a smooth broach just like the cutting broach 

except not faceted, and “burnishes” the inside of 
pivot holes with oil as though one were burnishing a 
pivot.  With enough pressure and rotation of the hand, 

the holes will look as good as the pivots, but it gets 
tiring to do all ten holes (which now include the two 

escape pallet pivots).  Actually, it’s only hard the first time one does it, and only if the 
bushings are so loose that they come out during the polishing process.  This is especially 
unfortunate because then one must go back and rebush it.  I was terribly glad when none 
of mine fell out, and neither did any of the previously bushed holes.  Having done this 
with oil on the smooth broach, there was now oil in the holes.  To remove it, I used the 
xylene/mineral spirits mixture to rinse the movement and then used toothpicks to clean 
out any extra contamination from the holes.  If contamination is present, it could react 
with the lubricating oils used later and cause the clock parts to become sticky and stop.  
Toothpick cleaning averted a disaster, however, and in no time at all, the holes were 
bushed and polished and the gears were free to be put back between the plates! 


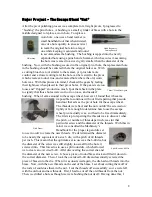
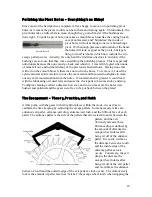
The Escapement – Theory, Practice, and Math 

 
At this point, with the gears in their rightful places within the clock, it was time to 
calibrate the time keeping by adjusting the escape pallets.  Some necessary terms are: 
entrance/exit pallet, entrance/exit drop, entrance/exit lock, and the lift/lock face of each 
pallet. The entrance pallet is the side of the pallets that allows teeth to enter between the 

pallets, and the exit 
obviously releases them. 
Entrance drop is defined by 
the amount of distance the 
escape wheel rotates after 
being let off of the entrance 
pallet. It is easily visible as 
the distance between a tooth 
and the inside edge of the 
entrance pallet as lock 
occurs.  Conversely, the exit 
drop is the distance the 
escape wheel rotates after 

being let off of the exit pallet 
and is visible as the distance 

between a tooth and the outside edge of the exit pallet as lock occurs.  The entrance/exit 
lock is the amount of pallet face that “catches” the escape wheel tooth when stopping the 

Smooth Broach 

A labeled diagram of a Graham deadbeat escapement 

Summary of Contents for Waterbury Regulator 61

Page 1: ...1 No 61 Restoration Log Instruction Manual Andrew LaBounty 2002...

Page 2: ...2 Waterbury Regulator No 61 Andrew LaBounty Apprentice Clockmaker Sophomore Olathe North High School 2002...

Page 3: ...ing For Real Now 9 Polishing the Pivot Holes Everything s so Shiny 10 The Escapement Theory Practice and Math 10 Beat and Rate Adjustments Nuts and Knobs 11 Refitting the Second Hand Found in the Case...

Page 4: ...citizens of that place including a senator and one of the richest men in the country He also spoke of his brother the chief movement mechanic as being as good a brass clock maker as can be found A gre...

Page 5: ...With the railroad came schedules and people needed to know what the time was to a greater accuracy than simply night or day As such precision regulators were found chiefly in train stations banks and...

Page 6: ...and take it to our shop then operating from home for restoration First the pendulum was removed and placed to the side Next the weight was detached and placed with the pendulum Finally to take the clo...

Page 7: ...ere purposely by an unknown repairman Unfortunately it serves no cause for good or ill but to mar the otherwise gorgeous workings of a Waterbury Regulator 61 and it is irreparable Apparently someone t...

Page 8: ...smaller portion of the gear either in the shape of a lantern or a cut smaller wheel that mates with the wheel of an adjacent gear The pinion is the driven and the wheel is the driver Another differenc...

Page 9: ...ough the escape pallets and the only constant you know is the minute hand which invariably makes one revolution in an hour With the minute hand as your beginning point and the escapement as the ending...

Page 10: ...eate a perfect polish This must be done at high speeds and with a good amount of pressure yet not so much of either to burn the steel When done correctly burnishing produces not only a beautiful shine...

Page 11: ...o hand nut that acts as the pivot hole for the escape wheel The threads were bad and the nut couldn t be screwed on tightly or far enough to determine how loose the escape wheel pivot actually was so...

Page 12: ...urate as it undoubtedly was with such a bad nut In passing there was another screw I had to create so that the plates would screw down correctly and fully This was done in a very similar fashion excep...

Page 13: ...ut any extra contamination from the holes If contamination is present it could react with the lubricating oils used later and cause the clock parts to become sticky and stop Toothpick cleaning averted...

Page 14: ...is extremely difficult Finally I put the escape pallets back into the clock and we checked the entrance drop which is always adjusted before the exit drop We found the entrance drop to be too large d...

Page 15: ...it on either side until it was perfectly balanced and static on the broach After it was poised I colored the lead with a magic marker to disguise its presence Such methods as super glue and markers c...

Page 16: ...ence today and I trust it will be around for another 90 or 100 years I would like to thank Mrs Dorland and Mr Carmody for their support in allowing me to restore the clock and I d also like to thank M...

Page 17: ...turning the crank Rotate the crank clockwise until the top of the weight starts to pass behind the dial This is fully wound and quite preferable to cranking until it stops which causes the dents and d...

Page 18: ...complete turn of the rating nut If it is seven minutes off in one month of a turn is all that is necessary Cleaning All cleaning of the mechanism movement should be done by a professional It is recom...

Page 19: ...e leader gently lift the pendulum up and away it is held on with a pin replace the screw in the leader to prevent it from being lost 3 Remove the weight by lifting up on the weight cover cap and then...

Page 20: ...e movement is reinstalled Reinstall the movement weight and pendulum using the instructions for Moving the Clock as a guide Setting the Beat One final adjustment will be necessary once the clock has b...

Page 21: ...book 24th Edition by Oberg Jones Horton Ryffel Edited by Robert E Green New York Industrial Press Inc 1992 pp 1706 1707 Seth Thomas Clocks and Movements by Tran Duy Ly Virginia Arlington Book Company...

Page 22: ...el teeth Tip machine escape wheel teeth to true escape wheel Straighten two pivots Replace threads on hand nut Install three bushings Make one new movement screw extra long and blued to match Realign...

Page 23: ...heel Pinion 10 leaves Hour Wheel 80 teeth Cannon Pinion 36 leaves Main Wheel 84 teeth Second Wheel 80 teeth Second Wheel Pinion 8 leaves Third Wheel 72 teeth Third Wheel Cut Pinion 12 leaves Third Whe...

Page 24: ...21 Attachment C Original Sketch...

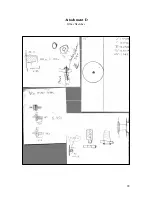
Page 25: ...22 Attachment D Other Sketches...

Page 26: ...23...

Reviews: