Activation
Power on and wire the network cable after installation. You should
activate the device before the first login.
If the device is not activated yet, it will enter the Activate Device page after powering on.
Steps:
1. Create a password and confirm the password.
2. Tap
Activate
to activate the device.
Note:
For other activation methods, see the device user manual.
1. Use finger to hold the screen surface and enter the activation password to
enter the main page.
2. Enter the User Management page, tap + to enter the Add User
page.
4. Tap
Face
and collect the face information according to the
instructions.
You can view the captured picture at the upper right corner of
the page. Make sure the face picture is in good quality and size.
For details about the tips and positions when collecting or
comparing the face picture, see the contents on the right.
5. If the picture is in good condition, tap Save to save the picture.
Or tap
T
ry Again
to take another face picture.
6. Tap to save the settings.
Go back to the initial page to start authentication.
For other authentication methods, see the device user manual.
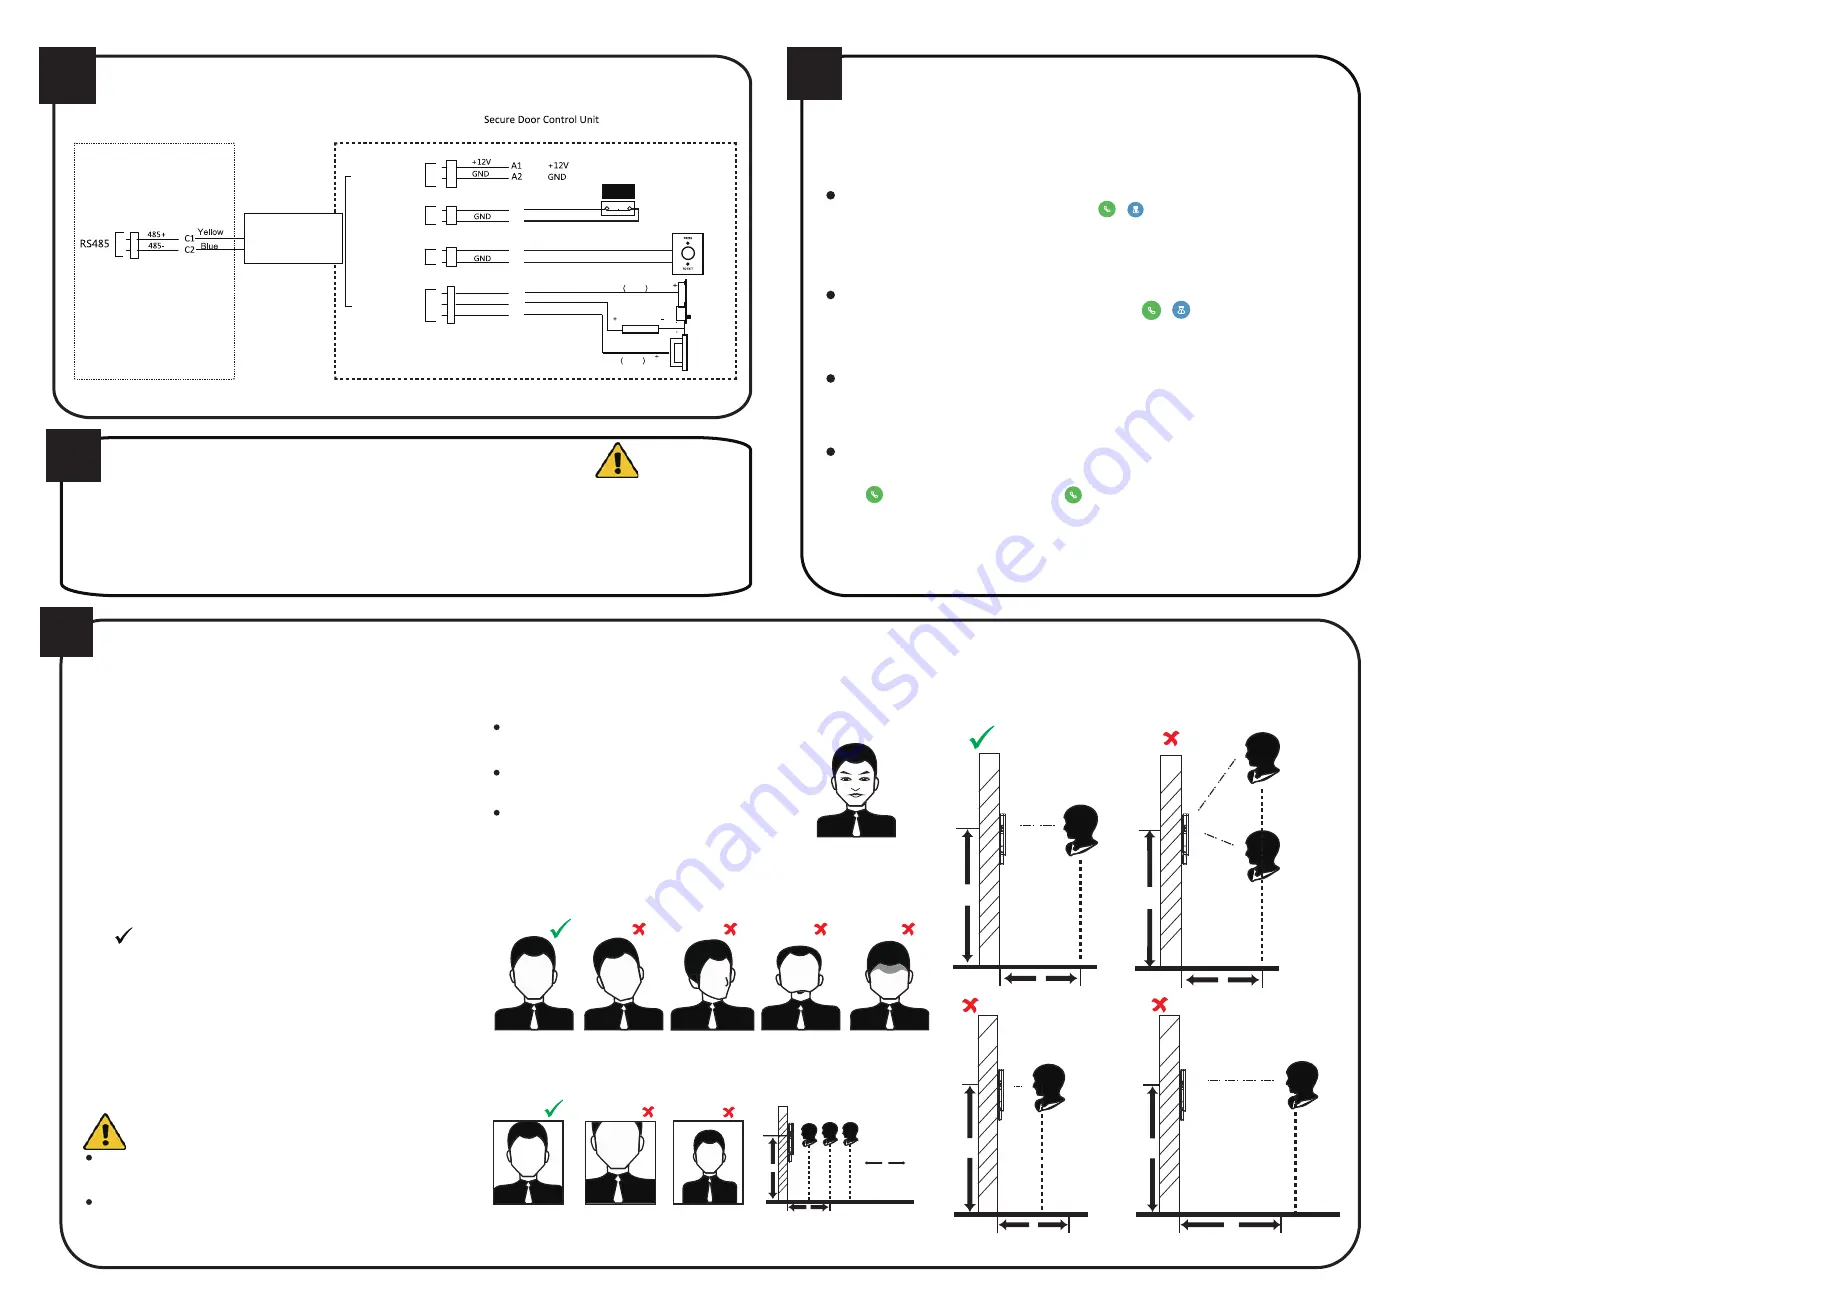
Adding Face Information
Positions When Collecting/
Comparing Face Picture
(Recommended Distance: 0.5m)
Tips When Collecting/
Comparing Face Picture
Expression
Posture
Size
1.4m
0.5m
1.4m
Too High
Too Low
Too Close
Too Far
1.4m
1.2m
1.4m
Make sure your face is in the middle of the collecting window.
Correct
Tilt
Raise
Side
Bow
0.5m
0.5m
Recommended Height:
1.43m to 1.90m
Correct
Too Close
Too Far
1.4m
Too
Close
Too
Far
Correct
0.5m
Height:
1.43m to 1.90m
Move
Back and Forth
Note:
Only the devices with the fingerprint module support the fingerprint related
functions.
Recommended:
Use 1:1 Face Matching when the face is hard to recognize.
Use other authentication methods if the device if affected by the light or other
items.
1:1 Matching:
The device will compare the captured face picture with the ones
in the database.
1:N Matching:
The device will compare the captured face picture with the user
linked face picture.
Device Wiring (With Secure Door Control Unit)
Keep your expression naturally when collecting or comparing face pictures, just like the
expression in the picture on the right.
In order to get a good quality and accurate face picture, position your face looking at
the camera when collecting or comparing face pictures.
Do not wear hat, sunglasses, or other accessories that can
affect the facial recognition function.
Do not make your hair cover your eyes, ears, etc. and
heavy makeup is not allowed.
STRONG PASSWORD RECOMMENDED–
We highly recommend you create a strong
password of your own choosing (using a minimum
of 8 characters, including upper case letters, lower
case letters, numbers, and special characters) in
order to increase the security of your product. And
we recommend you reset your password regularly,
especially in the high security system, resetting the
password monthly or weekly can better protect
your product.
Secure Door
Control Unit
Wiring Terminal
Note:
The secure door control unit should connect to an external power supply separately.
Exit Button
Power Input
SENSOR
BUTTON
B1
B2
B3
B4
Green/Brown
Black
Green/Black
Black
Lock Output
NC
C1
C2
C3
COM
NC
White/Purple
White/Black
White/Red
Red
Black
Door Magnetic
Exit Button
NO
Power
Electric
Dropbolt
Electric
Strike
Sensor Input
Face Recognition Terminal
5
2.2
3
NO
Biometric recognition products are not 100% applicable to anti-spoofing
environments. If you require a higher security level, use multiple authentica-
tion modes.
If you adopt multiple authentication modes, you should authenticate other
methods before authenticating face.
Two-Way Audio
4
Call Device from Client Software
After adding the device on the client software, you can enter the Live View page. Right click the live
view window and click
Start Two-Way Audio
to start two-way audio.
Call Client Software from Device
After adding the device on the client software, tap -> , and tap
Answer
on the pop-up
window on the client software to start two-way audio.
Note:
If the device is added by multiple client softwares and when the device is calling the client
software, only the first client software added the device will pop up the call receiving window.
Call Indoor Station from Device
After adding the device and the indoor station on the client software, link the added user
and the added indoor station, and set a room No. for the indoor station.
Tap and enter the room No. And tap to call the indoor station.
Call Center from Device
After adding the device and center on the client software, tap -> to call the center. When the
center answers the call, you can start two-way audio.
Note:
The device will call the center in priority when tap the administrator icon.
After adding the device to the client software, you can call the device from the client software, call the
client software from the device, call the center from the device, or call the indoor station form the
device.


