background image

16

TIMETEC QF PLUS

w w w . t i m e t e c c l o u d . c o m

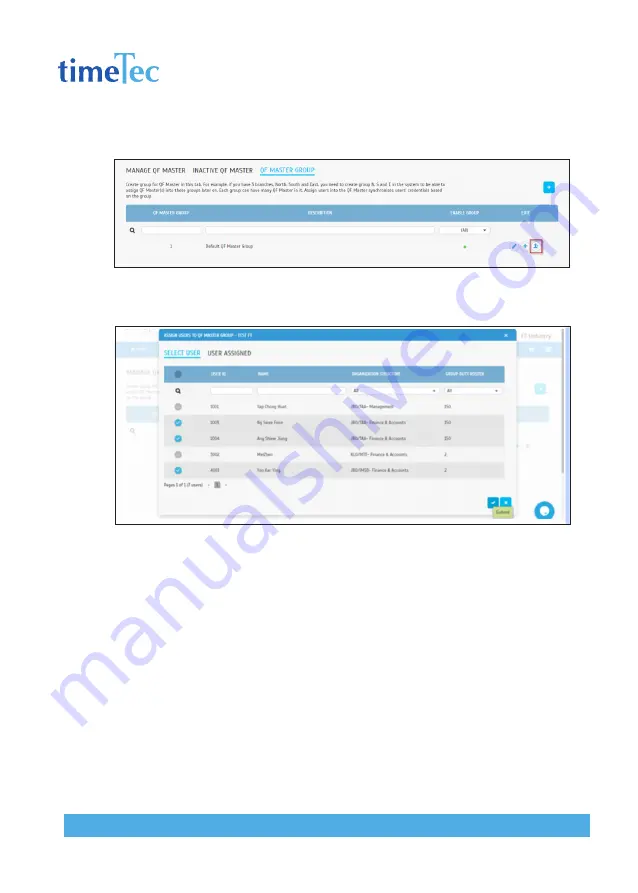
Select the QF Master > Click Submit

Click the User icon under the Edit column to assign users to this group.

Select the user(s) you want to assign under this group. Click Submit to confirm and the 
setup is completed. 

Summary of Contents for QF PLUS

Page 1: ...Wireless QR Code Facial Recognition Terminal TIMETEC QF PLUS User Guide w w w t i m e t e c c l o u d c o m Wireless QR Code Facial Recognition Terminal...

Page 2: ...ade to supply complete and accurate information Information in this document is subject to change without prior notice DISCLAIMER No person should rely on the contents of this publication without firs...

Page 3: ...l o u d c o m TABLE OF CONTENTS 1 BEFORE YOU START 4 5 2 THE OVERVIEW 6 3 INITIALIZATION AND SYNCHRONISATION 7 8 4 SYSTEM SETTINGS 9 13 5 HOW TO CONNECT TO TIMETEC TA ACCESS 14 To connect to TimeTec T...

Page 4: ...c c l o u d c o m 1 Before You Start Make sure the QF Plus is connected to the Internet via mobile data or WiFi The QF Plus app can only work after it is connected to the TimeTec server Figure 1 Enter...

Page 5: ...d application TimeTec TA TimeTec Access TimeTec VMS or iNeighbour as the QF Master device TimeTecVMS TimeTec Access i Neighbour TimeTecTA BLE 2 door accessories are not required for TimeTec TA Install...

Page 6: ...before The 1 icon indicates that the QF Plus is downloading the users face templates QR codes and access rules from the TimeTec cloud application The cloud icon will disappear right after the download...

Page 7: ...es the user s face when a user ap proaches it The user must readjust his her position to ensure that his her face fits within the scanning area 1 Display the date and time 2 Display the access point n...

Page 8: ...gure the QF Plus Refer to Figure 5 5 Indicate the QF Plus s connection status 6 Tap here to switch to scan the QR code Refer to Figure 4 When QF Plus switches for QR code scanning a square box will be...

Page 9: ...S w w w t i m e t e c c l o u d c o m 4 System Settings Insert your admin username and password the same credentials you use to login to the TimeTec cloud application Tap Login to enter the System Set...

Page 10: ...gure 6 Users Management You can check the list of users credentials and the assigned access rules See Figure 7 Configuration You can personalise the QF Plus display and scanning behavior See Figure 8...

Page 11: ...This user has enrolled with a face template QR code in grey This user is not assigned with a QR code QR code in green This user has been assigned with a QR code Tap on the icon next to the user s nam...

Page 12: ...referred hour format Verification Interval Set the waiting time before the next verification proc ess This is to avoid the same user verifying multiple times at one time The sys tem default time inter...

Page 13: ...nning distance is Medium Full Face Scan Users are required to stand in front of the device for a full face scan if Yes has been enabled Partial face scanning will not be allowed Set No to disallow par...

Page 14: ...14 TIMETEC QF PLUS w w w t i m e t e c c l o u d c o m 5 How to connect to TimeTec TA Access To connect to TimeTec TA Click on the icon to add QF under your account...

Page 15: ...p and add a description for the particular QF Click Submit upon completion Go to the QF Master Group to assign QF to a QF Master Group and allocate users under each group accordingly Click Add to crea...

Page 16: ...t e c c l o u d c o m Select the QF Master Click Submit Click the User icon under the Edit column to assign users to this group Select the user s you want to assign under this group Click Submit to co...

Page 17: ...r account Input the unique mobile ID as shown on the QF main screen Add a description for the particular QF Click Submit upon completion Go to Access Point Manage Access Point Select the newly added Q...

Page 18: ...2020 Timetec Cloud Sdn Bhd All rights reserved 062020 w w w t i m e t e c c l o u d c o m...

Reviews: