background image

W415-2884 / A / 09.21.20

EN

26


fi nishing

4.3 log 

placement

A. 


Remove safety screen.

B.


Remove cast top.

C. 


Remove glass door / cast front. See "glass  


door / cast front installation / removal" in the  


fi nishing section of this manual for more    

 information.

NOTE: 

It is not necessary to remove the cast front. 

However, it will make log installation simpler.

D.


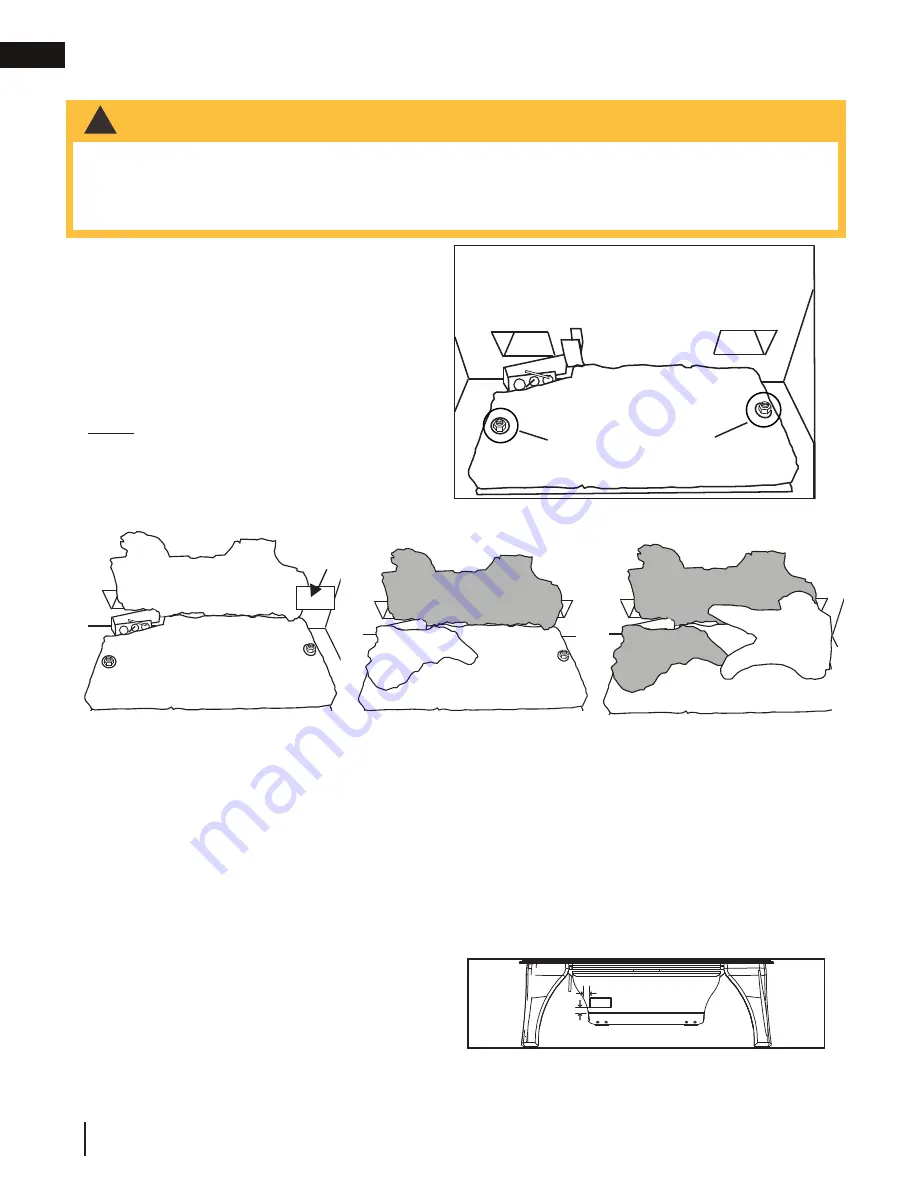
Place the rear log, as shown, 
onto the rear log support 
brackets. Ensure the cutout 
on the left underside of 
the log fi ts over the pilot 
assembly. Bend the bracket 
on the right side to help 
retain the rear log.

E. 

Place the hole in the 
underside of log #2 onto the 
locating screw on the left 
side of the burner. The fi bre 
burner is formed to cradle 
the centre of the log.

F. 

Place the hole in the 
underside of log #3 onto 
the locating screw on the 
right side of the burner. The 
bottom branch of log #3 sits 
in front of and against the 
right end of log #2.

4.4 logo 

placement

LOGO

1.27cm

1.27cm

Remove the backing from the logo and position onto the 
control door as shown.

LOG LOCATING SCREWS

BRACKET

G. 

Reinstall the glass door and cast front if removed. 

H.  

Reinstall cast top and safety screen.

!

WARNING

• 

Failure to position the logs in accordance with these diagrams or failure to use only logs specifi cally approved 
with this appliance may result in property damage or personal injury.

• 

Logs must be placed in their exact location in the appliance. Do not modify the proper log positions, since 
appliance may not function properly and delayed ignition may occur.

• 

The logs are fragile and should be handled with care.

Summary of Contents for TDS20 Series

Page 1: ...any electrical switch do not use any phone in your building Immediately call your gas supplier from a neighbour s phone Follow the gas supplier s instructions If you cannot reach your gas supplier ca...

Page 2: ...t burns A physical barrier is recommended if there are at risk individuals in the house To restrict access to an appliance or stove install an adjustable safety gate to keep toddlers young children an...

Page 3: ...anemia those under the in uence of alcohol those at high altitudes are more affected by carbon monoxide than others Failure to keep the primary air opening s of the burner s clean may result in sooti...

Page 4: ...ustibles 24 Batteries must be disposed of according to the local laws and regulations Some batteries may be recycled and may be accepted for disposal at your local recycling center Check with your mun...

Page 5: ...to be located should be considered If possible you should choose a location where the vent will pass through the house without cutting a oor or roof joist This appliance is approved for closet or rec...

Page 6: ...trical Code in Canada or the ANSI NFPA 70 National Electric Code in the United States In the case where the blower is equipped with a power cord it must be connected into a properly grounded receptacl...

Page 7: ...on pour les sp ci cations d vacuation Il est n cessaire de bien r installer et resceller l vacuation apr s avoir executer l entretien du syst me de prise d air Serial Number N de S rie W385 XXXX REFER...

Page 8: ...W415 2884 A 09 21 20 EN 8 general information 1 5 dimensions 25 3 8 645mm SAFETY SCREEN 18 1 2 470mm 24 610mm 19 1 4 4 102mm 7 178mm 489mm 9 5 8 245mm...

Page 9: ...mbined Different venting manufacturer components must not be combined These vent kits allow for either horizontal or vertical venting of the appliance The maximum allowable horizontal run is 20 feet 6...

Page 10: ...minate directly above a sidewalk or paved driveway which is located between two single family dwellings and serves both dwellings Local codes or regulations may require different clearances Do not all...

Page 11: ...ble See illustrations below It is recommended to maintain a 6 152mm rise 24 61cm maximum Use the periscope kit to locate the air termination above grade The periscope must be installed so that when na...

Page 12: ...hang N 16 40 6cm 16 40 6cm Clearance above the roof O 2 0 6m 2 0 6m Clearance from an adjacent wall including neighbouring buildings P 8 2 4m 8 2 4m Roof must be non combustible without openings Q 3 0...

Page 13: ...and is shown in the formula as 45 and 90 respectively or 135 when combined for 45 exit only For the following symbols used in the venting calculations and examples are greater than equal to or greater...

Page 14: ...gurations requiring more than two 90 elbows the following formulas apply Formula 1 HT VT Formula 2 HT VT 40 feet 12 2m Example V1 8 FT 2 4m VT V1 8 FT 2 4m H1 2 5 FT 0 8m H2 2 FT 0 6m HR H1 H2 2 5FT...

Page 15: ...7 5m Example V1 4 FT 1 2m V2 1 5 FT 0 5m VT V1 V2 4FT 1 2m 1 5FT 0 5m 5 5 FT 1 7m H1 2 FT 0 6m H2 1 FT 0 3m H3 1 FT 0 3m H4 1 5 FT 0 5m HR H1 H2 H3 H4 2FT 0 6m 1FT 0 3m 1FT 0 3m 1 5FT 0 5m 5 5 FT 1 7...

Page 16: ...2 2m Example V1 5 FT 1 5m V2 10 FT 3 1m VT V1 V2 5 FT 1 5m 10 FT 3 1m 15 FT 4 6m H1 3 FT 0 9m H2 2 5 FT 0 8m HR H1 H2 3FT 0 9m 2 5FT 0 8m 5 5 FT 1 7m HO 03 one 45 three 90 elbows 135 03 45 270 135 5 4...

Page 17: ...35 5 4 FT 1 6m HT HR HO 8FT 2 4m 5 4FT 1 6m 13 4FT 4 1m HT VT 13 4FT 4 1m 2 5FT 0 8m 15 9FT 4 8m Formula 1 HT 3VT 3VT 3FT 0 9m x 2 5FT 0 8m 7 5FT 2 3m 13 4 FT 4 1m 7 5 FT 2 3m Since this formula is no...

Page 18: ...t pipe may cause re For gas stoves only If the appliance is installed directly on carpeting vinyl tile or other combustible material other than wood ooring the appliance shall be installed on a metal...

Page 19: ...clearance to combustibles Once the vent pipe is installed in its nal position apply red RTV silicone W573 0002 not supplied between the pipe and the restop assembly C In the attic slide the vent pipe...

Page 20: ...e weather tight by sealing with caulking not supplied D If more vent pipe needs to be used to reach the replace couple them together as illustrated The vent system must be supported approximately ever...

Page 21: ...intake ex liner and the exhaust collar must be connected to the exhaust exible liner Both Simpson Duravent and Selkirk co linear to co axial adaptors have been approved on this appliance Follow vent...

Page 22: ...g over the air terminal connector leaving a min 3 4 19mm of the air terminal connector showing above the top of the ashing Slide the ashing underneath the sides and upper edge of the shingles Ensure t...

Page 23: ...Ensure that a continuous gas ow is at the burner before closing the door Ensure adequate ventilation For gas and electrical locations see dimensions section All gas connections must be contained with...

Page 24: ...tal vent Sides and bottom 1 25mm Top 2 51mm Vertical Vent All sides 1 25mm At a distance of 2 51mm from the wall access to the blower switch on off switch or the blower power cord may not be practical...

Page 25: ...he door meets the door retainer before closing the latches Follow the above steps in reverse order to reinstall the cast front Ensure that the tabs on the underside of the front t behind the front leg...

Page 26: ...cradle the centre of the log F Place the hole in the underside of log 3 onto the locating screw on the right side of the burner The bottom branch of log 3 sits in front of and against the right end o...

Page 27: ...CHES F Open the switch housing by removing the top screw G Install the thermal switch bracket as illustrated using 2 of the screws supplied Connect the agged leads to the terminals of the thermal swit...

Page 28: ...he battery holder to the wire harness before using the appliance Place near the IPI board If the back up is used it must be connected to this 6 volt battery pack supplied Do not connect to a 9 volt ba...

Page 29: ...lease If pilot does not continue to burn repeat steps E through I J With pilot lit turn gas knob counter clockwise to the ON position K If equipped with the ame adjustment valve push and turn the knob...

Page 30: ...ipped I Turn on the remote wall switch to the appliance J If the appliance will not operate follow instructions TO TURN OFF GAS and call your service technician or gas supplier A Set thermostat to low...

Page 31: ...off A timer will then begin the countdown for approximately seven days before shutting off the pilot if the appliance is not used This countdown will reset anytime the appliance main burner is used Th...

Page 32: ...rub pad such as Scotch Brite can be used to remove the paint from the pilot hood electrode and ame sensor INSERT PILOT ASSEMBLY Maximum inlet pressure not to exceed 13 Pressure Natural Gas inches Natu...

Page 33: ...cleaned logs rocks or glass Failure to properly position the media may cause carboning which can be distributed in the surrounding living area inside the rebox and on exterior surfaces sur rounding ve...

Page 34: ...nsure they open freely and close sealed Check the gas control valve pilot and Hi Lo knobs move freely if equipped Replace if any stiffness in movement is experienced Check for gas leaks on all gas con...

Page 35: ...ct you local authorized dealer distributor for complete cleaning instructions Razor blades steel wool or other metallic objects must not be used on both surfaces of the glass Doing so can remove a thi...

Page 36: ...ts can be ordered through your Authorized dealer distributor For warranty replacement parts a photocopy of the original invoice will be required to honour the claim When ordering replacement parts alw...

Page 37: ...arness pilot light assembly MV W660 0009 ON OFF switch W690 0002 Thermodisc W357 0001 Push button ignitor MV W090 0115 Porcelain Panel W080 1987 Magnet bracket EI 10 Log set 8 9 10 11 12 13 14 13 15 W...

Page 38: ...ber 1 W080 0751 Pilot bracket 2 3 W010 0798 Pilot assembly NG 4 W010 0800 4 W680 0005 Thermocouple 5 6 7 Ref No Part Number 8 W035 0141 Burner base 9 W080 0722 Top valve bracket X2 9 W432 0063 Manifol...

Page 39: ...Pilot assembly NG 3 W010 0800 4 W680 0005 Thermocouple 5 6 7 Ref No Part Number 10 W035 0513 Burner base 10 W080 1725 Top valve bracket X2 11 W456 0045 Burner ori ce 45 NG 12 W456 0055 Burner ori ce...

Page 40: ...ceiling plate 2 W025 0001 Decorative brass brand 3 RP4 4 Restrictor plate 4 F50 Remote control 5 GS 65KT Blower kit 6 Ref No Part Number W 065 0024 Hex head bolt GDSLL KT W 570 013 Hex head screw GDSL...

Page 41: ...OCKWISE FIRMLY TO RESEAL DO NOT OVER TORQUE Leak test with a soap and water solution Air shutter improperly adjusted Return air shutter to speci ed opening see venturi adjustment section Carbon is bei...

Page 42: ...shorting faulty Loosen and tighten thermocouple Clean thermocouple and valve connection Replace thermocouple Replace valve Faulty valve Replace Pilot burning no gas to main burner gas knob is on HI w...

Page 43: ...VER TORQUE Leak test with a soap and water solution Air shutter improperly adjusted Return air shutter to speci ed opening see venturi adjustments section in the installation manual Carbon is being de...

Page 44: ...d Receiver if equipped Reset program hold reset button on receiver and wait for 2 beeps Release after second beep Press small ame button on remote within 20 seconds you will hear an additional beep th...

Page 45: ...Choose one of the 3 methods below to reset the system 1 To reset ignition box when locked out Turn off power supply and remove batteries if used from the back up battery pack 2 To reset the DFC Board...

Page 46: ...s such as rooftops buildings nearby trees hills mountains inadequate vents or ventilation excessive venting con gurations insuf cient makeup air or negative air pressures which may or may not be cause...

Page 47: ...EN W415 2884 A 09 21 20 47 16 0 notes...

Page 48: ...Produced and distributed by 24 Napoleon Road Barrie Ontario Canada L4M 0G8 Tel timberwolffireplaces com...

Page 49: ...ce d entretien ou le fournisseur Cet appareil peut tre install dans une maison pr fabriqu e mobile d j install e demeure si les r glements locaux le permettent Cet appareil doit tre utilis uniquement...

Page 50: ...x br lures accidentelles Une barri re de protection est recommand e si des individus risque se trouvent dans la maison A n de restreindre l acc s l appareil installez une barri re de protection ajusta...

Page 51: ...leur s propre peut entra ner la formation de suies et dommages la propri t Comme dans le cas de tout appareil combustion il est recommand de faire inspecter et entretenir votre appareil r guli rement...

Page 52: ...l 66 3 4 installation de la terminaison horizontale 67 3 5 terminaison verticale travers une chemin e 68 3 6 installation de la terminaison verticale 69 3 7 branchement du gaz 70 3 8 interrupteur mura...

Page 53: ...re install dans une maison mobile install e en permanence et aliment e au gaz naturel Cet appareil ne doit fonctionner qu avec le gaz sp ci sur la plaque d homologation Cet appareil ne peut tre conver...

Page 54: ...o le souf erie est quip d un cordon d alimentation il doit tre connect une r ceptacle correctement mise la terre La che de mise la terre ne doit pas tre retir du cordon d alimentation Ce qui suit ne...

Page 55: ...ion pour des extensions plus grandes les longueurs d vacuation minimaux et maximum The appliance must be vented using the appropriate Napoleon vent kits See installation manual for venting speci catio...

Page 56: ...W415 2884 A 09 21 20 56 FR information g n rales 25 3 8 645mm SAFETY SCREEN 18 1 2 470mm 24 610mm 19 1 4 4 102mm 7 178mm 489mm 9 5 8 245mm L CRAN DE PROTECTION 1 4 dimensions...

Page 57: ...d vents approuv s l exception du raccordement du conduit d vacuation la buse du foyer qui doit tre scell avec le scellant noir haute temp rature Mill Pac Le scellant haute temp rature doit tre comman...

Page 58: ...ed ou 0mm par m tre mais pour une performance optimale nous recommandons que toutes les courses horizontales devraient avoir un l vation minimum de 1 4 par pied ou 21mm par m tre lors d utilisation d...

Page 59: ...pieds 2 4m pour un po le Lorsque l vent est install en coin la longueur maximale du conduit d vacuation est de 24 610mm de course horizontale en plus de la d viation de 45 Dans ce cas une pente de z...

Page 60: ...des murs adjacents incluant les maisons voisines P 8 2 4m 8 2 4m Le toit doit tre incombustible et sans ouvertures Q 3 0 9m 3 0 9m Voir le tableau pour les dimensions d un mur plus large R 6 1 8m 6 1...

Page 61: ...respectivement ou 135 lorsque combin es Pour la 45 sortie seulement 90 90 45 V1 H1 H2 HT VT 0 2 5 0 8 5 1 5 7 5 2 3 10 3 1 12 5 3 8 15 4 6 10 3 1 20 6 1 30 9 1 17 5 5 3 20 6 1 39 11 9 Con guration d v...

Page 62: ...5 8m Formula 1 HT 4 2PI 1 3m VT 4 2PI 1 3m VT 4 2PI 1 3m x 5 5PI 1 7m 23 1PI 7m 13 6PI 4 2m 23 1PI 7M Formula 2 HT VT 24 75PI 7 5m 19 1PI 5 8m 24 75PI 7 5m Puisque les deux formules sont respect es c...

Page 63: ...aleurs acceptables pour HT et VT Lorsque la con guration de l vacuation exige plus qu un coude de 45 et un coude de 90 les formules suivantes s appliquent Formule 1 HT VT Formule 2 HT VT 40 pieds 12 2...

Page 64: ...70 135 5 4 PI 1 6m HT HR HO 8 PI 2 4m 5 4 PI 1 6m 13 4 PI 4 1m HT VT 13 4 PI 4 1m 2 5 PI 0 8m 15 9 PI 4 8m Formule 1 HT 3VT 3VT 3PI 0 9m x 2 5PI 0 8m 7 5PI 2 3m 13 4PI 4 1m 7 5PI 2 3m Puisque cette fo...

Page 65: ...ceur coupe feu Installez les crans muraux et les espaceurs coupe feu tel que sp ci Si vous ne gardez pas l isolant ou tout autre mat riau l cart du conduit d vent un risque d incendie pourrait s ensui...

Page 66: ...onduit d vacuation et l espaceur coupe feu Calfeutrage Protecteur du conduit d vacuation Protecteur du conduit d vacuation Collet de conduit d vacuation Espaceur coupe feu face inf rieure des solves C...

Page 67: ...nt n cessaire aux mat riaux combustibles En soutenant la terminaison les inscriptions tant l endroit et lisibles xez la au mur ext rieur et rendez la tanche en la scellant avec du calfeutrage non four...

Page 68: ...ccord au conduit exible de prise d air et le collet d vacuation de la terminaison au conduit exible d vacuation Les adaptateurs colin aire coaxial Simpson Duravent et Selkirk sont approuv s pour cet a...

Page 69: ...connecteur de terminaison en laissant un minimum de 3 4 19 1mm de connecteur de terminaison visible au dessus du haut du solin Glissez le solin sous les c t s et le bord sup rieur des bardeaux Assurez...

Page 70: ...13mm Sans raccord exible l appareil est con u pour recevoir une conduite de gaz de 3 8 9 5mm L appareil est muni d une soupape d arr t manuelle pour fermer l alimentation en gaz Branchez le gaz en co...

Page 71: ...NS D EVENTS VERTICALES Un d gagement minimal aux mat riaux combustibles de 1 25mm est requis sur toutes les courses verticales Utilisez l espaceur coupe feu W500 0097 non fourni 121 9cm NOTE Si l appa...

Page 72: ...que les pattes situ es sous la fa ade en fonte soient plac es derri re les pattes avant du po le Note Il n est pas n cessaire de retirer la fa ade en fonte pour retirer la porte A Soulevez et retirez...

Page 73: ...fa on pouser la forme de la b che F Placez le trou sous la b che 3 sur la vis de positionnement du c t droit du br leur La branche inf rieure de la b che 3 est plac e devant et con tre l extr mit dro...

Page 74: ...G G H I INTERRUPTEURS F Ouvrez le bo tier d interrupteur en retirant la vis du haut G Installez le support du thermodisque tel qu illustr l aide de deux des vis fournies Branchez les ls avec raccords...

Page 75: ...de contr le Si le sauvegarde est utiliser il doit tre connect cet pile de 6V fourni Ne branchez le pas un pile de 9V note Ne raccordez pas l interrupteur mural ou la soupape de gaz l alimentation lec...

Page 76: ...le bouton poussoir d ignition Gardez le bouton de contr le du gaz enfonc pendant une minute puis rel chez le Si la veilleuse ne reste pas allum e r p tez les tapes E I J Lorsque la veilleuse est allu...

Page 77: ...e pas suivre les instructions de couper l alimentation de gaz et puis appelez votre technicien de service ou fournisseur de gaz A R gler le thermostat la r glage le plus bas si quip B Tournez l interr...

Page 78: ...e d compte se r initialisera chaque fois que le br leur principal de l appareil sera allum Par cons quent si l appareil est utilis r guli rement sur une base journali re la veilleuse restera allum e C...

Page 79: ...serrez pas trop fort V ri ez pour des fuites en appliquant une solution d eau savonneuse Avant d effectuer le r glage de la veilleuse assurez vous que l assemblage de la veilleuse n a pas t peint S i...

Page 80: ...VOLET D AIR VENTURI INJECTEUR Il est important que l injecteur soit correctement ins r dans le venturi note Il est important d effectuer p riodiquement une inspection visuelle de la amme de la veille...

Page 81: ...eur 5 Si votre appareil est fourni avec une cran de protection le nettoyage peut tre n cessaire en raison d un exc s de poussi re peluches des tapis animaux etc utilisez un l attachement du brosse sur...

Page 82: ...pr nettoyage Enlevez aussi tout d p t se trouvant sur l assemblage de la veilleuse et aussi s il y a lieu sur la thermopile le thermocouple le capteur de amme et l allumeur Inspectez tous les joints d...

Page 83: ...qu il le faudra sinon la vitre risque de rester marqu e en permanance Ne touchez pas la surface int rieure ou ext rieur de la vitre avec des lames de rasoir de la laine d acier ou d autres objets m t...

Page 84: ...les pi ces peuvent tre command es chez votre d taillant autoris Pour un remplacement de pi ce sous garantie une photocopie de la facture originale sera requise a n de pouvoir honorer la demande Lorsqu...

Page 85: ...5 Aimantes du support MV Pour les pi ces de rechange voir la section assemblage de la soupape 8 8 GL 651 GL 651 SER Ensemble de b ches 10 9 Barri re de protection 1 2 3 4 5 6 7 8 9 10 11 12 14 13 15 1...

Page 86: ...veilleuse GN 4 W010 0799 Assemblage de veilleuse P 5 W680 0005 Thermocouple 6 W010 3048 Assemblage du br leur 7 8 R f No de pi ce Description 9 W035 0141 Base du br leur 10 W080 0722 Support de la so...

Page 87: ...0751 Support de veilleuse 2 3 W010 2763 Assemblage de veilleuse GN 3 W010 2808 Assemblage de veilleuse P 4 W680 0005 Thermocouple 5 W010 3048 Assemblage du br leur 6 7 R f No de pi ce Description 10 W...

Page 88: ...laiton 3 RP4 4 Plaque de restriction 4 F50 T l commande 5 GS 654KT Souf erie 6 7 R f No de pi ce Description W065 0020 W160 0041 9 W570 0026 10 W530 0014 R gulateur P W175 0234 11 W456 0055 Injecteur...

Page 89: ...NE SERREZ PAS TROP FORT V ri ez pour des fuites en appliquant une solution d eau savonneuse Le volet d air est mal r gl Voir la section r glage du venturi pour le r glage de l ouverture du volet d ai...

Page 90: ...ettoyez le thermocouple et la connexion la borne de la soupape Remplacez le thermocouple Remplacez la soupape La soupape est d fecteuse Remplacez la soupape La veilleuse br le pas de gaz au br leur pr...

Page 91: ...t d air est r gl incorrectement Voir la section r glage du venturi pour le r glage de l ouverture du volet d air dans le manual d installation Du carbone se d pose sur la vitre les b ches les roches l...

Page 92: ...mentation de la veilleuse Le module n est pas mis la terre Assurez le bon polarit du thermocouple si fourni V ri ez si les assemblages de le veilleuse et de la soupape sont bien mis la terre R cepteur...

Page 93: ...rie fonctionnent si quip La bo te d allumage a t verrouill e Choisissez l une des trois m thodes suivantes pour r initialiser le syst me 1 Pour r initialiser la bo te d allumage lorsqu elle a t verro...

Page 94: ...s ventilateurs d vacuation les fournaises les s cheuses de linge etc Tous dommages caus s a l appareil la chambre de combustion l changeur de chaleur aux garnitures de laiton ou autres composants par...

Page 95: ...W415 2884 A 09 21 20 95 FR 16 0 notes...

Page 96: ...ProduJUT FU EJTUSJCV T QBS 24 Napoleon Road Barrie Ontario Canada L4M 0G8 T l timberwolffireplaces com...

Reviews: