background image

12

Turn it back on

BASIC OPERATION

Start to play the connected iPod/iPhone/iPad.

• 

To pause/resume play, press the 

 button.

• 

To skip to a track, press the 

 / 

buttons.

• 

To search during play: Press and hold 

 / 

 buttons, then release to resume normal play.

Charge the iPod/iPhone/iPad

The docked iPod/iPhone/iPad begins to charge automatically while the unit is connected to AC power.

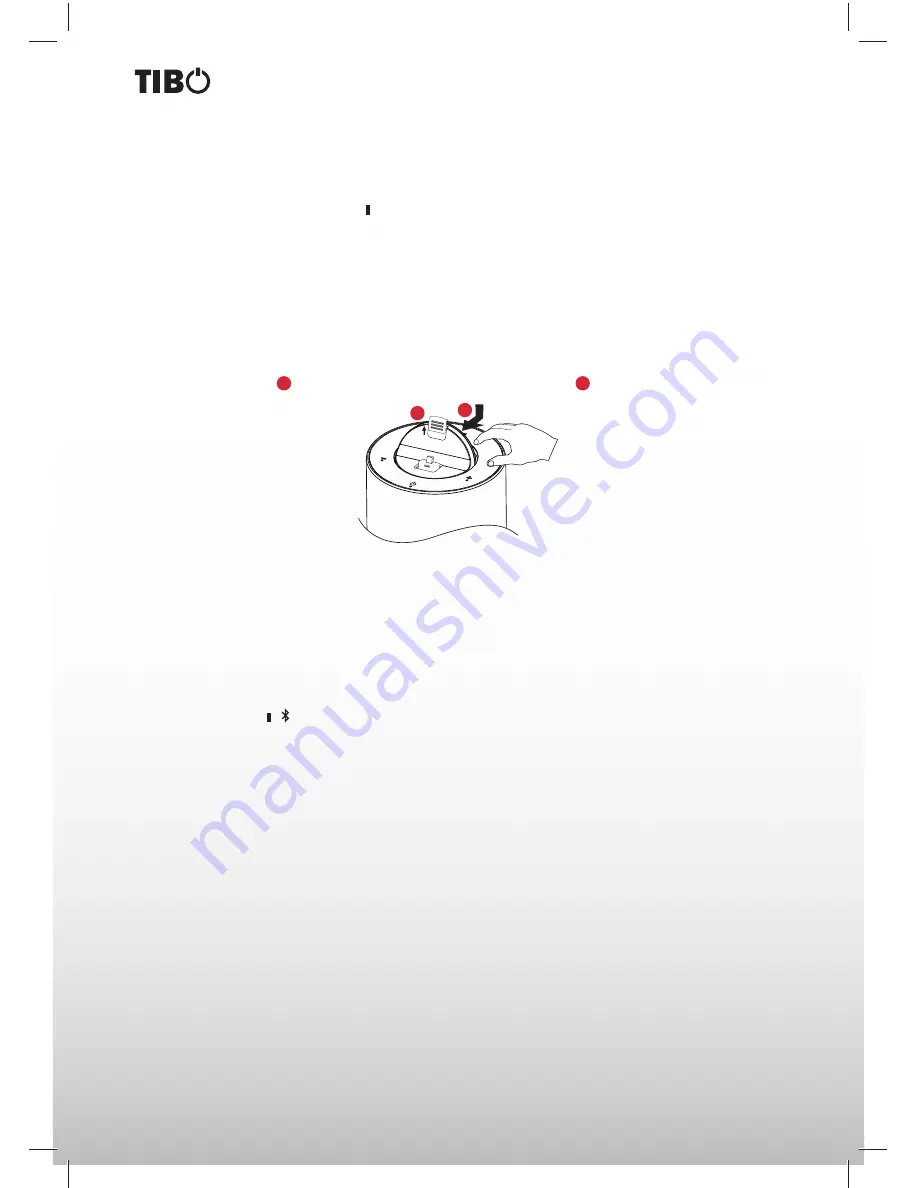
Remove the iPod/iPhone/iPad

1. 

Pull the iPod/iPhone/iPad out of the dock.

2. 

Raise up the buckle 

1

, and rotate the dock module to original position 

2

.

Playback using Bluetooth device

You can listen to music from a Bluetooth enabled device on this unit.

Pair a Bluetooth enabled device

The fi rst time you connect your Bluetooth device to the unit, you need to pair your device to the unit.

1. 

Turn on the Bluetooth function on your device.

2. 

Switch EVO-2 source to Bluetooth, Display panel shows “BLU T”, then show “NO BT” (if there’s no Blue-

tooth device connected).

3. 

Press and hold “

 /  “ button on remote control for seconds to activate Bluetooth pairing mode, display 

panel shows “PAIR”.

4. 

Search for Bluetooth device with your device.

5. 

Select “

EVO-2

” in the pairing list.

6. 

Enter default password “

0000

”, if promted for password. If the pairing succeeds, display panel shows 

“BLU T” again.

7. 

To disconnect connection, turn off the Bluetooth function on your device or switch the unit to other source

Note: 

The operational range between EVO-2 and a Bluetooth device is approximately 8 meters. Before 

you connect a Bluetooth device to EVO-2, familiarise yourself with the Bluetooth capabilities of the device. 

Compatibility with all Bluetooth devices is not guaranteed. Any obstacle between EVO-2 and a Bluetooth 

device can reduce the operational range. Keep EVO-2 away from any other electronic device that may cause 

interference.

2

1

Summary of Contents for EVO-2

Page 1: ...User Guide EVO 2 Turn it back on Please read this user manual carefully before using your EVO 2 system and retain for future reference ...

Page 2: ...2 Turn it back on ...

Page 3: ...power 9 INSTALLING REMOTE CONTROL BATTERY 10 Preparing the remote control 10 Replace the remote control battery 10 BASIC OPERATION 11 Power 11 Turning the system On 11 Turning the system Off 11 Set the clock 11 Play iPod iPhone iPad 11 Pair a Bluetooth enabled device 12 Adjust sound Level 13 Adjust the brightness level of display 13 Tuning a FM station 13 TROUBLESHOOTING 14 SPECIFICATION 15 CONTAC...

Page 4: ... can be repaired by the user Do not remove the covers Risk of dangerous voltage Only qualified technicians are allowed to repair the unit Important safety instructions Read the manual After unpacking the unit please read the manual carefully and observe all the instructions given Power supply Only the power supply indicated on the rating plate must be used for this unit If you are not sure which p...

Page 5: ...ed in the operation manual must be made as incorrect setting may result in damage and often will make it difficult for a qualified technician to make the unit work properly again E If the unit has been dropped or damaged in any other way F When the operation of the unit changes drastically the unit requires service Service Do not attempt to carry out any service work by yourself By opening or remo...

Page 6: ...OX User Guide EVO 2 Turn it back on Please read this user manual carefully before using your EVO 2 system and retain for future reference 1 x User Guide 1 x EVO 1 x Power Cable 1 x 3 5 mm to RCA Cable 1 x Remote Control battery included ...

Page 7: ...ock for iPod iPhone iPad Press this button to turn on or switch to Eco Power standby mode DOCK Load an iPod iPhone iPad VOLUME Increase or decrease volume level 1 2 3 4 5 REMOTE CONTROL SENSORS LED DISPLAY POWER INDICATOR 6 7 8 Main unit bottom view AUX IN Connect to an external audio device AC Power supply socket 1 2 1 2 2 3 4 5 1 ...

Page 8: ...nit or switch to Eco Power standby mode Press and hold to turn off the product and switch to Eco Power standby mode Mute or resume sound of the unit 5 FUNCTION Select a source 6 VOL VOL Increase or decrease volume level 7 Skip to next track Tune to a radio station by searching forward Select next preset radio station Adjust brightness level in standby mode 8 M CLOCK In standby mode press and hold ...

Page 9: ...l audio device Note Press FUNCTION button on main unit or remote control to select AUX for your connection Connect power Caution Risk of product damage Ensure that the power supply voltage corresponds to the voltage printed on the back or the underside of the unit Before connecting the AC power cord ensure you have completed all other connections Connect the AC power cord to the AC socket on the r...

Page 10: ...le to push the battery forward through the hole on rear of remote control 2 Remove the old battery Place a new CR2025 battery with correct polarity as indicated Then install the battery into the remote control 1 2 Precautions concerning batteries When the Remote Control is not to be used for a long time more than a month remove the battery from the Remote Control to prevent it from leaking If the ...

Page 11: ... display panel 1 In standby mode press and hold the CLOCK button to activate the clock setting mode hour indicator will blink 2 Set the hour with the button or button 3 Press CLOCK button to confirm minute indicator will blink 4 Set the minute with the button or button 5 Press the CLOCK button to confirm the built in clock starts operating and the seconds start counting from 0 Play iPod iPhone iPa...

Page 12: ... on your device 2 Switch EVO 2 source to Bluetooth Display panel shows BLU T then show NO BT if there s no Blue tooth device connected 3 Press and hold button on remote control for seconds to activate Bluetooth pairing mode display panel shows PAIR 4 Search for Bluetooth device with your device 5 Select EVO 2 in the pairing list 6 Enter default password 0000 if promted for password If the pairing ...

Page 13: ...player 2 Start play music via your device if it support A2DP 3 Use supplied remote control to control play if it support AVRCP To pause resume play press the button To skip to a track press the buttons Adjust sound Level During play press the buttons to increase decrease volume level Mute sound During play press the MUTE button to mute or resume sound Press this button again or buttons to cancel t...

Page 14: ...e the distance between the remote control and the unit Insert the battery with its polarities aligned as indicated Replace the battery Aim the remote control directly at the sensor on the front of the unit Poor radio reception Increase the distance between the unit and your TV or VCR Clock setting erased Power has been interrupted or the power cord has been disconnected Reset the clock Using iPhon...

Page 15: ... Unit Dimensions W x D x H Speaker Front Impedance Rate Power Woofer Impedance Rate Power Remote Distance Angle AC 220 240V 50 60Hz 35 Watts 100 Watts 1 1kHz 1W 500mV 47kΩ 40 20 000 Hz 288 x 288 x 1192 mm 3Ω 2 x 25 Watts 6Ω 50 Watts 6 m 30º We reserve the rights to change the technical data and the design of the product without notice as a result of further development ...

Page 16: ...IFYING THE PARTS 7 INCLUDED IN THE BOX 6 INSTALLING REMOTE CONTROL BATTERY 10 Main unit bottom view 7 Main unit top view 7 Pair a Bluetooth enabled device 12 Play iPod iPhone iPad 11 Power 11 Preparing the remote control 10 Remote control 8 Replace the remote control battery 10 SAFETY 3 4 Set the clock 11 SPECIFICATION 15 TROUBLESHOOTING 14 Tuning a FM station 13 Turning the system Off 11 Turning ...

Page 17: ...17 Turn it back on CONTACTS Tibo Ltd DSV House Maidstone Road Milton Keynes MK10 0AJ United Kingdom tel 44 0 845 2711 906 e mail info tibo electronics com Proof of purchase attach your receipt here ...

Page 18: ...18 Turn it back on ...

Page 19: ...19 Turn it back on ...

Page 20: ...Turn it back on www tibo electronics com ...

Reviews: