


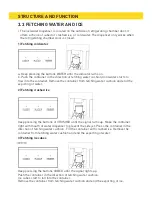
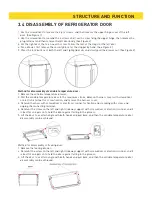
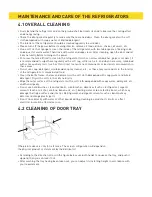
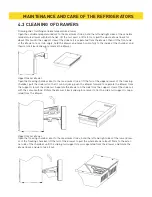


STRUCTURE AND FUNCTION
Temperature setting of flex drawer
Press the flex drawer key to select temperature shift zone, and press the temperature shift key
again to adjust the temperature of flex drawer. The temperature shift key is pressed once, the
temperature will be increased by 1 gear, When the temperature is increased to WINE (4th
gear), press the temperature shift key again, the temperature will return to MEAT(1st gear).
The corresponding temperature settings of each gear are MEAT(-1°C/30°F), BEV (1°C/34°F),
DELI (3°C/37°F), and WINE (5 °C/ 41°F).The settings will take effect after locking.
Temperature setting of freezing chamber
Press the freezing key to select the freezing temperature zone, and then press the“-” and “+”
temperature regulation keys to adjust the temperature of the freezing chamber. The“-” key is
pressed once the temperature will drop by 1°C/1°F. After the temperature reaches -22°C/-7 °F,
the“-” key will be invalid no matter how it is pressed. The “+” key is pressed once the
temperature will rise by 1°C/1°F. After the temperature reaches -14°C/7 °F, the “-” key will be invalid no
matter how it is pressed. The temperature setting range of freezing chamber -22°C /-7 °F ~ -14 °C/7 °F.
The setting will take effect after locking.
Switching between Fahrenheit temperature and Celsius temperature
The composite key of “+” and “-” is pressed for 3s, Fahrenheit temperature and Celsius temperature
are switched and it will take effect after locking; State setting of distributor. Touch the key of the
corresponding mode to select ice cube mode / water drainage mode / ice breaking mode. After the
corresponding function is selected, the indicator light of the corresponding mode will be on. Water will
be drained out immediately after water drainage mode is selected. Ice is drained out 3 seconds after the
switch of ice cube mode /ice breaking mode is pressed.
Control of distributor lamp
When the distributor switch is switched on, the distributor lamp will be on; when the distributor switch is
disconnected, the distributor lamp will be off after 3S delay;
Press the REF-ICE key to turn on the backlight and the refrigerating ice maker; press the REF-ICE key
again to turn off the backlight and the refrigerating ice maker. It will take effect after locking; Note:
When the refrigerating ice maker is on, the ice maker will turn over the ice into the ice making chamber
if the ice storage box is removed and the ice maker is currently turning over the ice;
Tips for replacing filter
When the filter is used for more than 150 days and the backlight is always on, or when the filter is used
for more than 180 days and the backlight flashes, press WATER-FILTER key for 3s to clear the alarm
settings and re-time it. The buzzer rings for 3 times at the same time.
Mode setting
Quick cooling mode. Press and hold the refrigeration key for 3s to enter the quick cooling mode. At the
same time, the icon of the refrigerating chamber turns blue. The quick cooling mode will take effect
after being locked; At the time of setting the quick cooling mode, the temperature of refrigerating
chamber is automatically set at 1°C/34°F; when the quick cooling mode is exited, the set temperature of
the refrigerating chamber automatically returns to the set temperature before the quick cooling mode.
Quick-freezing mode Press and hold the freezing key to enter the quick cooling mode. At the same time,
the icon of the freezing chamber turns blue. The quick cooling mode will take effect after being locked;
At the time of setting the quick cooling mode, the temperature of refrigerating chamber is automatically
set at -22°C/-8°F; when the quick cooling mode is exited, the set temperature of the refrigerating
chamber automatically returns to the set temperature before the quick cooling mode.
Summary of Contents for TRF3601FD
Page 1: ...TRF3601FD...
Page 2: ...TRF3601FD REFRIGERATOR WITH ICE AND WATER DISPENSER...
Page 29: ...TROUBLE SHOOTING...
Page 30: ...WARRANTY...