background image

13

Updating Transcripts 

West Case Notebook transcripts can be updated using the following types of files: 

E-Transcript files (PTX or EXE)—files containing transcript text, and, if the transcript is signed, the 
signature details

ASCII (text only) files—files containing transcript text, usually received from the court reporter 

Portable Transcript (PTF) files—files containing transcript text and annotations, usually received from 
another West Case Notebook user 

LiveNote Evidence Format (LEF) files—files containing transcripts, exhibits, exhibit links, and possibly 
synchronized video 

Note: 

You can also import CT Summation (TRN) files and Timaro Technologies Post-Production Time-

Stamp (PTS) files. 

Any annotations, including Quick Marks and Issue Marks, are automatically transferred to the updated 
transcript. No work product will be lost because all annotations are linked to the transcript text, not to 
the page and line references. Therefore, annotations made in the old transcript are simply transferred to 
the same text location in the updated transcript. 

Starting the Updating Process

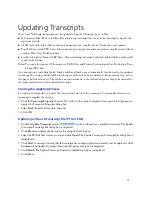
To update an transcript, you must first assign draft status to the transcript. To assign draft status to a 
transcript, complete these steps:

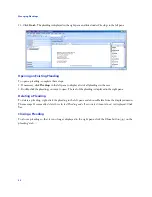
1. Click the 

Transcript Properties 

button (

) on the toolbar above a displayed transcript in the right pane to 

display the Transcript Properties dialog box. 

2. Select 

Draft

 from the 

Status

 drop-down list.

3. Click 

OK

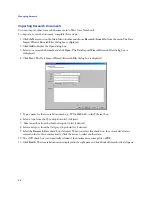
Updating with an E-Transcript File (PTX or EXE)

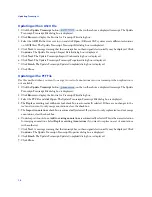
1. Click the 

Update Transcript

 button (

) on the toolbar above a displayed transcript. The Update 

Transcript–Transcript File dialog box is displayed. 

2. Click 

Browse

 to display the Browse for Transcript Files dialog box. 

3. Select the PTX file that was sent to you and click 

Open

. The Update Transcript–Transcript File dialog box is 

redisplayed. 

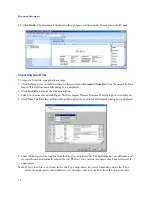
4. Click 

Next

. A message warning that the transcript has not been signed electronically may be displayed. Click 

Continue

. The Update Transcript–Transcript Properties dialog box is displayed.

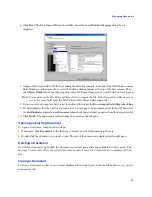
5. Click 

Finish

. The Update Transcript–Update Completed dialog box is displayed.

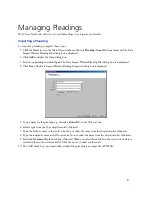
6. Click 

Close

Summary of Contents for West Case Notebook

Page 1: ...Version 1 0 and Version 1 1 West Case Notebook User Guide February 2009...

Page 2: ......

Page 3: ...West Case NotebookTM User Guide Version 1 0 and Version 1 1 February 2009...

Page 4: ...otebook Because of the evolving nature of this technology there may be changes to the West Case Notebook interface and functionality that are not reflected in the documentation Information in this gui...

Page 5: ...List of Favorite Secure Cases 7 Replicating Cases Offline and to the Network 8 Replicating a Case Offline 8 Replicating a Case to the Network 8 Changing Replication Options 8 Managing Transcripts 9 I...

Page 6: ...Fact 28 Closing the Key Facts Tab 28 Saving Key Facts As a West Case Timeline File 29 Managing Characters 31 Creating a Character 31 Editing a Character 32 Deleting a Character 32 Closing the Characte...

Page 7: ...uto Tags 42 Showing and Hiding Auto Tags 42 Deleting Auto Tags 42 Working with Reports 43 Annotations Report 43 Verbatim Digest Report 44 Notes Report 45 Attachments Report 45 Issues Report 45 Case Re...

Page 8: ...o Segments 63 Transferring Annotation Video Segments 63 Creating a Video Segment from a Single Annotation 63 Creating Multiple Video Segments from an Annotations Report 63 Transferring Annotations to...

Page 9: ...iveNote Repository West Case Notebook If you intend to view video with West Case Notebook use the recommended configurations IBM PC or compatible computer with Pentium 4 processor Windows Vista or Mic...

Page 10: ...for documents and pleadings into West Case Notebook An administrator can designate who can access the case file documents Images TIF TIFF Tagged Image File Format JPE JPG JPEG Joint Photographic Expe...

Page 11: ...reate a new case follow these steps 1 Access West Case Notebook to display the Open Case dialog box 2 Click New to display the Save As dialog box 3 Select the location to use for storage of the case t...

Page 12: ...is displayed 3 Select the RealLegal Binder Case PXL file you want to import and click Open 4 The message This case was created with RealLegal Binder It must be imported before it can be used Do you wa...

Page 13: ...ialog box is displayed 3 Select the repository that you want to log on to and click Logon The Logon to Repository Name dialog box is displayed 4 Type your username and the password that is assigned to...

Page 14: ...e case that is currently being accessed through the network A blue folder with a key indicates a secure case that was replicated offline and is currently being accessed locally To view cases only secu...

Page 15: ...y those cases when you access West Case Notebook To view your list of favorite cases complete these steps 1 Access secure cases The Open Case dialog box is displayed with the list of the cases to whic...

Page 16: ...rk complete these steps 1 From the File menu choose Replicate Case Online The Cases Replicated to Network dialog box is displayed 2 Click one of the following Open Case The case is displayed in the le...

Page 17: ...nscript File dialog box is redisplayed 4 Click Next A message warning that the transcript has not been signed electronically may be displayed Click Continue The Import Wizard Transcript Properties dia...

Page 18: ...he left pane and choose Delete from the menu The message Permanently delete the selected Transcript and all associated Annotations is displayed Click Yes Printing a Transcript with Annotations You can...

Page 19: ...sed Transcript dialog box is redisplayed 7 Select the Include Quick Marks check box if desired 8 Select the Include Annotations with no Issues check box if desired 9 Select the Display Annotations in...

Page 20: ......

Page 21: ...made in the old transcript are simply transferred to the same text location in the updated transcript Starting the Updating Process To update an transcript you must first assign draft status to the tr...

Page 22: ...transcript when replication is not available 1 Click the Update Transcript button on the toolbar above a displayed transcript The Update Transcript Transcript File dialog box is displayed 2 Click Brow...

Page 23: ...text with new text check box is automatically selected If there are no changes to the transcript text clear the check box 5 TheImport exhibits checkboxisautomaticallyselected Ifyoudonotwanttoimportex...

Page 24: ......

Page 25: ...les dialog box is displayed 5 Type a name for the document e g JobSummary_1005 in the Title text box 6 Select a type from the Type drop down list if desired 7 Type the author s name in the Author text...

Page 26: ...d click Open The Data Import Wizard Document Files dialog box is redisplayed 4 Click Next The Data Import Wizard Load Files Select the Load File Field Delimiter dialog box is displayed 5 Select the fi...

Page 27: ...check box 9 If a field indicates that the load file contains a row for each page of a document select the field Then select the Field indicates start of a new document when check box and select an op...

Page 28: ......

Page 29: ...ata Import Wizard Pleading Properties dialog box is displayed 5 Type a name for the pleading e g Answer_BowerDC in the Title text box 6 Select a type from the Type drop down list if desired 7 Type the...

Page 30: ...n the case 2 Double click the pleading you want to open The text of the pleading is displayed in the right pane Deleting a Pleading To delete a pleading right click the pleading in the left pane and c...

Page 31: ...result list click the Export to Case Notebook icon in the upper right corner To deliver specific documents in the result list select the check box next to each document you want to deliver and then cl...

Page 32: ...w document in West Case Notebook To update KeyCite information complete these steps 1 Choose Advanced Update KeyCite Flags from the Tools menu in West Case Notebook The Update KeyCite Login dialog box...

Page 33: ...onnectors query e g retaliat wrongful 5 terminat discharg s work 5 compensat da aft 2005 in the Terms text box 3 Under Source type a database identifier in the text box or select a database e g All Fe...

Page 34: ...mport Wizard Research Files dialog box is displayed 5 Type a name for the research document e g 39 Cal 4th 260 in the Title text box 6 Select a type from the Type drop down list if desired 7 Select an...

Page 35: ...12 00PM is entered in the text box automatically Otherwise the start time of the last key fact you created is entered Type a different start time if desired 5 Select the End Date check box if desired...

Page 36: ...The key fact is displayed on the Key Facts tab in the right pane and listed under Key Facts in the left pane Editing a Key Fact To edit a key fact right click the key fact and choose Properties from t...

Page 37: ...ne For more information on West Case Timeline refer to Using West Case Timeline which can be downloaded at west thomson com support user guide livenote case notebook aspx To create a West Case Timelin...

Page 38: ......

Page 39: ...tact information Creating a Character To create a character complete these steps 1 Click the New arrow on the Main Menu toolbar and choose Character from the menu The Character Properties dialog box i...

Page 40: ...box is displayed Make the appropriate changes and click OK Deleting a Character To delete a character right click the character and choose Delete from the menu The message Permanently delete the selec...

Page 41: ...Click the Manage Issues button on the Main Menu toolbar The Manage Issues dialog box is displayed 2 Click New to display the New Issue dialog box 3 Type the name of the issue e g Employment history in...

Page 42: ...then choose Issues from File from the menu The Open dialog box is displayed 2 Select the file containing the issues you want to import and click Open 3 The message Issues were successfully imported fr...

Page 43: ...select the issue and assign it to the annotation you are adding 3 Select the text you want to annotate The text is highlighted with the color of the issue you selected The issue will be assigned to e...

Page 44: ...t the check boxes for any issues you previously selected on the Main Menu toolbar are already selected 3 Click OK The annotated text is highlighted with the color of the issue you selected Adding a Ke...

Page 45: ...Realtime Chat from the menu 2 Click OK The annotation is displayed in the Annotation text box under Stream in the left pane 3 Click Send to send the annotation to your chat group Or select an individu...

Page 46: ......

Page 47: ...ding which connectors to place between your terms To retrieve variations of terms use the root expander and the universal character To retrieve a phrase place quotations marks around the phrase For mo...

Page 48: ...cept at the beginning For example Type To retrieve gr w grew grow Note When you place one or more universal characters at the end of a term you specify the maximum length of that term Using Connectors...

Page 49: ...gs dialog box is displayed 2 Click New Then type the word or phrase you want to add to the Auto Tags list 3 Select the Show Auto Tags check box to highlight Auto Tags in the document 4 Click the Color...

Page 50: ...dialog box is displayed Select the Show Auto Tags check box and click OK To hide Auto Tags clear the Show Auto Tags check box Deleting Auto Tags To delete an Auto Tag complete these steps 1 From the A...

Page 51: ...surrounding questions and answers To create an Annotations report for the document you are viewing right click the Annotations folder in the left pane and click Report The report is displayed on the R...

Page 52: ...tle text box if desired Then select or clear the appropriate check boxes 9 Click the Context tab to display a list of context options Select or clear the appropriate check boxes 10 Click the Authors t...

Page 53: ...the Display tab Clear all check boxes except the Attachments check box under Annotations then click OK Issues Report This report lists all of the issues in a document grouped by issue and then arrange...

Page 54: ...u The Case Report Properties dialog box is displayed By default all document types and data are selected on the Data tab To exclude a document type from the report clear its check box To exclude parti...

Page 55: ...lar data from the report click the document type containing the data then clear the check boxes for the data you want to exclude 4 Click the Display tab to view a list of display options Type a title...

Page 56: ...steps 1 Click Save Report as on the toolbar above the report in the right pane The Save As dialog box is displayed 2 Select a location for the file 3 Type a name for the file in the File name text box...

Page 57: ...isplayed 2 Type the name of the group e g Defense Witnesses in the Name text box 3 By default all document types and data are selected To exclude a document type from the group clear its check box To...

Page 58: ...ck OK again to create the report Using Data Groups in Full Text Searches You can run full text searches using data groups To conduct a search using data groups complete these steps 1 From the Search m...

Page 59: ...xample to paste the text into Microsoft Word press Ctrl V or choose Paste from the Edit menu in Word Transferring Text of a Document or Pleading To transfer the text of a document or pleading that is...

Page 60: ...ion with the text To transfer text with its citation complete these steps 1 Make certain the Copy with Citation button is displayed 2 Select the text you want to copy 3 Open another application and pa...

Page 61: ...d Index display options choose Display Options from the View menu to display the Display Options dialog box Click the Word Index tab You can specify whether you want to see your word in context when y...

Page 62: ......

Page 63: ...se Realtime Transcript from the menu The Connect to Realtime dialog box is displayed 2 Select Serial The court reporter will give you the necessary settings for connecting to the reporter s CAT comput...

Page 64: ...ogin dialog box 5 Type the username and password sent to you by LiveNote and click OK to display the Connect to LiveNote Stream dialog box 6 Select the session you want to attend and click OK Accessin...

Page 65: ...ealtime using West Case Notebook software you have access to all the tools in West Case Notebook Below is a chart showing the features available with LiveNote Stream West Case Notebook Features LiveNo...

Page 66: ......

Page 67: ...ick Marks are marks at the line number in the margin of a transcript They are the simplest form of annotation in West Case Notebook and are displayed as a solid bar in the default Quick Mark color You...

Page 68: ...t clear its check box 3 Click the Data tab to display a list of transcripts By default all transcripts are selected To exclude a transcript from the report clear its check box 4 Click the Display tab...

Page 69: ...a line number A complete list of all Issue Marks is located in the Annotations folder in the left pane Click the plus symbol next to the transcript to view the Annotations folder Double click an Issu...

Page 70: ......

Page 71: ...3 From the menu that is displayed choose Send Then choose Video File from the submenu The Save As dialog box is displayed 4 Select a location for the file 5 Type a different file name in the File name...

Page 72: ...lick in the annotation and choose Send from the menu and PowerPoint from the submenu The Save As dialog box is displayed 3 Select a location for the file 4 Type a different file name in the File name...

Page 73: ...in the transcript that the deponent reports is in error The Annotation Properties dialog box is displayed 5 Type any information regarding the error in the Note text box e g Witness says name should...

Page 74: ...ure for signed transcripts version 7 0 and later video sync information Documents Documents document contents document properties Title document properties Type Author Recipient Bates Range Date OCR i...

Page 75: ...been synchronized with the transcript A synchronized video is a video that plays in sync with the transcript i e as the person in the video speaks the transcript scrolls and highlights the spoken text...

Page 76: ...is displayed select Gil Bower v DC Corporation and click OK The case window is displayed 3 Click the New arrow on the Main Menu toolbar then choose Realtime Transcript from the menu The Connect to Rea...

Page 77: ...e Repository Note A transcript printed from the trial version includes a Demo watermark System Requirements You will need the following to run the trial version of West LiveNote if you intend to view...

Page 78: ......

Page 79: ......

Page 80: ...The trademarks used herein are the trademarks of their respective owners West trademarks are owned by West Publishing Corporation For assistance using West CaseNotebook call 1 800 290 9378 For free re...

Reviews: