

General Controls
Install software in your computer
The Music Management CD that came with your Lyra Jukebox contains all of the necessary
software components you need to make your Lyra Jukebox work properly.
1.
Place the Music Management CD that came with your Lyra Jukebox into your computer (the
startup screen appears).
If the setup screen doesn’t appear, double click
My Computer
, double click your CD-ROM drive
icon, and double click
Install
to run installer.
2.
Follow the on-screen instructions to complete the installation.
3.
Refer to the user manual stored on the CD for further information.
MusicMatch Jukebox is a trademark of MusicMatch, Inc.
Transfer files to your Lyra Jukebox
Files in mp3 and WMA audio format are currently supported for playback on the Lyra Jukebox.
For more information about transferring files, go to the Lyra User’s Guide.
Note:
You can tranfer files either via Windows Media Player 10 or MusicMatch Jukebox.
Refer to your Lyra User’s Guide for details.
NOTE: As with any portable device that has a hard drive, you must back up the
drive. RCA and Thomson are not responsible for lost data.
Front View
1.
LCD (Liquid Crystal Display) -
This is where the Lyra’s user interface appears (go to the
user manual for an explanation of the items that appear on the LCD during playback).
Navigation Controls
2.
CONTROL
- For navigation control and various functions in different modes.
Audio navigation mode
Control joystick -
Press once to play the highlighted item; or press and hold to select the
item into My Selections.
LEFT - go back one level.
RIGHT - go in one level.
UP - scroll up one item, press and hold for continuous scroll.
DOWN - scroll down one item, press and hold for continuous scroll.
Control ring -
Rotate clockwise to scroll down, rotate counterclockwise to scroll up.
Audio playback mode
Control joystick -
Press once to pause the selected item; or press and hold to select the
item into My Selections playlist.
LEFT - Press to skip to the previous song, press and hold to search backward.
RIGHT - Press to skip to the next song, press and hold to search forward.
UP - Go to previous set of songs* (when the shuffle mode is not selected).
DOWN - Go to next set of songs* (when the shuffle mode is not selected).
Control ring -
Rotate clockwise to increase volume, rotate counterclockwise to decrease
volume.
* Set of songs include Artist, Album, Genres, Years, Lyra DJ, Playlists.
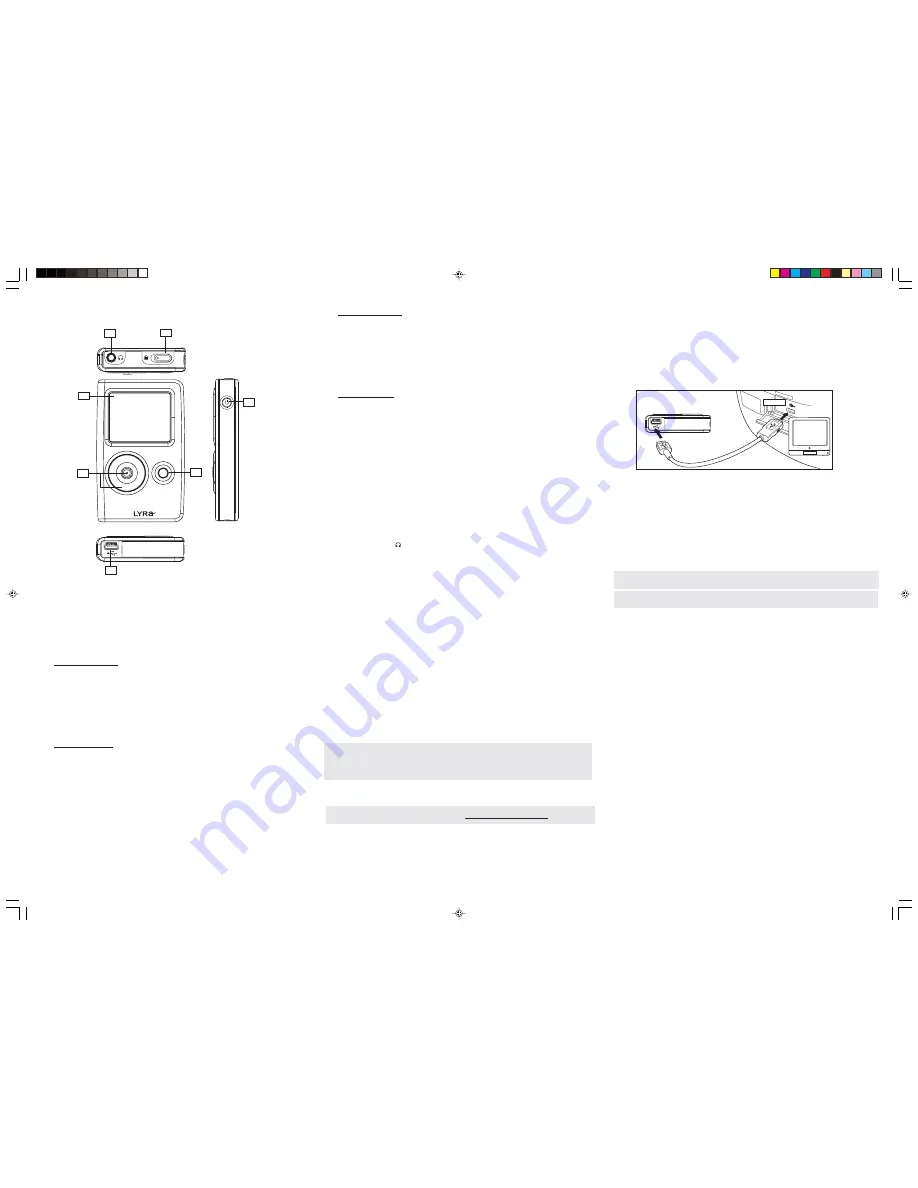
COMPUTER
USB PORT
LYRA JUKEBOX
(BOTTOM VIEW)
Note:
Player firmware updates are available at http://www.thomsom-lyra.com
Note:
It is recommended to uninstall any previous installations of the MusicMatch
Jukebox software before proceeding. After the uninstall process has been completed,
delete the C:\Program Files\MusicMatch folder from Windows and where C:\Program Files
is the path where the software was installed.
Top View
Bottom View
Right View
Front View
1
2
3
5
M
6
4
7
Photo navigation mode
Control joystick -
Press once to view the selected item, if the item selected is a folder, the
slide show will start.
LEFT - Go back one level.
RIGHT - Go in one level.
UP - Scroll up one item, press and hold to scroll continuously.
DOWN - Scroll down one item, press and hold to scroll continuously.
Control ring -
Rotate clockwise to scroll down, rotate counterclockwise to scroll up.
Photo viewing mode
Control joystick -
Press once to return to navigation menu. In slide show, press to pause or
resume playback.
LEFT - Skip to the previous item.
RIGHT - Skip to the next item.
Control ring -
Rotate clockwise to scroll down, rotate counterclockwise to scroll up.
3.
M (Menu)
- View the settings menu, press continuously to cycle between previous menu and
settings menu during playback.
Right View
4.
ON / OFF / STOP
- When the power is off, press to turn on the unit; when the unit is in stop
mode, press and hold to turn the power off. When playing music or viewing photo, press to
stop playback. Press and hold for longer than 10 seconds will reset the device.
Top View
5.
Headphones jack (
)
- Insert the headphones plug here.
6.
HOLD
- Slide to activate or deactivate key lock.
Bottom View
7.
USB port (to computer) -
Attach the small end (Type mini-B) of the mini-USB cable here.
Attach the large end (Type A) to your computer. The unit will enter USB mode automatically,
and you can transfer files to and from the computer.
The Lyra Jukebox will get power from the USB port when connected, the power draw from
the USB port will only be enough to support data transfer.
USB port (to power supply)
- Plug in the AC power adapter here, the battery inside the
Lyra Jukebox automatically starts charging.
Install the USB Driver (Windows 98SE Only)
For Windows 98SE systems, you need to install the USB drivers before your computer can
recognize your Lyra Jukebox. The USB drivers are automatically installed from the Music
Management CD that comes with your Lyra Jukebox. After the USB drivers are installed, the
installer may ask you to reboot the computer.
Connecting Lyra to the Computer
Attach the small end (Type mini-B) of the mini-USB cable here. Attach the large end (Type A) to
your computer. The unit will enter USB mode automatically, and you can transfer files to and
from the computer.
Charging your Lyra Jukebox
Whenever your Lyra is connected to a PC, it will be charged automatically. To charge the unit
faster, please turn off the unit after connected to a PC. The display will show “Charging...”
PDP2814 QSG EN
9/14/05, 10:26 AM
2


