background image

02.38.3

User's Guide LDK 4482 - SuperXpander

1-7

Assembly

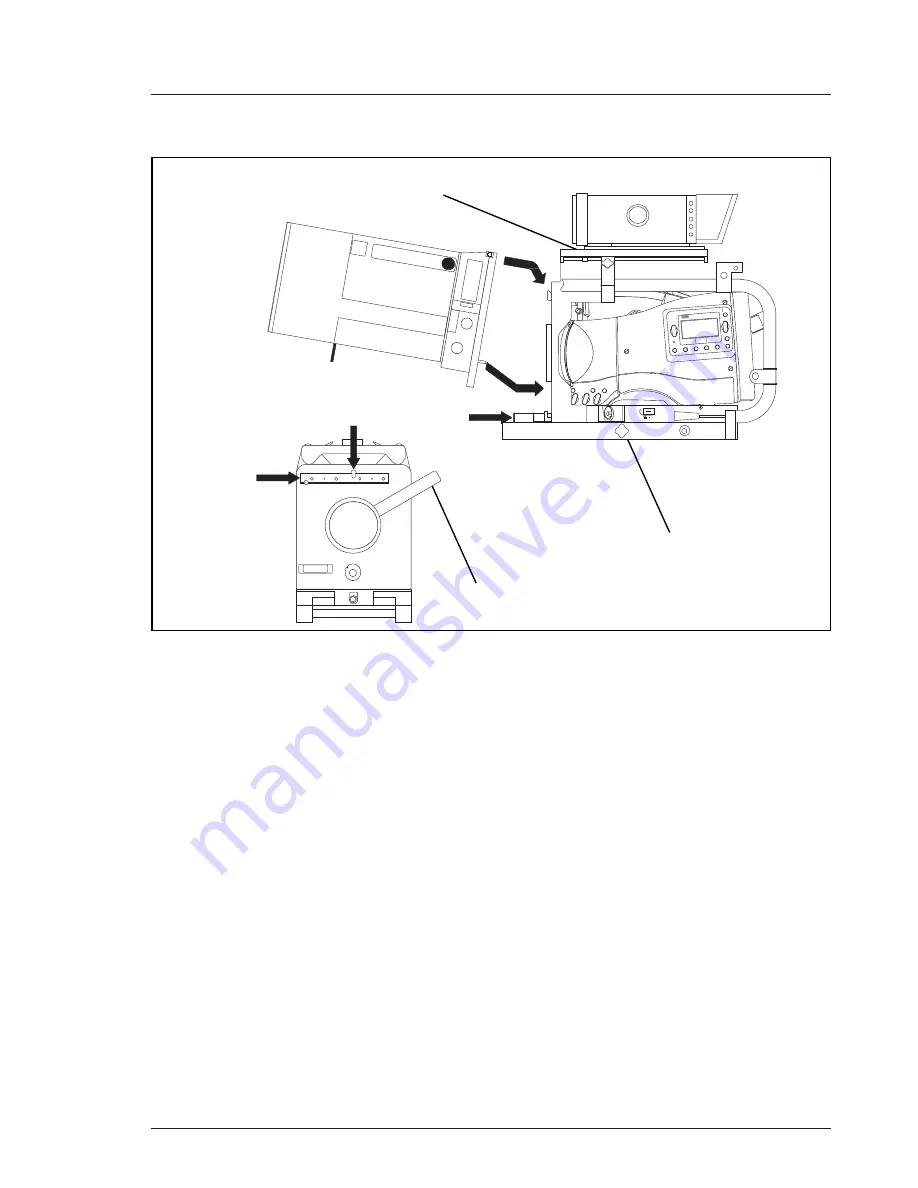
It is important that you assemble and disassemble the
units in the right order. The correct order of assembly
is as follows:
1. Attach the large lens adapter to the tripod.
2. Mount the lens onto the large lens adapter.
3. Attach the camera to the large lens adapter.
4. Mount the 7-inch viewfinder onto the large lens

adapter.

To disassemble the units follow this order in reverse.

Tripod

To mount the large lens adapter on a tripod, first
attach the tripod wedge plate to the underside of the
adapter as follows:
a. Lie the large lens adapter on its side.
b. Ensure that the flat side of the tripod wedge plate

is against the underside of the large lens adapter.

c. Secure the tripod wedge plate to the large lens

adapter by screwing four M6 x 16 screws into the
holes provided.

d. Slide the large lens adapter onto the tripod and lock

in place with the tripod locking bar and security pin.

Mounting a Lens

To mount the lens onto the large lens adapter, proceed
as follows:
a. Slide the viewfinder support back towards the rear

of the large lens adapter.

b. Hook the lens onto the support rail ensuring that

the upper lens pin fits into the slot in the support
rail.

c. Swing the lens downwards so that the lower lens

pin fits into the hole in the front of the camera.

d. Turn the lens locking handle clockwise to secure

the lens in place.

If the lens cannot be secured see Information
on the next page
To remove the lens, remove the camera from
the large lens adapter first, then follow this
procedure in reverse.

Viewfinder Mount

Retaining Knob

Bayonent Ring
Locking Lever

Balance Knob

Lens

Locking

Handle

Support

rail slot

Lens

support

rail

LDK


10P

70 VA max

Summary of Contents for SuperXpander LDK 4482

Page 1: ...LDK 4482 LDK 4482 LDK 4482 LDK 4482 LDK 4482 SuperXpander User s Guide 3922 496 48661 St 01 ...

Page 2: ...modification au cours de l évolution technique Thomson Multimedia Broadcast Solutions 2002 We Thomson Broadcast Solutions Nederland B V Kapittelweg 10 4827 HG Breda The Netherlands declare under our sole responsibility that this product is in compliance with the following standards EN60065 EN55103 1 EN55103 2 following the provisions of a the Safety Directives 73 23 EEC and 93 68 EEC b the EMC Dir...

Page 3: ... User s Guide LDK 4482 SuperXpander 1 1 LDK 4482 SuperXpander User s Guide Contents Location of Controls and Functions 1 2 Location of Controls and Functions for HS 1 4 Connections 1 10 ServiceInformation 1 14 ...

Page 4: ... balance switch Pressingthisswitchstartstheautomaticwhitebalance process This switch is in parallel with the AWB switch at the front left of the camera and operates in the same way The LED in the switch flashes during the auto white process Theoperationofthisswitchdependsonthe user level that has been set for the camera 3 VTR switch When pressed it starts or stops the VTR when the camera is in the...

Page 5: ... selected in the Vf Lens Vf Inst Vf mon menu on the camera Note Viewfinder and External selection switches on the camera are disabled 8 Dim Switches the brightness of the on air lamp on the viewfinder up and down in steps 9 On air lamp switch If function On air is on you can switch the on air lamp on the lens and 7 inch viewfinder on and off Note For function On air see Installation Manual Base St...

Page 6: ...viewfinder screen 2 VF Boost switch Thisswitchisusedtoaddanextra18dBamplification to the viewfinder contours This function can be used as a focus assist tool for the camera man 3 Down switch This down scroll switch is used to directly move through frequently used menus displayed in the viewfinderscreen 4 Up switch This up scroll switch is used to directly move through frequently used menus display...

Page 7: ...3 Utility outlet Supplies power maximum 70W at the mains supply voltage and frequency Loading or unloading this outlet could interrupt camera operation 4 Utility outlet power indicator Lights when power is available at the utility outlet 5 Script light connector A 3 pole socket which supplies 12 Vdc 500 mA for a script board light Script board LDK 6985 15 does not connect to this socket but to the...

Page 8: ...s power supply input Local power Input voltage for NTSC version 115 Vac 15 Fuse 4A Slow 250 Vac Input voltage for PAL version 230 Vac 15 Fuse 1 6A Slow 250 Vac The frequency of the mains power supply must be between 47Hz and 63Hz 5 Mains power supply On Off switch Switches the mains power supply to the large lens adapter on or off It does not switch off the power to the utility outlet 6 Local Remo...

Page 9: ...e plate to the large lens adapter by screwing four M6 x 16 screws into the holesprovided d Slidethelargelensadapterontothetripodandlock inplacewiththetripodlockingbarandsecuritypin Mounting a Lens Tomountthelensontothelargelensadapter proceed as follows a Slidetheviewfindersupportbacktowardstherear of the large lens adapter b Hook the lens onto the support rail ensuring that the upper lens pin fit...

Page 10: ...othefootbedbutdonotslide it home yet d Connectthelenscablefromthelargelensadapter to the lens connector at the side of the camera e Connect the viewfinder cable from the large lens adapter to the viewfinder connector at the side of the camera f Push the camera all the way home along the wedge shaped groove so that the stud on the footbed engages the bottom rear of the camera and the bayonet ring e...

Page 11: ...entheviewfinderretainingknobontopofthe large lens adapter Mounting the Scriptboard Tomountthescriptboardontothelargelensadapter proceed as follows a Mount the separately delivered scriptboard quick mounting pin to the scriptboard clamp of the large lensadapter Tightenwithscrew6andsecurewith screw738 Thescriptboardclampcanbemounted on the right as well as on the left side of the large lens adapter ...

Page 12: ...hecamera Remember to use the mirror image of the drawings to identify the pins on the solder side of the connector The part numbers of the panel connectors can be found in the spare parts lists of the service manual 3 2 1 Eurostyle 3 pin female 1 Neutral 2 Line 3 Earth Voltage 115 230 Vac Maximumpower 70 VA 3 pin female 1 12V 500mA 2 GND 12Vreturn 3 Housing Shield of cable directly to the connecto...

Page 13: ...V 5 no connection 6 D SCL 7 GND 8 D SDA 9 D INTN 10 Video 2 in 11 Videoreturn 12 Video 1 in Shield of cable directly to the connector housing Eurostyle 3 pin male 1 Neutral 2 Line 3 Earth 12 pin female 1 Shield 2 no connection 3 no connection 4 no connection 5 no connection 6 D SCL 7 GND 8 D SDA 9 D INTN 10 no connection 11 Videoreturn 12 VF video Shield of cable directly to the connector housing ...

Page 14: ...w 8 Iris auto remote 9 no connection 10 Zoom follow 11 Focus follow 12 Spare Shield of cable directly to the connector housing Top Viewfinder Connector X605 15 pin female 1 VF video 2 CVBS Ext Video 3 no connection 4 GND 12Vreturn 5 Housing 6 12V 7 SDL 8 no connection 9 VF video return 10 CVBS Ext Video return 11 12v 12 GND 12Vreturn 13 Housing 14 On airlamp 15 SDA Shield of cable directly to the ...

Page 15: ...Iris F follow 13 Zoom F follow 14 Ext SW 1 15 Ext SW 2 16 not used 17 Iris 18 Iris A R auto remote 19 Zoom 20 Focus 21 On airN tallycontrol 22 ZF L R zoom focus local remote 23 Ext SW 3 24 Lens ID 0 25 Lens ID 1 26 Lens ID 2 27 Lens ID 3 28 not used 29 not used 30 Focus F follow 31 not used 32 not used 33 Eng SW 34 Prod SW 35 not used 36 not used Shield of cable directly to the connector housing 3...

Page 16: ...e following changes in the Viewfinder LDK4016 02 have to be performed Video Board 3922 406 81721 status 9 RemoveC4 ZR27 was 3K3 becomes 12K code number 482205151203 In place of the not mounted ZR20 mount a capacitor of 22 nF ZC22 code number 4822 12231797 Old status 9 New status 10 Power Deflection Board 3922 406 81731 status 9 Connect pin 5 of ZIC100 to the 0V pin 1 or 8 of ZIC100 Old status 9 Ne...

Reviews: