background image

31

Player Menus

EN

DVD

Using the player menus

1.

Press the 

MENU

button to display the player’s main menu.When a disc is playing, press the

STOP

button first.

2.

Select a menu option using the 

and 

buttons, then press the 

button to access the

submenu.The submenu shows the current setting and the alternate setting(s).

3.

Select a submenu option using the 

and 

buttons, then press the 

button to access the

submenu.

4.

Select an option using the 

and 

buttons and press 

OK

to confirm your selection.

5.

Press 

MENU

again to exit the main menu.
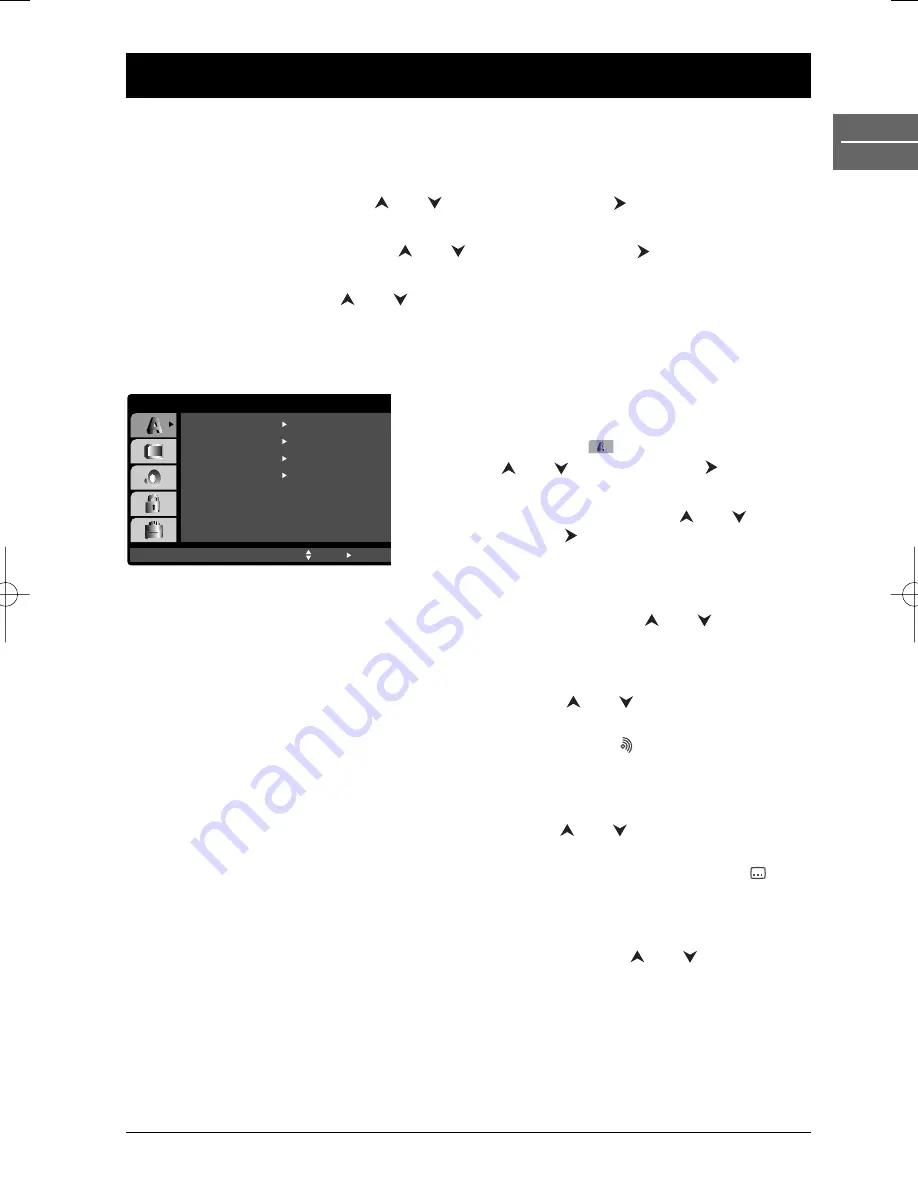
The Language menu

With this menu, you can set the language for player
menus, dialogue, subtitles and the disc menus.

1.

Select the 

Language

option in the main menu

using the 

and 

buttons and press 

button to

access the submenu.

2.

Select one of the options using the 

and 

buttons, and press 

button to access the various

options.

Menu language

To change the language of the player menus, choose the language using the 

and 

buttons and

press 

OK

to confirm.

Disc Audio  (DVD)

To change the dialogue language, choose the language using the 

and 

buttons and press 

OK

to confirm.

Note:To change the language during play, display the audio icon by pressing the 

button on the remote

control (see page 26).

Disc Subtitle (DVD)

To change the subtitle language, choose the language using the 

and 

buttons and press 

OK

to

confirm.

Note:To change the language of the subtitles during playback, display the subtitle icon by pressing the 
button on the remote control (see page 27).

Disc Menu (DVD)

To change the language of the disc menus, choose the language using the 

and 

buttons and

press 

OK

to confirm.

Notes:

The 

Original

option refers to the original language in which the disc was recorded.

The 

Other

option allows you to select a language which is not in the list: refer to the language code list at

the end of the booklet, enter the 4-digit code corresponding to the chosen language and press 

OK

.

Menu Language

Original

English

Off

Original

Disc Audio

Disc Subtitle   

Disc Menu

Move

Select      

LANGUAGE

DTH6300E_EN  28/05/04  18:48  Page 31

Summary of Contents for DTH6300

Page 1: ...doctor 19 Sound settings 19 On screen display 19 Format 20 Decoder 20 OPR 20 NICAM 20 Resetting the tape counter 21 Child lock 21 Playing NTSC tapes 21 DVD mode Basic playback operations Compatible di...

Page 2: ...ving it from a cold environment to a warm one is likely to cause condensation on some components inside the appliance Let the condensation disappear of its own accord before turning the appliance on a...

Page 3: ...EC Start recording inVCR mode DVD VCR Change from DVD mode toVCR mode and vice versa Front panel controls buttons appear left to right below Front panel display Indicates total playing time elapsed ti...

Page 4: ...m function MENU Access and hide the disc menu during play Display the player s main menu see page 22 red Access the audio function of the Info menu see page 26 green Access the subtitle function of th...

Page 5: ...he LP function see page 14 OPEN CLOSE Eject the tape Functions inTV mode This remote control can be used with some recent models of televisions Thomson Saba Brandt Ferguson Telefunken and Nordmende No...

Page 6: ...et using a Scart lead set the TV Output Select option in the Display menu to RGB see page 32 Basic connections DVD VCR TV satellite or cable receiver 1 Connect the DVD VCR to the television set as des...

Page 7: ...provided using an analogue audio connection Use one of these sockets to connect your DVD Player to an amplifier equipped with two channel digital stereo PCM or to an Audio Video receiver equipped wit...

Page 8: ...set the TV Output Select option in the Display menu to YPbPr see page 32 If your television is a high definition television you may take advantage of the DVD player s progressive scan output to get t...

Page 9: ...eo playback tune your TV until you see a bright blue screen 5 Tune this channel until the video picture is sharp and the sound is clear 6 Store this channel on your TV You will need to look at the TV...

Page 10: ...Should this be the case change these numbers by carrying out the instructions below see Sorting the channels 7 Press to store the settings Note After the automatic channel search has taken place the t...

Page 11: ...hen name your station 9 Press OK to reveal the television channel name list Use the and buttons to choose a channel name from the list Press OK to select it 10 If the station name you require is not l...

Page 12: ...picture see page 20 NIC Activation or deactivation of the NICAM function see page 20 3 Use the direction buttons and to select an option Press OK to confirm your selection and use the and buttons to...

Page 13: ...e This picture may display some interference in the form of black and white horizontal lines This is perfectly normal and does not mean that the video tape is damaged Notes Freeze frame cannot exceed...

Page 14: ...recording speed SP or LP 4 Press the RECORD button to start recording RECORD appears on the television screen and REC is displayed on the front display The video recorder starts recording until the en...

Page 15: ...er the SHOWVIEW number of the broadcast you want to record Note If you make a mistake press then enter the correct number 4 Press OK The data corresponding to the entered SHOWVIEW number are displayed...

Page 16: ...r basis press OK before entering a date in order to choose one of the available options DLY daily recording from Monday to Friday or weekly recording e g MO for Monday to record at the same time every...

Page 17: ...toVCR This unit allows you to copy the contents of a DVD to a video tape using the REC button Notes Be sure to set the Progressive Scan option to Off in the Display menu see page 32 If the DVD you ar...

Page 18: ...enter the HH hours MN minutes DD day MM month and YY year The day of the week is automatically displayed once the date has been entered If you make a mistake use and to select the item and re enter t...

Page 19: ...h the and buttons 3 Press OK 4 Use the and buttons to choose between STEREO LEFT left channel only RIGHT right channel only MONO 5 Press to exit the menu On screen display OSD This function is used to...

Page 20: ...oder is connected to the AV2 socket 4 Press to exit the menus OPR Optimum Picture Response This feature enhances the picture from the video tape by adjusting to the condition of the video tape If you...

Page 21: ...minutes and seconds Press CLEAR to reset the counter Then when you press STOP and then REV the video recorder will stop rewinding at 0 00 00 Child lock To prevent the video recorder from being used bu...

Page 22: ...menu vary according to the type of disc you have inserted and are independent of the player s menus When the disc is playing press the MENU button to display and hide this menu Info menu The player s...

Page 23: ...PAUSE once for freeze frame Note After 30 seconds in PAUSE with no user interaction the player goes into screen saver mode Frame advance 1 Press the PAUSE button a number of times to advance forward...

Page 24: ...k Control set the PBC option to Off in the Others menu see page 35 Press and hold PLAY MODE again to exit the Playback list mode 3 Select a track in the list using the and buttons and press OK to add...

Page 25: ...s if appropriate or the OK button to execute the setting Press the INFO button again to exit the Info menu Note When one of the icons is not followed by a small arrow this means that the relevant func...

Page 26: ...ons 2 Enter a time with the numeric buttons format hh mm ss Note If you make a mistake press CLEAR to remove numbers and then input the correct numbers 3 Press OK to confirm Audio Some discs have seve...

Page 27: ...in the Language menu see page 31 Camera angle DVD Some discs offer different camera angles for specific scenes To change the camera angle during playback press the INFO button then select the Angle ic...

Page 28: ...yback Notes In the file list select and press OK to go back to the folder list Press and hold the MENU key for a few seconds to display the previous page of the list During playback press the INFO but...

Page 29: ...to the playback list select Clear All and press OK Notes The playback list is erased when the CD is removed from the player Press the PLAY MODE button to access the available play modes during program...

Page 30: ...t the icon using the button and then press OK The simultaneous playback of music and pictures starts Playing DivX files This DVD player is an Official DivX Certified product that allows you to play Di...

Page 31: ...layer menus choose the language using the and buttons and press OK to confirm Disc Audio DVD To change the dialogue language choose the language using the and buttons and press OK to confirm Note To c...

Page 32: ...ct On using the and buttons and press OK to confirm 2 A confirmation screen appears Cancel is highlighted by default Use the button to high light Enter and press OK to confirm Note If your TV does not...

Page 33: ...s Licensing Corporation Dolby Digital is a sound compression technique developed by Dolby Laboratories for digital audio multichannel signals The Dolby Digital system supports any audio channel config...

Page 34: ...K to confirm Note Select Unlock to unlock the player Password This option allows you to set or change the password To set a password Select the New option and press OK Enter the four digit password an...

Page 35: ...display high resolution pictures if the disc contains any Press the and buttons to enable or disable this function and press OK to confirm Note This option may not be available on all VCDs Auto Play D...

Page 36: ...k that the files have a resolution of less than 2 760 x 2 048 pixels Check that the disc s regional code matches the player s regional code This player s regional code is 2 Clean the disc see page 38...

Page 37: ...obstructed During thunderstorms we recommend that you isolate the appliance from the electrical supply so that it is not damaged by electrical or electromagnetic surges This appliance is designed for...

Page 38: ...These documents are required in the event of claiming your guarantee rights All repairs during the guarantee period must be carried out by an authorised engineer representing our brand If this condit...

Page 39: ...VD R DVD RW DVD R DVD RW due to differences in recording formats software used Disc types DVD Video Digital video discs 12 cm and 8 cm single or double sided single or dual layer DVDs are high density...

Page 40: ...ound quality with mp3 files basically depends on the rate of compression decompression you choose Obtaining audio CD quality sound requires an analog digital sampling rate that is conversion to mp3 fo...

Reviews: