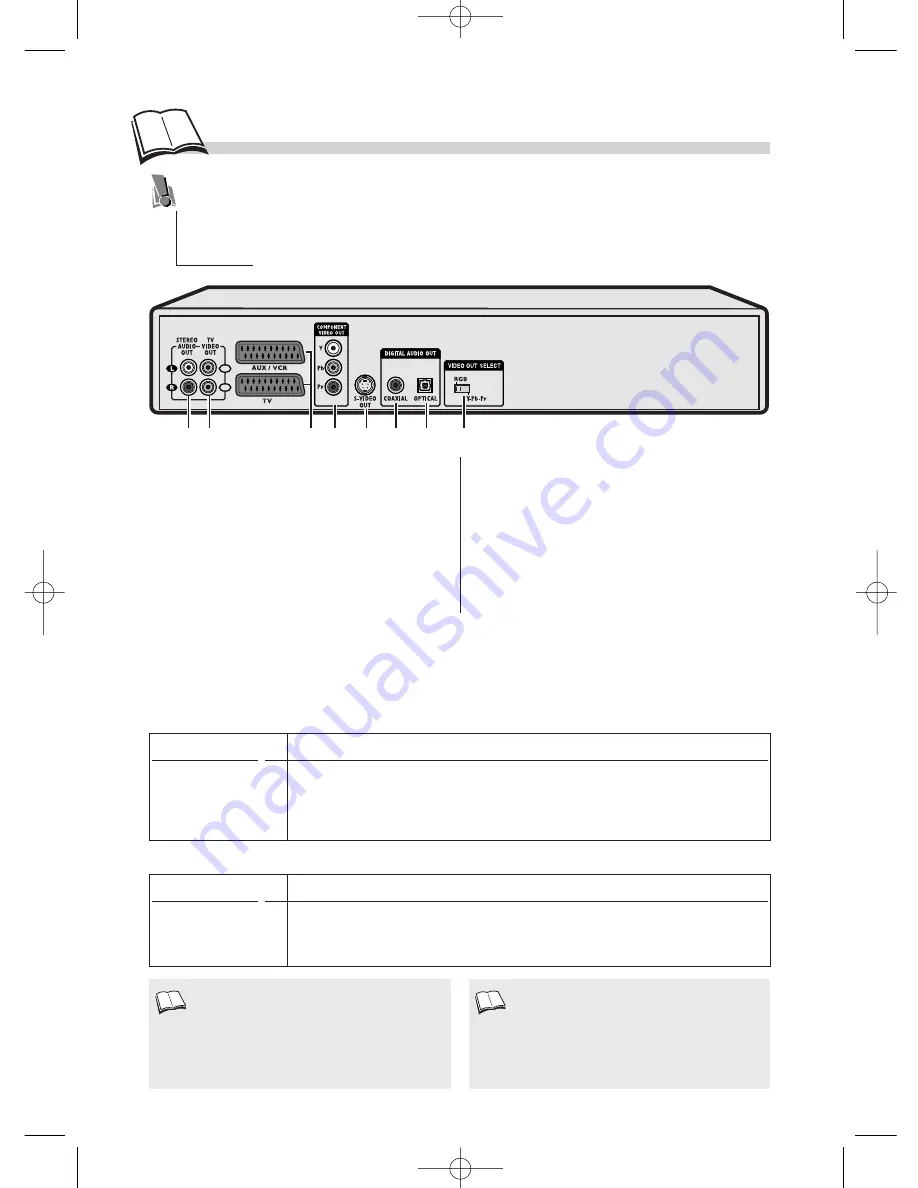
THOMSON DTH220U Manual Download Page 6

6

O

ther connections

1

2

6

1

2

5

3

8

7

4

1.

Analog Audio Out sockets 

to amplifier.

2.

Composite Video Out sockets (CVBS)

: to AV

amplifier or TV (standard-quality picture).

3.

SCART/PERITEL Outputs (1) (RGB)

: to AV

amplifier or TV with button 

8

on 

RGB

.

4.

COMPONENT Output (Y, Pb, Pr)

: to TV or

devices equipped with equivalent inputs with

button 

8

on 

Y

Pb

Pr

.

5.

S-VIDEO Out sockets (Ushiden signals Y/C)

:

to AV amplifier or TV. 

6-7.

Digital Audio Out sockets 

to amplifier or TV.

8.

VIDEO OUT SELECT

at the rear of the player to

select the type of output signal: 

RGB

for the 

TV

(Scart/Peritel) or 

Y

Pb

Pr

for the 

COMPONENT

VIDEO OUT 

sockets.

Audio connections (sound)

Video connections (picture)

Connections

The table below lists the connectors and quality of your player’s output signals. Select one of the 4
connection setups shown for video connection and one of the 3 connection setups shown for audio
connection.

Sound quality  

Type of connector used

The connection setup shown on page 5 provides a rapid connection of your player. This setup
gives standard-quality sound reproduction and an optimum-quality picture (RGB). You may
need to use other connection setups suited to the connectors available on your other devices or
to get maximum performance out of your player. Your player has other sockets for these
purposes.

*** 

• OPTICAL OUT socket (

7

) (Toslink optical connector – digital signal)

***

• COAXIAL OUT socket (

6

) (RCA socket- digital signal)

**

• AUDIO OUT L socket (

1

) (RCA sockets- analog signal)

Picture quality 

Type of connector used

***

• TV socket (

3

) (SCART socket – RGB signals)

***

• 3 Components sockets YPbPr (

4

) (RCA sockets - signals Y, Pb, Pr)

**

• S-VIDEO OUT socket (

5

) (Hosiden socket- Y/C signal) 

*

• VIDEO OUT sockets (

2

) (RCA sockets- CVBS signal)

If the connecting cables are not supplied with
your player, get good-quality cables, preferably
well-known brands.

Connection through the scart socket supplies
both video and audio signals. If you choose the
connection using a scart cable, you don’t need to
connect any other sockets. Make sure that button

8

at the back is positioned on RGB and that your

TV set supports that type of signal. 

1.

1.

DTH220U_UK  22/03/02 10:47  Page 6

Summary of Contents for DTH220U

Page 1: ...of its components It can be dangerous for you or for certain fragile components You could receive an electric shock or touch the laser beam Do not place your eyes close to the opening of the disc tra...

Page 2: ...cture and audio are recorded by means of digital signals Video CD VCD Video Compact Disc CD on which you can record up to 74 min of VHS quality video associated with still images audio tracks and inte...

Page 3: ...functions Precautions 1 Discs you can play 2 Initial setup 4 5 Before you start Initial setup of your remote control Initial setup of your DVD player Other connections 6 7 Connections Connections exa...

Page 4: ...e Do not throw them into fire do not recharge them If you are not using the remote control for a long period of time remove the batteries Initial setup of your remote control Before you start Thank yo...

Page 5: ...on your player it will ask you to select a preferred language for the various displays via the menu which appears on your TV screen If this menu is not displayed on your TV screen select the AV socke...

Page 6: ...page 5 provides a rapid connection of your player This setup gives standard quality sound reproduction and an optimum quality picture RGB You may need to use other connection setups suited to the conn...

Page 7: ...2 Video recorder Audio Video amplifier not provided AV Cable Scart cable Scart cable Scart cable TV Your DTH 220 Your DTH 220 Video projector Video recorder or or Optical Cable Coaxial Cable Audio Ca...

Page 8: ...se playback and switch to Frame advance mode k pages 14 15 Displays the contents of a DVD k page 10 Repeats the last scene Each press steps backward 10 seconds during DVD playback Displays the program...

Page 9: ...OPEN CLOSE To open and close the disc tray 6 PLAY To play the disc 7 STOP To stop playback 8 SEARCH Fast forward or reverse k page 15 9 SKIP To skip a chapter forward or backwards k page 14 10 Front p...

Page 10: ...sing OK 4 Change Settings by pressing the Navigation keys 5 To exit the menus press MENU or TITLE Disc Menu or go back to the previous menu by pressing RETURN Player Menu Selecting menu functions and...

Page 11: ...ers k page 18 INTROSCAN To play the first 10 seconds of each track Track 1 currently being played k page 15 In addition to menus your player also has banners which display the main settings related to...

Page 12: ...splay then tick one of the settings Dim for Movies Off for Movies Always Bright Always Dim The Display menu provides you with settings to adapt the picture format and TV standard to that of your TV se...

Page 13: ...S film onto the two channels of your TV or stereo amplifier The sound effects of a 5 1 system are then simulated Select Sound then Virtual Surround and switch the function to On Dolby Digital is a sou...

Page 14: ...disc specific menu appears In that case follow the instructions The player has memorised the last scene on the disc If you now press PLAY playback starts from this point To erase Resume memory press...

Page 15: ...DVD or a track CD VIDEO CD Change the language of DVD dialogues or subtitles For direct access to a specific scene on the disc select the first icon with the Navigation keys Enter the requested place...

Page 16: ...function is enabled It does not work with Video CDs Your player has several Play modes Standard play which follows the order of the tracks titles and chapters on the discs Random play which plays the...

Page 17: ...on keys The programming menu appears 2 Follow instructions a b c d to make up your selection a Choose a title then a chapter or a track only for an Audio CD using the Navigation keys or the remote con...

Page 18: ...B A B Repeat appears to tell you that the repeat playback of the sequence is starting To stop repeating the sequence select Off with the Navigation keys or press STOP Repeat functions remain active u...

Page 19: ...layed press STOP to exit the menu During playback press yellow INFO key info strip is displayed on screen 1 Collie 2 Terrier 3 Bobtail 4 Shepdog 5 Husky Pedigree dogs DVD Camera angles On certain DVDs...

Page 20: ...previous song or to the next one Press as many times as the number of songs you want to skip wait a few seconds after each press Navigation keys If JPEG or MP3 files are recorded on the disc or the di...

Page 21: ...et MP3 files are compatible with Microsoft s DOS and Windows and with Apple s Mac These two formats are the most widely used When naming your MP3 files do not exceed 12 characters and place mp3 as the...

Page 22: ...In the menu choose your preferred language for dialogues and subtitles If it is available on the DVD you will be playing it will be selected automatically The default language is the one which is sel...

Page 23: ...will be selected as the dialogue language If it is not available the preferred disc language will be selected Original corresponds to the original soundtrack language of the film on the disc With DVDs...

Page 24: ...o validate lock To enable the Lock Player function you must enter a password The Ratings Limits function enables you to control the type of discs or programs that your family can watch If certain disc...

Page 25: ...n menu If you forget your code key number for the parental rating locking function you must do the following Open the player s disc tray and if it contains a disc remove the disc Close the disc tray T...

Page 26: ...ial functions Keys to select programmes TV Mute sound off TV Sound level whatever the switch position dvd tv TV control To switch your set on and off stand by This remote control enables you to contro...

Reviews: