background image

Recording

15

EN

Instant Timer  Recording

1.

To set the length of time you want to
record for, press the 

RECORD

button

twice.The television screen shows the
recording duration.

2.

Press the 

RECORD

button again to

increase the recording time to a maximum
of eight hours.

Recording from an AV socket

If you wish to record from the Scart socket,
from the rear AV sockets or from the front AV
sockets located on the front panel, you need to
select the appropriate audio/video input.

1.

Select the 

Scart Input

or

Front AV

option from the 

Recorder

menu and

press or 

ENTER

.

2.

Select one option using the 

and 

buttons.

3.

Press the 

SOURCE

button several times

to select either 

Front AV  IN

or

Rear AV

IN

.

4.

Start playback on the other equipment.
Press 

RECORD

to start recording.

5.

Press 

to stop recording.

Programming a recording

Ensure the television channels have been tuned
and stored correctly and that the clock is set
to the correct time.You can programme up to
15 recordings over one year.

1.

Open the tray by pressing the

OPEN/CLOSE

button. Place a DVD+RW

or a DVD+R disc with the printed side
facing up and close the tray.

2.

Press the 

TIMER

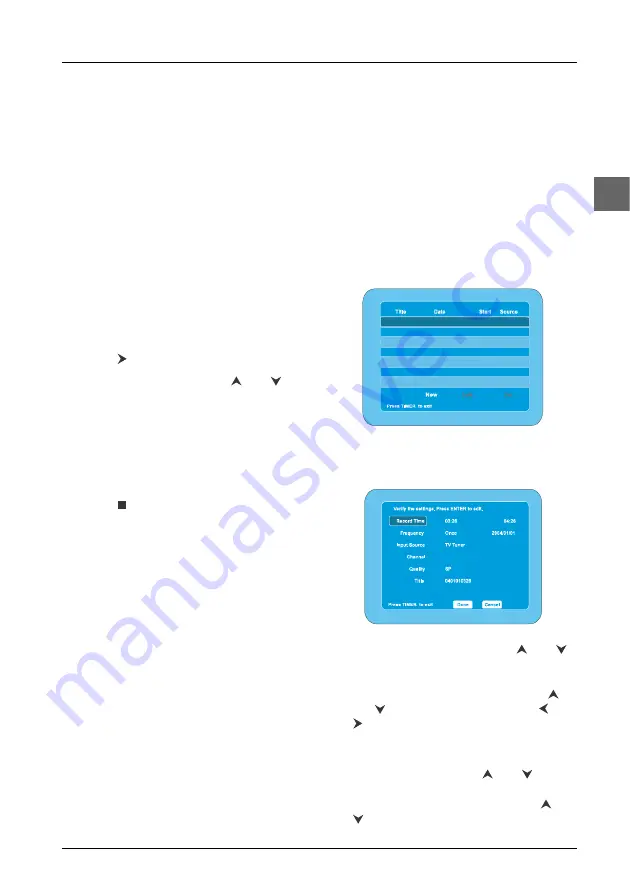
button.The “My  Record

List” menu appears.

3.

Select

New

and press 

ENTER

.The

“Record Show” menu appears.

4.

Select

Record Time

using the 

and 

buttons and press 

ENTER

.

Enter the start and end time of the
programme you wish to record using 
and 

or the numeric buttons and 

and

to move the cursor.

When finished, select 

Done

and press

ENTER

.

5.

Select

Frequency

using and and

press 

ENTER

.

Select either 

Once

or

Repeat

using and

, select

Continue

and press 

ENTER

.

My Record List

Record Show

Summary of Contents for DPL953REC -

Page 1: ...DPL953REC User manual...

Page 2: ...E LES RISQUES D LECTROCUTION NE PAS OUVRIR LE BO TIER DE L APPAREIL LES PI CES INTERNES DE CET APPAREIL NE N CESSITENT AUCUN ENTRETIEN FAITES APPEL DU PERSONNEL QUALIFI POUR TOUTE OP RATION DE MAINTEN...

Page 3: ...Storing radio stations 20 RDS for FM only 20 Player Menus Recorder menu 21 System menu 21 Language menu 23 Video menu 24 Speaker menu 25 Audio menu 26 TVTuner menu 26 Additional Information Troublesh...

Page 4: ...efore turning the appliance on again Before moving the player make sure the disc tray is empty Other important information about using and cleaning your appliance is available at the end of the bookle...

Page 5: ...e input source 10 VOLUME To adjust the sound volume 11 AUDIO IN L and R Audio input sockets 12 VIDEO IN Video input socket 13 S VIDEO IN S video input socket Inserting batteries in the remote control...

Page 6: ...eparate from the black and white part of the video signal If your TV has an S Video socket connect the appliance to the TV with an S Video cable not supplied Component video out TheY Pb Pr sockets pro...

Page 7: ...images coming from another appliance connect the other appliance to the DVD recorder using audio video cables not provided SAT VCR SCART OUT VCR SAT VIDEO OUT VCR SAT SCART IN IN AUDIO OUT VCR SAT Vi...

Page 8: ...lack bass out of phase effect Do not ground the output line as this will damage the speaker 1 2 1 Centre In surround mode the centre speaker transmits much of the dialogue as well as music and effect...

Page 9: ...nd field Alternative Surround Placement Rear wall If rear wall mounting is the only option direct the speakers at each other A towards the front B or even towards the side walls C D Experiment with th...

Page 10: ...G To start reverse or forward slow motion during playback To access program playback in Stop mode To start playing a disc Pause To stop playback PRESET To directly access the next or previous chapter...

Page 11: ...l set up assigns the numbers to the channels in a predefined order These numbers may therefore not match the actual channel numbers Should this be the case change these numbers by carrying out the ins...

Page 12: ...on Select the TV Tuner option using the and buttons and press or ENTER 2 Select the Modify Channel option using the and buttons and press or ENTER 3 Select the channel to modify using the and buttons...

Page 13: ...Disc menu appears One of its options can be selected to start playing the disc Select it and press ENTER or press on the remote control 4 Press to stop playback Note The player stores the point where...

Page 14: ...equence Then the sequence is played repeatedly until you press A B to resume normal playback Note A B repeat can only be used within the same chapter or track Shuffle playback VCD SVCD and audio CD Yo...

Page 15: ...audio formats Note This option is only available if the disc offers a number of dialogue languages or audio formats Subtitles DVD Press several times the SUBTITLE button to select one of the available...

Page 16: ...the OPEN CLOSE button Place a DVD RW or a DVD R disc with the printed side facing up and close the tray Note When you insert a DVD RW disc for the first time the DVD recorder must first format the dis...

Page 17: ...back on the other equipment Press RECORD to start recording 5 Press to stop recording Programming a recording Ensure the television channels have been tuned and stored correctly and that the clock is...

Page 18: ...elect Delete to cancel the last typed character and press ENTER or select Clear to cancel the whole title and press ENTER When finished select Done and press ENTER Select Done and press ENTER again 10...

Page 19: ...other players that are compatible with the disc format Caution Once a disc is finalized you cannot edit it or record on it 1 Select Finalize Disc using and and press ENTER A confirmation screen appear...

Page 20: ...playing JPEG files or playing mp3 or WMA files Before inserting a disc check that it is compatible with the player 1 Open the tray by pressing the OPEN CLOSE button 2 Place the disc with the printed s...

Page 21: ...ting purchasing DivX VOD files DivX VOD files are similar to DVD video rental discs The difference lies in the access to the media DivXVOD files are downloaded after paying a rental from certain comme...

Page 22: ...is obtained TV and other electronic devices could be the cause of interferences so try to position the aerial away from them Storing radio stations The player can store up to 40 radio stations in its...

Page 23: ...To set the clock manually select Manual and press ENTER 3 Select a field using the and buttons and set the time and then the date using the and buttons or the number buttons Press the button to select...

Page 24: ...cenes according to the rating limits In Europe very few discs have coded scenes 1 Press or ENTER to access the sub menu 2 Select Choose Rating and press or ENTER 3 Select the rating level using the an...

Page 25: ...NTER to access the sub menu 2 To change the dialogue language choose the language using the and buttons and press ENTER to confirm Note If the selected language is not available on a disc the disc s d...

Page 26: ...ted to the format of your TV screen 1 Press or ENTER to access the sub menu 2 Select an option using the and buttons then press ENTER to confirm Normal PS reproduces a 4x3 picture without distortion N...

Page 27: ...le on a conventional analogue TV or monitor Speaker menu 1 Press the SETUP button to display the player s menu 2 Select Speaker using the and buttons 3 Press or ENTER to access the sub menu Front L R...

Page 28: ...to access the sub menu Auto CH Scan 1 Press or ENTER A confirmation screen appears 2 Select Yes and press ENTER Note If you finally do not wish to launch the automatic channel search select No and pre...

Page 29: ...sound Check the speaker configuration in the Speaker menu The remote control does not work or works only intermittently Check that batteries are inserted or change them Aim the remote control at the...

Page 30: ...e or alcohol based products risks damaging the appliance If an object or liquid enters inside the appliance unplug it immediately and have it checked by an authorised engineer Handling and caring for...

Page 31: ...d by means of digital signals DVD R DVD RW DVD R DVD RW Most DVD R and DVD R one recording only DVD RW and DVD RW discs rewritable Depending on the DVD writer and discs used Recordings using DVD R and...

Page 32: ...ommendations cannot be taken as a guarantee that the DVD player will play mp3 recordings or as an assurance of sound quality You should note that certain technologies and methods for mp3 file recordin...

Page 33: ...from the mains supply but switches operating power on and off Important If the plug is removed rewire new plug as follows The wires in the mains plug are coloured in accordance with the following code...

Page 34: ...Multimedia Sales Europe 46 quai A Le Gallo 92648 Boulogne Cedex FRANCE 322 019 464 RCS NANTERRE http www thomson europe com 56123440 Copyright THOMSON 2005 DPL953REC Model and serial number Dealer s...

Reviews: