


EN
9
English
Installing channels
•
Press
OK
to skip the country selection and
enter the next step. Or use
◄/►
to reselect
your country, then press
OK
to enter.
•
- If you select
Digital & Analogue
, then
press
OK/►
to enter. Select your scan
mode if available and configure proper cable
information in the same way as in Initial
setup. Press
▲/▼
to select
Scan
and press
OK/►
to start your automatic search relating
to all DVB-C digital and analogue channels.
- If you select
Digital
, then follow the same
process as above to start your automatic
search relating to all DVB-C digital channels.
- If you select
Analogue
, then press
OK/►
to start your automatic search relating to all
analogue channels.
-
c) If you have selected
Satellite
.
•
Press
▲/▼
to select
Channel install
, and
press
OK/►
to enter.
•
Select
Automatic search
, then press
OK/►
to enter. You can select a proper satellite or an
operator.
•
Press
OK
to go to the next step. Before you
start scanning, you can select
Satellite Setup
and press
OK
to select a satellite and press
OK
to edit the parameters of the selected satellite.
Then with your desired options of
Scan mode
and
Channels
, select
Scan
and press
OK/►
to start scanning.
4.
The search may take a few minutes. During the
process, you can press
MENU
to abort halfway.
5.
Once the automatic search ends, press
MENU
to
return to the previous step or press
OK
to restart
your channel search.
6.
After the automatic search, channels are arranged
in a preset order. If you wish to skip channels,
modify the preset order or rename channels, select
Settings > Setup > Organiser
and press
OK/►
to
enter.
preset order or rename channels, select
Setup >
Organiser
and press
OK/►
to enter.
-
In this step, you can also press ◄ to return to the
previous step.
Performing an automatic channel search
This section describes how to search and store
channels automatically. Instructions are for both
analogue and digital channels. This may be done in
any of the cases below:
- you have selected
Skip scan
in the Initial setup
- you see
“Please scan channels!”
in TV mode
- you want to update your channels.
1.
Press
MENU
on the remote control and select
Settings > Setup > Language
. Press
OK/►
to
enter and press
◄/►
to select your desired menu
language.
2.
Press
MENU
to return to
Setup
, press
▲/▼
to
select
Country
, then press
◄/►
to select your
country. The TV installs and arranges channels
according to your country. At this step, you will be
requested to enter your password.
3.
Press
▲/▼
to select
Tuner mode
, then
press
◄/►
to select
Antenna
or
Cable
or
Satellite
.
(Note:
Satellite
option may not be
available for certain models.) Then follow a) or b)
or c) below.
-
a) If you have selected
Antenna
.
•
Press
▲/▼
to select
Channel install
, and
press
OK/►
to enter.
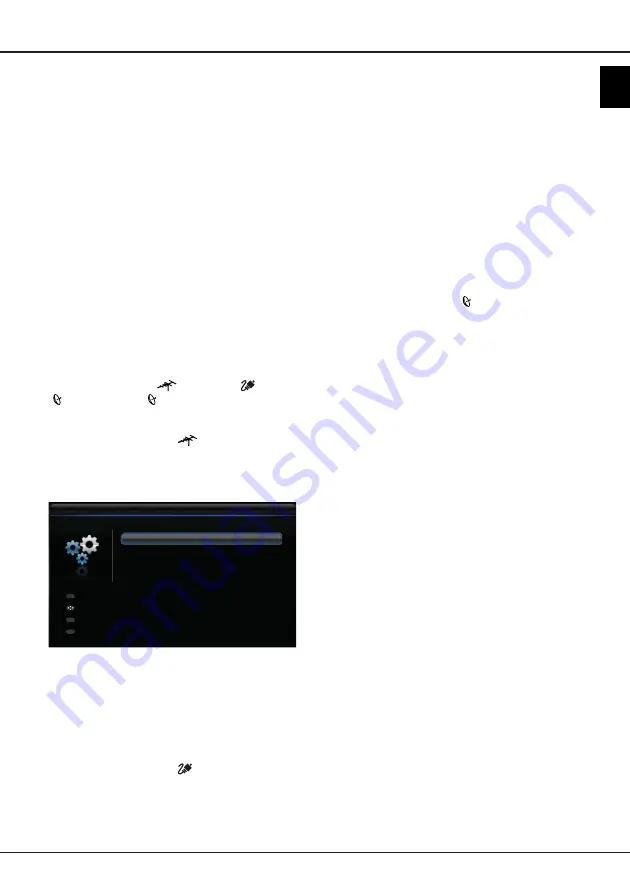
•
Select
Automatic search
(Refer to Figure 2.),
then press
OK/►
to display
Automatic search
.
Channel install
Automatic search
Automatic update
Analogue manual scan
Antenna manual installation
Clean channel list
Back
Exit
Select
Enter
Exit
Menu
OK
...
...
...
...
...
Figure 2
•
Press
OK
to skip the country selection and
enter the next step. Or use
◄/►
to reselect
your country, then press
OK
to enter.
•
Select
Digital & Analogue
or
Digital
or
Analogue
, then press
OK/►
to start the
automatic search, which relates to all DVB-T
digital and/or analogue channels.
-
b) If you have selected
Cable
.
•
Press
▲/▼
to select
Channel install
, and
press
OK/►
to enter.
•
Select
Automatic search
, then press
OK/►
to
display
Automatic search
.


