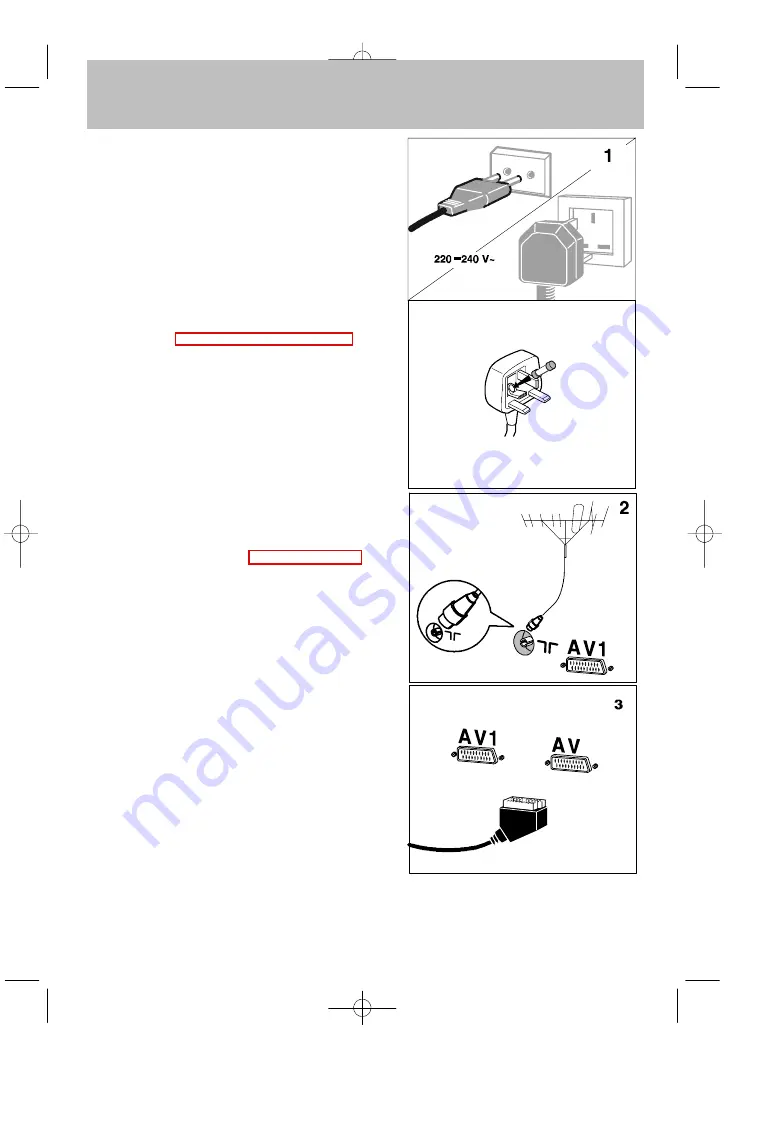
THOMSON 2 1 D U 2 1 C User Manual Download Page 5

$

Continental

Europe

United Kingdom

The plug is fitted with a fuse which protects your
television. If your television does not work, the fuse may
be blown. In this case, replace it with an identical 5 Amp
ASTA or lr BSI (BS 1362) certified fuse.

Note: the mains lead of your television is fitted with a
moulded plug. This lead contains all the safety equipment,
so you are advised when replacing it not to use a
non-specific commercially-available model.

2

Basic connections

3

Basic connections

The mains plug (1) supplies power to the television. The
television must only be plugged in to a 220-240 V - 50 Hz
power supply. It must never be plugged in to a DC source.
Should the plug become separated from the lead, never
attempt to plug it in to a mains socket. This could cause
electrocution.

The aerial socket (2), located on the rear of the television, can
be used to connect an external aerial or other appliance
equipped with a modulator such as a VCR, satellite receiver,
etc.

If you connect an appliance to the aerial jack, you must give
it a channel number. To do this, switch on the appliance, then
use the television to find the modulator channel (see the
appliance manual). Now give it a programme number and
memorise it (see Manual Programming of channels). Then,
when you wish to use the appliance, simply select its
programme number on the television. This procedure is not
required for VCR’s not equipped with a modulator.

The SCART socket AV1 (3), located on the rear of the
television, is intended to connect a VCR or a camcorder
(VHS, 8 mm), a Canal+ decoder, a video games console or
RGB-signal emitting appliances.

The SCART socket AV2 (3), located on the rear of the
television, is intended to connect a VCR or a camcorder
(VHS, 8 mm, S-VHS or Hi-8).

We strongly recommend the use of this type of connection,
which gives a better picture quality. To use the peripheral
appliance that you have connected, press the AV key on your
remote control (press once to select AV1; twice to select
AV2; three times for AV3: see ”Other Connections”). This
selection is automatic for some appliances. Pressing “”play”
on a VCR, or switching on a satellite receiver connected to
AV1 or AV2 will automatically switch on your television.

When you stop the VCR, if you have not changed channels
while watching the VCR, the television automatically
switches back to the channel you were watching beforehand.
If the television has been switched on from the VCR, it
switches to standby when the VCR is switched off. The
television automatically switches to 16/9 format if the
connected appliance delivers the corresponding signal.

Summary of Contents for 2 1 D U 2 1 C

Page 1: ...10 U s e r m a n u a l U s e r m a n u a l U s e r m a n u a l U s e r m a n u a l U s e r m a n u a l 2 4 W K 2 3 U 2 5 D G 2 1 U 2 8 D G 2 1 U 2 8 W S 2 3 U 3 2 W S 2 3 U...

Page 2: ...10 cm 10 cm 5 cm 10 cm 2 de couv TX807 11 05 98 10 43 Page 1...

Page 3: ...s plug must be easily accessible In the following cases we recommend that you pull out the mains connector 1 During a thunderstorm In such a case it is advisable that you also disconnect the TV set fr...

Page 4: ...ing within the Menus 7 Installing your television for the first time 8 Automatic installation 9 Programme organisation 10 Manual programming 11 Channel number guide 12 Channel number guide Ireland 13...

Page 5: ...number and memorise it see Manual Programming of channels Then when you wish to use the appliance simply select its programme number on the television This procedure is not required for VCR s not equ...

Page 6: ...r to avoid any interference use the male to male adaptor and the male to female cable supplied with your TV set as shown below TV Antenna Male to female cable Male to male adaptor TV VCR Antenna AUDIO...

Page 7: ...s connected to the television AV1 AV2 For programme numbers higher than 10 press the 0 key on the remote control appears on the screen Now use the number keys on the remote control to enter first the...

Page 8: ...must enter the code of your video recorder in the table on the next page following the adjustment procedure described below You may find that this remote control is not compatible with your brand of...

Page 9: ...ISHI 048 049 NEC 039 NOKIA 003 010 035 038 NORDMENDE 001 002 012 054 057 058 059 010 ORION 024 025 026 027 028 029 PANASONIC 008 009 062 PHILIPS 061 062 063 064 065 066 RADIOLA 061 062 063 064 065 066...

Page 10: ...ting your television Calling up a Menu Select the menu you wish using the Up Down keys Press the key to validate Navigating within the Menus Use the Up Down keys 1 to select a line Use the Left Right...

Page 11: ...to be displayed 2 Then validate using 3 A list of countries is now displayed Fig 2 Select the country in which you live or the country from which you wish to receive the broadcasts if you live in a bo...

Page 12: ...ountry so see the Manual programming chapter to install any channels not found For cable networks if you have not found certain channels select Other instead of a country name in the PERSONAL SETTINGS...

Page 13: ...TALLATION MAIN MENU then select Programme organisation and validate using To delete a programme for which reception is too poor 1 Select the line marked Select program 2 Use the or Left Right keys to...

Page 14: ...se the same frequencies as the RF channels If this is the case you must select Aerial instead of Cable Autosearch Enter the programme number if you know it If not search using the Left Right keys Your...

Page 15: ...26 23 29 Northern Ireland Channel Islands Brougher Mountain 22 28 25 32 Fremont Point 51 44 41 47 Divis 31 27 24 21 South Limavady 55 62 59 65 Hannington 39 45 42 66 Midhurst 61 55 58 68 Rowridge 31...

Page 16: ...r you need a horizontal or vertical aerial to suit the transmissions REPUBLIC OF IRELAND NORTHERN IRELAND RTE 1 RTE CH5 2 BBC 1 BBC 2 UTV CH4 North West Holywell Hill 23 26 Brougher Mountain 22 28 25...

Page 17: ...level between different channels and between different programmes on the same channel Activate or deactivate the auto volume level as required On models equipped with Virtual Dolby Surround this func...

Page 18: ...on the front or the side of the television Format control Use the Left Right keys to select the desired picture format Auto if the transmitter for 16 9 format TV s or the appliance connected to one o...

Page 19: ...lect each of these lines one after the other and set as required Contrast expand Select this line then choose the desired Contrast expand setting High or Low Tone Select this line then choose the desi...

Page 20: ...tched on again from the remote control Current time The current time is given by the Teletext see PERSONAL SETTINGS menu You can also set the time manually using the number keys 0 to 9 on your remote...

Page 21: ...control or Display the SUMMARY using the key on the remote control Select the line marked List Validate using The page displayed is the page containing the programme you are watching It is identified...

Page 22: ...ures black bands at the top and bottom of the screen Use the Left Right keys to select the desired zoom position ZOOM 0 4 3 picture black bands at the sides FULL SCREEN for a 4 3 picture that fills th...

Page 23: ...urn to the normal display Sub code You can use this to access a sub page directly Select using the Up Down keys Then enter the four digits of the required sub page number Certain programmes have Alarm...

Page 24: ...ntrol to select a programme The headphone socket 2 is provided to connect a headphone or earphones Connecting headphones mute the sound from the television loudspeakers Other Possibilities Copying a c...

Page 25: ...n 6 pin 4 return B Pin 2 pin 4 return AUDIO OUTPUTS A Pin 3 pin 4 return B Pin 1 pin 4 return FAST BLANKING INPUT Pin 16 1 V to 3 V for fast blanking switching 75 W SIGNAL SELECTION Facilities are pro...

Page 26: ...2 T H O M S O N m u l t i m e d i a Sales UK Limited Crown road Enfield Middlesex EN 1 1DZ 253 760 90...

Reviews: