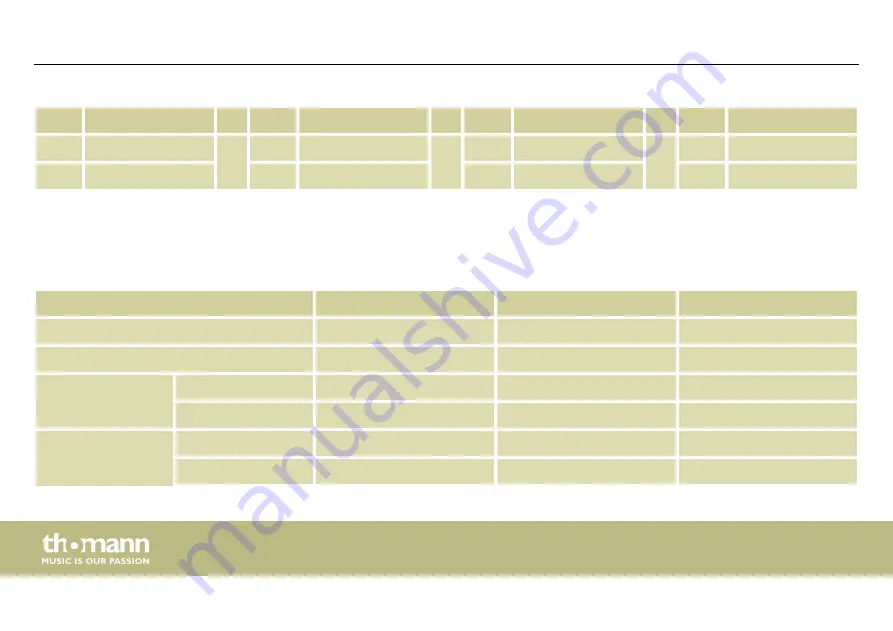
thomann Millenium MPS-500 USB User Manual Download Page 58

Nr.

Name


Nr.

Name


Nr.

Name


Nr.

Name

49

PowerRoll

U09

UserKit09

U19

UserKit19

U29

UserKit29

50

Mad Drum

U10

UserKit10

U20

UserKit20

U30

UserKit30

11.2  MIDI implementation

Function

Transmitted

Recognized

Remarks

Basic channel

10

1-16


Note number

0-127

0-127


Velocity

Note ON

1-127

0-127


Note OFF

64

0-127


Major controls


Yes

No

Hi-Hat pedal control


Yes

Yes

Reset all controller

Appendix


e-drum module

58

Summary of Contents for Millenium MPS-500 USB

Page 1: ...MPS 500 USB e drum module user manual...

Page 2: ...Musikhaus Thomann Thomann GmbH Hans Thomann Stra e 1 96138 Burgebrach Germany Telephone 49 0 9546 9223 0 E mail info thomann de Internet www thomann de 04 12 2015 ID 305855 V3...

Page 3: ...s and signal words 9 2 Safety instructions 11 3 Features 14 4 Installation 15 5 Controls 17 6 Operation 24 6 1 Functions 24 6 2 Playing customising and accompanying songs 28 6 3 Drum kits 32 6 4 Pad s...

Page 4: ...ory defaults 49 7 Technical specifications 51 8 Connector and pin assignments 52 9 Cleaning 54 10 Protecting the environment 55 11 Appendix 56 11 1 Kit list 56 11 2 MIDI implementation 58 Table of con...

Page 5: ...ons and all other instructions Keep the manual for future reference Make sure that it is available to all those using the device If you sell the unit please make sure that the buyer also receives this...

Page 6: ...ord search Use the search function in the electronic version to find the topics of interest for you quickly Online guides Our online guides provide detailed information on technical basics and terms P...

Page 7: ...tions The letterings for connectors and controls are marked by square brackets and italics Examples VOLUME control Mono button Texts and values displayed on the device are marked by quotation marks an...

Page 8: ...device Text inputs that are carried out on the device are indicated by typewriter font Example 2323 References to other locations in this manual are identified by an arrow and the specified page numbe...

Page 9: ...diate dangerous situation that will result in death or serious injury if it is not avoided CAUTION This combination of symbol and signal word indicates a pos sible dangerous situation that can result...

Page 10: ...Warning signs Type of danger Warning danger zone General notes e drum module 10...

Page 11: ...be improper and may result in personal injury or property damage No liability will be assumed for damages resulting from improper use This device may be used only by persons with sufficient physical...

Page 12: ...d swallow the pieces and choke Never let children unattended use electrical devices CAUTION Possible hearing damage With loudspeakers or headphones connected the device can produce volume levels that...

Page 13: ...y Before connecting the external power supply ensure that the input voltage AC outlet matches the voltage rating of the device and that the AC outlet is protected by a residual cur rent circuit breake...

Page 14: ...its 30 user kits n 52 songs 10 user songs n Metronome n Stroke counter n Recording function n MIDI functions n Flexible assignment of pad voices n Connections for headphones AUX and MIDI n Automatic s...

Page 15: ...ug into a mains wall outlet Connect the supplied sub D plug of the pad connector cable to the sub D input socket on the rear panel of the drum module Connect your computer Windows Vista XP Mac to the...

Page 16: ...PHONE output on the rear panel of the drum module Connect audio devices like CD or MP3 player etc to the LINE IN input on the rear panel of the drum module Connecting headphones Connecting CD or MP3...

Page 17: ...5 Controls Front panel Controls MPS 500 USB 17...

Page 18: ...s the tempo of the click and of the song playback 3 CLICK Turns the metronome on and off and opens the click menu 4 MODE Use this button to toggle operating modes 5 ENTER Input button to confirm a sel...

Page 19: ...activate pads and kits 10 Rotary control To increase or decrease the value of the currently selected parameter 11 Record button Use this button to start the recording 12 Start stop button Use this bu...

Page 20: ...14 SONG Use this button to activate the Demo mode and to playback user songs 15 KIT Opens the KIT menu Controls e drum module 20...

Page 21: ...Rear panel Controls MPS 500 USB 21...

Page 22: ...cket to connect an amplifier or powered speaker 18 LINE IN Input socket to connect audio devices like CD or MP3 players etc 19 VOLUME Rotary control to adjust the headphones volume 20 PHONE Headphone...

Page 23: ...22 ON OFF Main switch to turn the device on and off 23 POWER Connection socket for the power adapter Controls MPS 500 USB 23...

Page 24: ...the drum module to minimum Use the ON OFF switch on the rear panel If the module is not in use it shuts off after 20 minutes automatically To switch it on again press ON OFF To set the volume hit a p...

Page 25: ...pter 11 1 Kit list on page 56 and Chapter 6 3 Drum kits on page 32 1 Press the KIT button The display shows the number and description of the first preset kit in 01 xx format The indicator LED of the...

Page 26: ...ons are described in detail in chapter Chapter 6 5 Metronome click settings on page 44 Use this function to count the strokes within a certain period of time 1 Press the SETUP button to open the devic...

Page 27: ...y starts flashing on the display 9 Hit any pad to start the count function The display continuously indicates the number of registered stokes and the remaining time in 000 Cnt SecXXX format 10 By the...

Page 28: ...emo appears in the display 2 Press the Start Stop button The indicator LED of the button lights up and the continuous playback starts after three seconds with song number 01 or 1 Press the SONG button...

Page 29: ...talled songs n FULL In this mode you hear the whole song when accompanying i e all tracks n DRUM ONLY In this mode you hear only the drum track of the song n DRUM MUTE In this mode the drum track of t...

Page 30: ...indicator LED of the button lights up and the selected song is being played If you make no selection within three seconds the display automatically jumps to the user song 01 If no user Song was previo...

Page 31: ...volume in a range from 0 to 24 default value is 11 5 Confirm by pressing ENTER 1 Press the SETUP button 2 Use the rotary control to select the parameter D Drum Vol 3 Confirm by pressing ENTER The curr...

Page 32: ...words you can create your own drum kits and store them in the unit The following sec tions describe how to create your own kits 1 First choose the desired kit see Chapter 6 1 Functions on page 24 2 P...

Page 33: ...ate the desired trigger see the chart below Alternatively you can activate a trigger directly by playing the corresponding pad area The current setting value along with the symbol for the selected tri...

Page 34: ...ints display Pad Symbol Trigger points display Pad Symbol H Pedal Hi Hat pedal HiHat Open Open Hi Hat HiHat Close Closed Hi Hat Crash Crash cymbal arch Crash Edge Crash cymbal edge Ride Ride cymbal ar...

Page 35: ...igger points display Pad Symbol Tom2 Tom 2 Tom2 Rim Tom 2 rim shot Tom3 Tom 3 Tom3 Rim Tom 3 rim shot Kick Bass drum The possible assignment of the triggers depends on the actual configuration of your...

Page 36: ...umber is flashing in the display 3 Press ENTER to jump to the next parameter see chart below 4 Use the rotary control to adjust the respectively shown value 5 Press ENTER to jump to the next parameter...

Page 37: ...ttings as a user kit in the unit To do so proceed as follows 1 Press EXIT The display shows the safety prompt Save it 2 Press ENTER to store the setting Next to the User Kit indication the kit number...

Page 38: ...when you turn the drum module off The storage process can be cancelled at any time by pressing EXIT 6 4 Pad settings The Master Tune parameter allows you to adjust the trigger pitch of a drum kit glob...

Page 39: ...desired pad using the pad select buttons or by striking it The symbol for the pad flashes in the display 5 Use the rotary control to set the sensitivity of the pads to the desired value in a range fr...

Page 40: ...pen while activating the PDL Bottom parameter see 5 the module reads the value 120 and thus works with wrong parameters 5 Press H PEDAL while the hi hat remains closed to set the closing point The dis...

Page 41: ...and thus the signal to noise ratio 1 Press KIT to change to the kit mode followed by the SETUP button 2 Repeatedly press ENTER or turn the rotary control until the menu item Advanced appears in the di...

Page 42: ...rotary control until the menu item Advanced appears in the display 3 Confirm by pressing SETUP to enter the setup menu Use the rotary control to change to the third parameter Trigger 4 Activate the de...

Page 43: ...eatedly press ENTER or turn the rotary control until the menu item Advanced appears in the display 3 Confirm by pressing SETUP to enter the setup menu Use the rotary control to change to the fourth pa...

Page 44: ...e to enter the Click menu The bar indicator Time Sig flashes in the second line of the display 2 Use the rotary control to select the desired time signature 1 8 2 1 8 4 1 8 8 1 8 16 the default value...

Page 45: ...n the first line of the display then flashes the indicator of the current click sound MetroSound 1 When the display of the current click sound is flashing MetroSound use the rotary control to set the...

Page 46: ...running during the setup The click tempo can be adjusted independently from the three other parameters 1 Press CLICK to activate the click function 2 Press TEMPO The tempo indicator Tempo flashes in t...

Page 47: ...Selecting a drum kit on page 25 and adjust the click tempo and the time signature Chapter 6 5 Metronome click settings on page 44 2 Press The Record LED flashes The recording starts regardless of whe...

Page 48: ...nfirm the saving of the user song and exiting the recording menu If you want to overwrite an existing user song with a new recording you have to con firm by pressing ENTER when being prompted Replace...

Page 49: ...ows the safety prompt Erase it 5 Confirm with ENTER to delete the song Press EXIT to cancel the operation 6 7 Resetting to factory defaults 1 Press SETUP to enter the setup menu 2 Use the rotary contr...

Page 50: ...up to reset pad settings n Reset Song to delete all user songs n Reset All to reset all settings and to delete all user songs 5 Confirm your selection with ENTER Resetting the device settings will tak...

Page 51: ...reset kits 30 user kits Songs 52 preset songs 10 user songs Connections Headphones 1 4 phone socket Line in 1 4 phone socket Line out 1 4 phone socket Sub D pad cable connector USB Operating voltage s...

Page 52: ...ience is ensured Please note these advices because especially in Sound Light caution is indicated Even if a plug fits into the socket an incorrect connection may result in a destroyed power amp a shor...

Page 53: ...1 Signal left 2 Signal right 3 Ground 1 4 TRS phone plug stereo unbalanced Connector and pin assignments MPS 500 USB 53...

Page 54: ...onments may cause a higher accumulation of dirt on the components of the device n Use a dry soft cloth for cleaning n Remove stubborn stains with a slightly damp cloth n Never use cleaners containing...

Page 55: ...Please follow the notes and markings on the packaging This product is subject to the European Waste Electrical and Electronic Equipment Directive WEEE Do not dispose with your normal household waste...

Page 56: ...Hip Hop 22 POWlay 32 Slap 3 Jazz 13 ROOM drum 23 Mass 33 Moto Drum 4 Funky 14 Double Bass 24 Match 34 Mad Drum 5 1 STD drum 15 Chinese 25 ELECdrum 35 PowerBe 6 2 STD drum 16 Latin 26 RealDrum 36 Bloom...

Page 57: ...Power JAZ U02 UserKit02 U12 UserKit12 U22 UserKit22 43 Boxer U03 UserKit03 U13 UserKit13 U23 UserKit23 44 BrushDrum U04 UserKit04 U14 UserKit14 U24 UserKit24 45 Asian U05 UserKit05 U15 UserKit15 U25 U...

Page 58: ...U10 UserKit10 U20 UserKit20 U30 UserKit30 11 2 MIDI implementation Function Transmitted Recognized Remarks Basic channel 10 1 16 Note number 0 127 0 127 Velocity Note ON 1 127 0 127 Note OFF 64 0 127...

Page 59: ...ll notes OFF Programme change No Yes System exclusive Yes Yes RPN No Yes NRPN Yes Yes Channel 10 supports bank 0 only For more information regarding the System Exclusive RPN and NRPN please con tact y...

Page 60: ...Notes e drum module 60...

Page 61: ...Notes MPS 500 USB 61...

Page 62: ...Notes e drum module 62...

Page 63: ......

Page 64: ...Musikhaus Thomann Hans Thomann Stra e 1 96138 Burgebrach Germany www thomann de...

Reviews: