


39
38
EN • Original User Manual
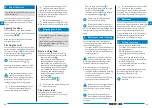
A
Flush-water tank
C
Cover
D
Seat
E
Toilet bowl
F1
Piston pump (565P)
F2
Electric pump (565E)
G
Level indicator
flush-water tank
H
Water fill cap
I
Blade handle
J
Clasp
K
Water fill adaptor
B
Waste-holding tank
L
Pour out spout
M
Cap+measuring cup
N
Blade opener
O
Vent button
P
Level indicator
waste-holding tank
Q
Toilet roll holder
R
Lip seal
S
Vent seal
Main parts
Floor plate
This allows you to attach
the toilet to the floor,
wherever you like. One
simple action releases
the toilet.
Optional extra for your toilet
1. Introduction
This is the user manual for your
Thetford portable toilet. Read the safety
instructions and information on use and
maintenance of the toilet carefully before
continuing. This will enable you to use the
toilet safely and efficiently. Retain this
manual for future reference.
For the latest version of this manual,
please visit
www.thetford.com
2. Symbols
Key to symbols:
Warning. Risk of serious injury and/
or damage.
Caution. Risk of injury
and/or damage.
Attention. Important information.
Note. Information.
3. Before use
See the images in the ‘Quick Guide’ at the
front of the manual for a visual reference
(p 2-3).
Your portable toilet is made up of two
detachable sections: the flush-water
tank (
A
) and the waste-holding tank
(
B
). Before using the toilet, it is vital that
you add toilet additives (where available)
to both tanks.
Not using the correct products to
care for your Thetford toilet could
cause damage.
Thetford offers a wide range of
toilet additives and care products.
Look on the flyer for the variety of all
products.
Prepare the
waste-holding tank
(
B
)
:
- Separate tanks (
01
).
- Remove the cap from the pour out
spout while it is pointing upwards (
02
).
- Add the correct dosage of waste-
holding tank toilet additive (
03
).
- Add the correct dosage of water
to ensure that the bottom of the
waste-holding tank is covered (
04
).
- Replace the cap (
05
).
Never add toilet additives directly
via the blade as this could damage
the lip seal of the waste-holding tank.
Only fill the waste-holding tank via the
pour out spout.
Prepare the
flush-water tank
(
A
)
:
- Recombine tanks (
06
).
- Remove the water fill cap (
07
).
- Place the water fill adaptor (
08
).
- Add the correct dosage of flush-water
tank toilet additive (where available)
and fill the flush-water tank with clean
water (
09
).
- Replace the cap (
05
).
If you have a toilet with an electric
pump, insert six batteries before
use.
EN
EN
C
D
G
H
I
J
K
L
M
N
O
P
Q
R
S
E
F1
F2
C
D
G
H
I
J
K
L
M
N
O
P
Q
R
S
E
F1
F2
A
B