Thetford N304M.3 Installation Manual Download Page 10

Installation Manual  10

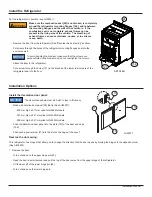
Connect the 240 volt AC supply:

Connect the AC power cord only to a grounded three-prong power point.  Do not remove the earth pin 

from the power cord.  Do not use a two-prong adapter or an extension cord.  Operation of the refrigerator 

without correct ground can cause dangerous electrical shock or death if you are touching the metal parts 

of the refrigerator.

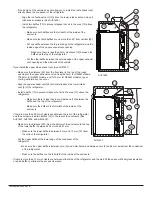
Put the AC power cord into a grounded three-prong power point:

-  Make sure the power point is 100-150 mm above the floor of the enclosure and is positioned within easy reach of the lower intake 

vent.

-  Make sure the power cord does not touch the burner cover, the flue pipe, or any hot component that could damage the insulation of 

the power cord.

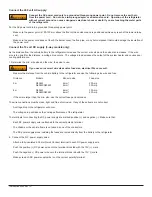
Connect the 12 volt DC supply (3-way models only):

As the distance from the vehicle battery to the refrigerator increases, the correct  wire size and fuse size also increases.  If the wire 

size is too small for the distance, a voltage drop occurs.  The voltage drop decreases the output of the system heater and causes poor 

cooling performance.

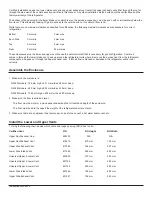
1. Determine the min. wire size and the max. fuse size to use:

If you use an incorrect wire size and/or fuse size, electrical fire can result. 

-  Measure the distance from the vehicle battery to the refrigerator and use the following size wire and fuse:

  Distance  


Models   


Min wire size  


Fuse size 


  5 m  


N304M   


4 mm²   


20 Amp


N404M/N504M   

4 mm²   


30 Amp


  8 m   


N304M   


6 mm²   


30 Amp


N404M/N504M   

6 mm²   


40 Amp

-  If the wire is larger than the min. size, use the correct fuse per local codes.

The wire connections must be clean, tight and free of corrosion.  If any of these items are not correct:

-  A voltage drop to the refrigerator will occur.

-  The voltage drop will reduce the cooling performance of the refrigerator.

The terminals for connecting the DC power supply are marked positive (+) and negative (-).  Make sure that:

-  Each DC power supply wire is attached to the correct polarity terminal.

-  The chassis or the vehicle frame is not used as one of the conductors.

-  The DC power supply wires including the fuses are routed directly from the battery to the refrigerator.

2.  Connect the D.C. power supply wires:

-  Attach a fully insulated 6.35 mm Quick Connect terminal to each DC power supply wire.

-  Push the positive (+) DC power wire onto the terminal block tab with the 12V (+) mark.

-  Push the negative (-) DC power wire onto the terminal block tab with the 12V (-) mark.

-  Make sure each DC power supply wire is on the correct polarity terminal.

WARNING

!

WARNING

!

Summary of Contents for N304M.3

Page 1: ...com au Part No 636524C 10 16 2014 Installation Manual For Australian refrigerator models N304M 3 93 liter 3 way operation with LP gas 240 volts AC or 12 volts DC N404M 3 128 liter 3 way operation with LP gas 240 volts AC or 12 volts DC N504M 3 164 liter 3 way operation with LP gas 240 volts AC or 12 volts DC DO NOT install this refrigerator in below deck marine applications Do not install this ref...

Page 2: ...zard Carefully read the descriptions of these signal words to fully know their meanings They are for your safety This signal word means a hazard which if ignored can cause dangerous personal injury death or much property damage This signal word means a hazard which if ignored can cause small personal injury or much property damage This refrigerator is made for use in Recreational Vehicle and towab...

Page 3: ...fication and Code Requirements This refrigerator is certified under the latest edition of the Australian Gas Association Standard AS4555 AG105 and the Australian National Electric Standard for household and similar electrical appliances AS NZS 3350 1 1994 The refrigerator is made for installation in a caravan or a recreational vehicle The installation must obey the requirements of this installatio...

Page 4: ...t from the refrigerator components and goes out through the upper exhaust vent If this air flow is blocked or decreased the refrigerator will not cool correctly Assemble the Enclosure 1 Make sure the enclosure is N304M models 756 mm high x 521 mm wide x 543 mm deep N404M models 929 mm high x 602 mm wide x 620 mm deep N504M models 1083 mm high x 602 mm wide x 620 mm deep 2 Make sure the floor is so...

Page 5: ...dust insulation or other construction debris is on the refrigerator or in the enclosure Debris can cause a combustion hazard and prevent the refrigerator from operating correctly Tighten the screws of the upper roof exhaust cap to 11 5 kgf cm max Also make sure that the air flow around the upper roof exhaust cap is not blocked or decreased by other roof mounted features such as a luggage carrier a...

Page 6: ... can occur Align the upper exhaust vent 24 horizontally above the lower intake vent 9 of the refrigerator Install a baffle 13 to prevent stagnant hot air in the area 14 above the refrigerator Make sure there is less than 6 mm clearance 15 between the baffle and the top of the refrigerator Make sure the baffle is the full width of the inside of the enclosure If there is more than 25 mm of clearance...

Page 7: ... the lower rear corners of the refrigerator and into the floor Install the Refrigerator Installation Options Install the decorative door panel The decorative panels must be 5 mm or less in thickness Make a decorative door panel 38 that is See Art00977 659 mm high x 511 mm wide for N304M models 787 mm high x 541 mm wide for N404M models 939 mm high x 541 mm wide for N504M models Push the decorative...

Page 8: ...the door N304M Pull the plastic plug out of the top of the door N304M Put the travel latch plate on the other side of the door Attach the travel latch plate with the screw Put the filler plate on the other side of the door N404M N504M Attach the filler plate with the screw N404M N504M Push the plastic plug into the whole on the other side at the top of the door N304M Push each hinge bushing 74 int...

Page 9: ... Draw 0 8 Amps at 240 volts AC DC Operation 12 volts DC 11 5 volts min 15 4 volts max Current Draw 12 0 Amps at 12 volts DC 14 0 Amps at 14 volts DC N404M and N504M models AC Operation 240 volts AC 216 volts min 264 volts max Current Draw 1 0 Amps at 240 volts AC DC Operation 12 volts DC 11 5 volts min 15 4 volts max Current Draw 14 2 Amps at 12 volts DC 14 5 Amps at 12 volts DC fan models only 16...

Page 10: ...ou use an incorrect wire size and or fuse size electrical fire can result Measure the distance from the vehicle battery to the refrigerator and use the following size wire and fuse Distance Models Min wire size Fuse size 5 m N304M 4 mm 20 Amp N404M N504M 4 mm 30 Amp 8 m N304M 6 mm 30 Amp N404M N504M 6 mm 40 Amp If the wire is larger than the min size use the correct fuse per local codes The wire c...

Page 11: ...ough the floor of the enclosure Make sure the hole through the floor is large enough to allow clearance for the LP gas supply line Put a weather resistant seal grommet sealant etc around the LP gas supply line where it goes through the floor to prevent vibration and abrasion To prevent vibration and abrasion make sure that the LP gas supply line is not against anything in the enclosure Attach the ...

Page 12: ...Check That the refrigerator is plugged in That the AC thermostat is not in the OFF position That the AC thermostat is turned to the desired temperature setting Check That the LP gas supply line is purged That thee LP gas tank s is not empty That the LP gas is at the correct pressure That the gas control is not in the OFF position Check That the battery charging equipment of the vehicle is operatio...

Reviews: