


Owner's Manual for Thern Model FVC-1000 Winches
page 12
A8018B-1210
3.4.4
Instructions for Periodic Inspection
a
OPEN THE FIRE VENT to release tension from the winch and wire rope by
following the procedure for testing the fi re vent.
b
VISUALLY INSPECT the winch and all other equipment.
• Check
the
fi nish for wear, fl aking, or other damage.
• Check all equipment for cracks, dents, bending, rust, wear, corrosion
and other damage. If the winch was overloaded, or if you notice cracks
or other signs of overloading and damage, consider using magnetic or
chemical crack detecting procedures.
DO NOT CONTINUE TO USE
DAMAGED OR OVERLOADED EQUIPMENT OR WIRE ROPE
.
• Check all fasteners for stripped threads, wear, bending, and other damage.
• Check the foundation for cracks, corrosion or other damage.
• Make sure the winch is lubricated properly.
• Make sure all labels and plates are readable, fi rmly attached, free of dam-
age and clean. Replacements are available from the factory.
• Check the entire length of wire rope for bent wires, crushed areas, bro ken
or cut wires, corrosion, and other damage. Carefully inspect areas that
pass over sheaves or through roller guides.
• Note the location and concentration of broken wires. Replace wire rope if
more than 6 wires are broken in one lay, or more than 3 wires are broken
in one strand in one lay. See Figure 4.
• Make sure connecting devices are securely attached to the wire rope, and
the wire rope where they are attached is not frayed, cor rod ed, bro ken, or
otherwise damaged.
• Make sure the wire rope is securely anchored to the drum and inspect the
fl ange clip for signs of wear or distortion.
• Make sure the ratchet engages and disengages completely.
• Measure the diameter of the wire rope, especially in areas where wear
is noticeable. Replace the wire rope if the diameter measures below the
minimum diameter at any point. See Figure 5.
• Check for excessive drum movement indicating worn or loose gears,
bearings, or shafts.
• Disassemble the winch if necessary. Inspect gears, bearings, spring pins,
and shafts for wear, corrosion, distortion, and other damage.
c
MONITOR WINCH PERFORMANCE as winch is operated.
• Listen for unusual noises, and look for signs of damage as you operate the winch.
• Make sure the wire rope winds evenly and tightly onto the drum. If it is
loose or uneven, rewind it before continuing.
• Observe the rotating drum; look for signs of loose or misaligned bearings.
Completely correct all problems before continuing. Use the troubleshooting
chart to help determine the cause of certain problems. See Table 2.
Perform periodic inspections:
• Every 6 months.
• Whenever you return the winch
to service from storage.
• Whenever you notice damage
or poor operation in a frequent
inspection.
• Whenever you have, or think you
may have, overloaded or shock
loaded the winch.
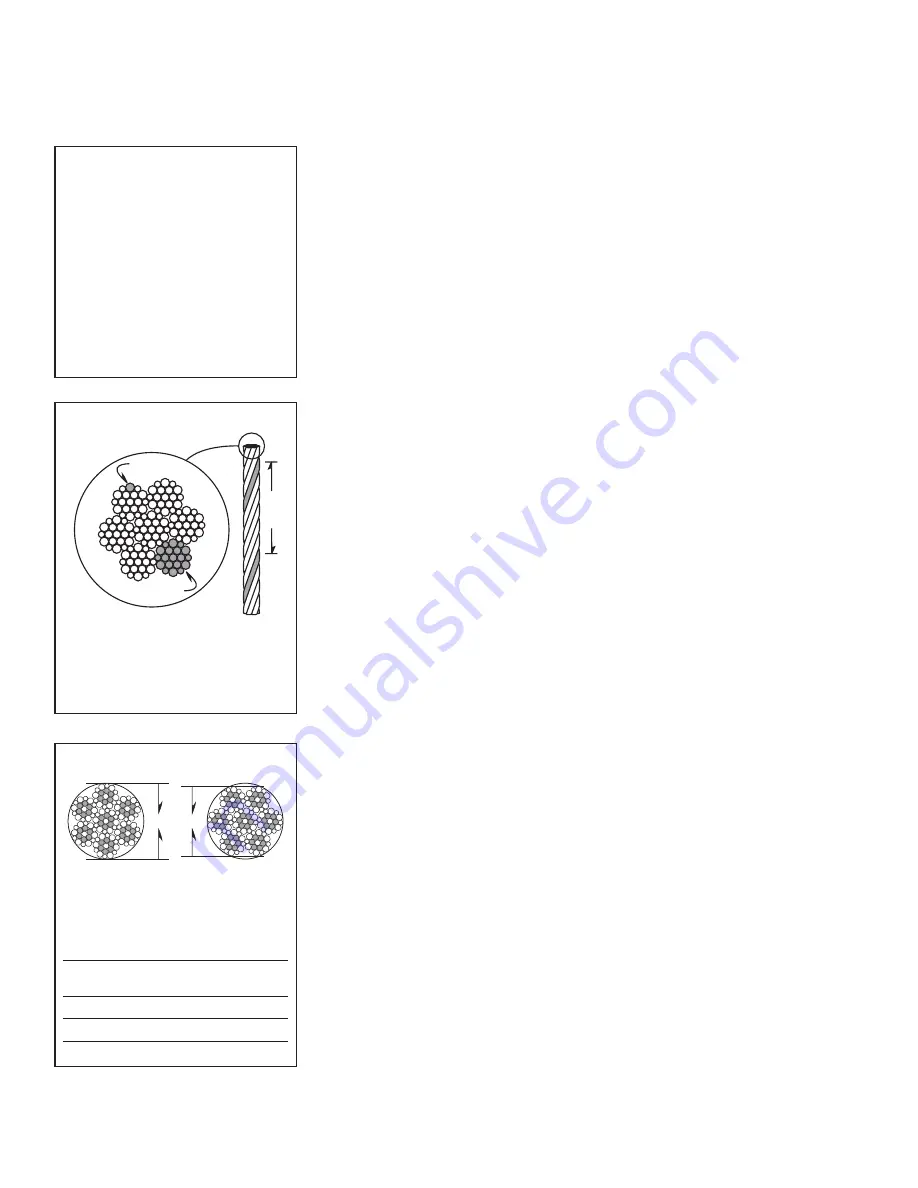
wire
strand
one
lay
Figure 4 – Broken Wires
Wire rope assembly must be re-
placed if more than 6 wires are
bro ken in one lay, or if more than
3 wires are broken in one strand
in one lay.
diameter
correct
incorrect
Figure 5 – Rope Diameter
The wire rope assembly must be
replaced if the diameter measures
less than the minimum diameter at
any point.
wire rope
diameter minimum
diameter
1/8 in
7/64 in (.1094 in)
3/16 in
11/64 in (.1719 in)
1/4 in
15/64 in (.2344 in)
Summary of Contents for FVC-1000
Page 17: ...Owner s Manual for Thern Model FVC 1000 Winches page 17 A8018B 1210 ...
Page 19: ...Owner s Manual for Thern Model FVC 1000 Winches page 19 A8018B 1210 ...
Page 21: ...Owner s Manual for Thern Model FVC 1000 Winches page 21 A8018B 1210 ...
Page 22: ...Owner s Manual for Thern Model FVC 1000 Winches page 22 A8018B 1210 ...
Page 23: ...Owner s Manual for Thern Model FVC 1000 Winches page 23 A8018B 1210 ...