Configuring alerts
1. After setting the range limits for your sensor, you may
assign group of users to receive alerts in case the sensor
detects out-of-bounds conditions.
2.
Create call groups and edit user profiles by clicking on
Call
groups
in the main menu bar ( )
è
User List
and
Call
group list
. You may create groups and add members, with
contact information such as phone or fax numbers (calls
require optional modem) and e-mail addresses.
3. Click on
Close
and follow the instructions on the screen.
4. Click on
Alert configuration
(F8) and select a receiver or
sensor group (their options are slightly different).
5. Select an available call group and click on the right-arrow
(
è
) to assign that group to receive alerts. You may assign
multiple groups, which will be alerted sequentially in case
nobody in a previous group confirms notification.
6. Click on
OK
when done.
7.
You may test your alert configuration by
selecting
Tools
è
Alert test
. Here you may
run fictitious tests for your various receivers and
sensor groups.
A word about calibration
The sensor in your kit is NIST-calibrated before delivery. A
copy of the NIST certificate may be downloaded at any time
via the Smart-Vue Client software.
The certificate contains correction coefficients, referred to as
“A and B correction parameters”, based on linear regression
to ensure data accuracy in Smart-Vue Client. You must enter
this information into the software.
To enter A and B coefficients for your sensor:
1. Select
Sensor settings
(F11)
è
Sensor correction
parameters
tab.
2. Click on
Modify
to change the A and B values based on
your calibration certificate, then click on
OK
.
3. Here you may also download the correction parameters or
calibration certificate directly.
4. Click on
Close
when done and follow the instructions on
the screen.
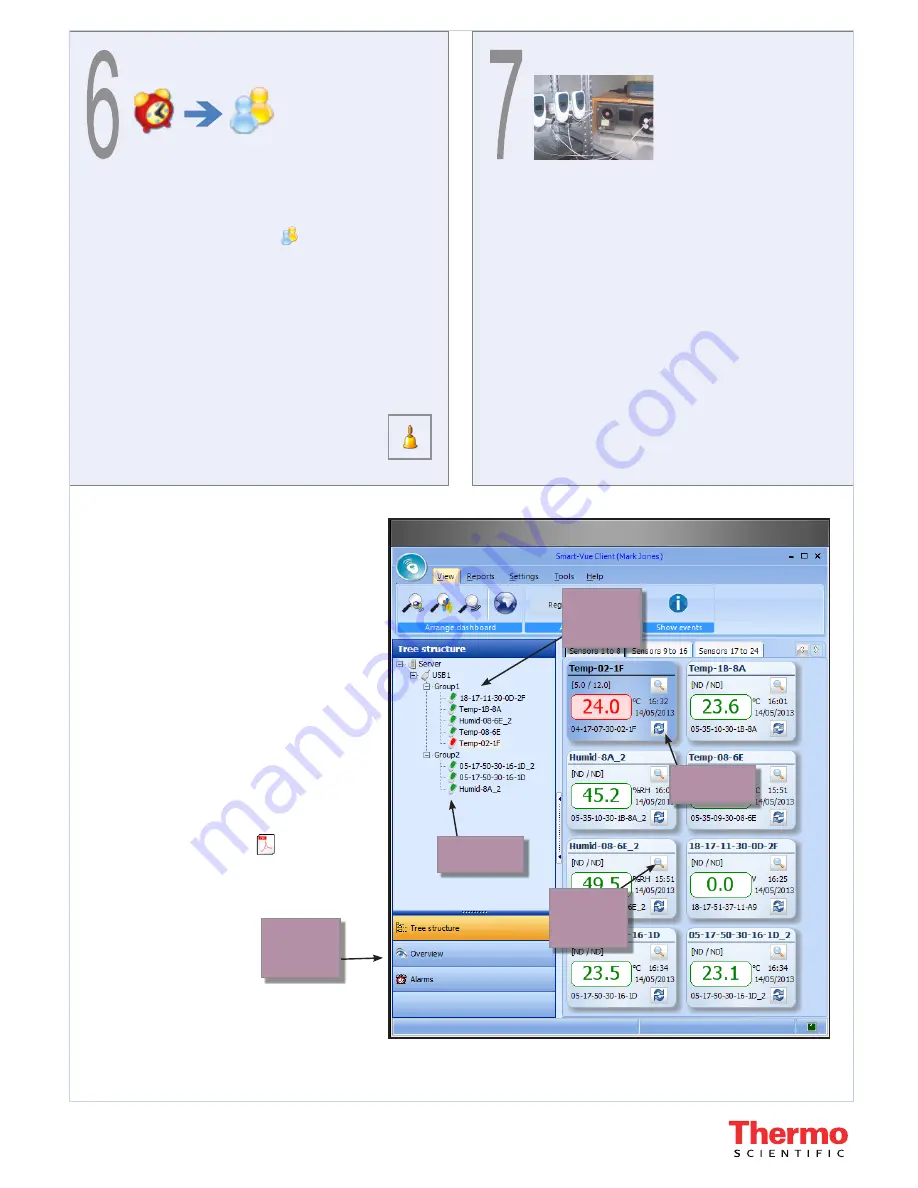
Overview of the Smart-
Vue Client 2.0 dashboard
window
In normal operation, the Smart-Vue Client
application displays the sensor dashboard win-
dow. This window enables you to monitor your
various sensors, with color coding to indicate
sensor status clearly.
Where to go next
We highly recommend that you read the
Smart-Vue Software User Manual for
information on configuring user profiles,
viewing and acknowledging alarms, testing
sensors, creating reports, and much more. To
access the user manual from within Smart-Vue
Client, click on
Help
in the main menu bar, and
then click on the PDF icon (
) to open the
manual.
Smart-Vue Client 2.0 main dashboard window
Tree showing
your sensor
network
Color shows
sensor status
Click to refresh
Click here
for sensor
details
© 2014 Thermo Fisher Scientific Inc. All rights reserved. All trademarks are the property of Thermo
Fisher Scientific Inc. and its subsidiaries. Specifications, terms and pricing are subject to change. Not
all products are available in all countries. Please consult your local sales representative for details.
Click here to
see current
alarms.


