


Section 2 - Calibration
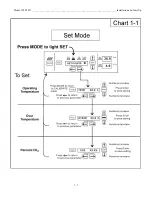
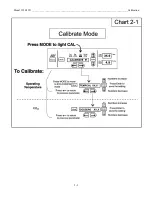
2.1 Calibration Mode
After the unit has stabilized, several different systems can
be calibrated. In the calibration mode, the air temperature, CO
2
and RH levels can be calibrated to reference instruments. To
access the calibration mode, press the Mode key until the Cal
indicator lights. Press the right and/or left arrow until the prop-
er parameter appears in the message center. See Chart 2-1 at the
end of this section for more detail.
Calibration frequency is dependent on use, ambient condi-
tions and accuracy required. A good laboratory practice would
require at least an annual calibration check. On new installa-
tions, all parameters should be checked after the stabilization
period.
Prior to calibration, the user should be aware of the follow-
ing system functions. While the unit is in the calibration mode,
all system control functions are stopped so the unit remains sta-
ble. Readout of the system being calibrated will appear on the
message center. If no keys are pressed for approximately five
minutes while in Calibration mode, the system will reset to Run
mode so control functions are reactivated.
Before making any calibration or adjustments to
the unit, it is imperative that all reference instru-
ments be properly calibrated.
a. Calibrating the Temperature
Before calibration, allow the cabinet temperature to stabi-
lize. Place the calibrated instrument in the center of the cham-
ber. The instrument should be in the airflow, not against the
shelf.
Temperature Stabilization Periods
Start-Up
- Allow 12 hours for the temperature in the cabinet to
stabilize before proceeding.
Presently Operating
- Allow at least 2 hours after the display
reaches setpoint for temperature to stabilize before proceeding.
1.
Press the Mode key until Cal indicator lights.
2. Press the right arrow until “TEMPCAL XX.X” appears
in the message center.
3. Press the up/down arrow to match the display to the cal-
ibrated instrument.
4. Press Enter to store calibration.
5. Press the Mode key to return to Run or the right/left
arrow to go to next/previous parameter.
b. Calibrating the CO
2
System
Model 3950 Series incubators have a CO
2
sensor. The incu-
bator atmosphere is not only effected by the quantity of CO
2
present but also by the air temperature and water vapor present
in the incubator atmosphere. In monitoring the effects of CO
2
,
air temperature and absolute humidity must be held constant so
any change is caused by a change in CO
2
concentration.
Changing temperature or changing from elevated humidity
to room ambient humidity levels will require re-calibration of
the CO
2
control.
CO
2
Sensor Stabilization Periods
Start -Up
- The CO
2
sensor has been calibrated at the factory
for 37°C and elevated humidity. Allow the temperature, humidi-
ty and CO
2
levels in the chamber to stabilize at least 12 hours
before checking the CO
2
concentration with an independent
instrument.
Presently Operating
- Make sure the chamber doors are
closed. Allow at least 2 hours after the temperature and CO
2
displays reach their setpoints for chamber atmosphere stabiliza-
tion.
1. Make sure the stabilization periods outlined above are
followed.
2. Sample the chamber atmosphere through the sample port
with an independent instrument. Sample the atmosphere
at least 3 times to ensure accuracy of the instrument.
3. Press the Mode key until the Cal indicator lights.
4. Press the right arrow until “CO2 CAL XX.X” is dis-
played in the message center.
5. Press the up /down arrows to change the display to
match the independent instrument.
6. Press Enter to store the calibration.
7. Press the Mode key to return to Run or the right or left
arrows to go to the next/ previous parameter.
Model 3950/3951 _____________________________________________________________________________Calibration
2 - 1


