background image

15 

Menu 1 – Circuit Details 

Circuit Details Screen 

The Circuit Details Screen can be accessed directly 
from Menu 1 or by touching the option. Details on 
the Home screen. This screen provides addition 
information relative to the particular circuit. 
 

Figure 14 – Circuit Details Screen (MXR) 


Figure 15 – Circuit Details Screen (MXW) 


Circuit Details Screen – Interlocks 

Touching the I-LOCK button on the bottom of the 
Circuit Details Screen will display the Interlock 
Screen. If the compressor is not starting, the reason 
for the fault will clearly be visible on this screen. 
 

Figure 16 – Interlocks 


Touching the CRITICAL button opens the Critical 
Interlocks Screen (Figure 17). A critical interlock fault 
shuts down the entire system and must be resolved 
prior to a restart. 
 

Figure 17 – Critical Interlocks 


Menu 1 – Logging 

The HMI is constantly logging key registers internal 
to the HMI. It is possible to export the data to an 
external thumb drive. Data logging occurs every two 
seconds in a FIFO methodology up to a total of 24 
hours. 
 

Figure 18 – Logging Screen 


Summary of Contents for Accuchiller MX Series

Page 1: ......

Page 2: ......

Page 3: ...rmining Equivalent Line Length 6 Table 1 Equivalent Lengths of Elbows 7 Liquid Line Sizing 7 Table 2 Liquid Line Size Circuit inches OD 7 Discharge Hot Gas Line Sizing 7 Figure 4 Vertical Riser Traps...

Page 4: ...nputs Outputs Screens 16 Figure 20 Digital Inputs Screen 16 Figure 21 Digital Outputs Screen 16 Figure 22 Analog Inputs Screen 16 Figure 23 Analog Outputs Screen 17 Figure 24 RTD Inputs Screen 17 Menu...

Page 5: ...Restore Factory Settings 23 Figure 36 Factory Settings Restored 23 Menu 2 Remote Mode 23 Menu 2 Backup Chiller 23 Figure 37 Backup Chiller Screen 23 Menu 2 Modbus BAS 23 Figure 38 Modbus Setup Screen...

Page 6: ...Checking Compressor Oil Level 29 Cleaning the Operator Interface 29 General Troubleshooting 29 Preventive Maintenance Checklist 32 Drawings 32...

Page 7: ...erant for heat transfer purposes This chemical is sealed and tested in a pressurized system containing ASME coded vessels however a system failure will release it Refrigerant gas can cause toxic fumes...

Page 8: ...aining or repairing the equipment to protect against any sparks debris or fluid leaks Pre Installation Receiving Inspection When the unit arrives verify the information on the unit nameplate agrees wi...

Page 9: ...d impact loading caused by sudden jerking when lifting or lowering the chiller Use pads where abrasive surface contact may occur Process Fluid Piping Proper insulation of chilled process fluid piping...

Page 10: ...meter elevation when operating Wear ear protection as required for personal comfort when operating or working in close proximity to the chiller CAUTION Wear protective gloves when installing maintaini...

Page 11: ...ide lifting brackets Use spreader bars when lifting to apply the lifting force vertically Under no circumstances use the coil headers or return bends in the lifting or moving of the condenser Mounting...

Page 12: ...er than 100 actual feet without a minimum of 2 efficiency decrease 4 To form a proper liquid seal at the condenser immediately drop at least 15 inches down from the liquid outlet before routing the pi...

Page 13: ...ght from the condenser liquid line connection The liquid line does not require pitching Install a pressure tap valve at the condenser to facilitate measuring pressure for service Liquid lines do not t...

Page 14: ...Systems Designed for 40 F to 80 F Set Point 50 Ton 75 Ton 100 Ton 125 Ton 50 Ton 75 Ton 100 Ton 125 Ton 25 A 1 3 8 1 5 8 1 5 8 1 5 8 1 3 8 1 5 8 1 5 8 2 1 8 B 1 5 8 2 1 8 2 1 8 2 5 8 1 5 8 2 1 8 2 1...

Page 15: ...leg is not within the specified range notify the supplier and correct before operating the unit Voltage imbalance must not exceed two percent Excessive voltage imbalance between the phases of a three...

Page 16: ...begins once a compressor starts and will not let that compressor restart until the recycle timer has timed out When the start button is pressed any pumps controlled by the chiller will turn on any con...

Page 17: ...s screen displays for 5 seconds after the Programmable Logic Controller PLC and Human Machine Interface HMI establish communications The control system version is located on this start up screen Figur...

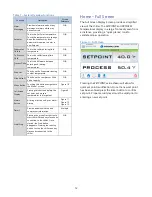
Page 18: ...is button displays the set point and process temperatures in a large font Figure 9 Alarms Button A listing of active and prior alarm history Figure 11 Figure 12 Figure 13 Detail Provide additional cir...

Page 19: ...Figure 25 EXV Control Electric Expansion Valve Setup Figure 26 Discharge Control Water Regulating Valve Setup Discharge Pressure Control Figure 27 Figure 28 Capacity Control This shows the compressor...

Page 20: ...ion of the display will be blank All alarms must be resolved and reset using the RESET ALARM button Alarm Setup The Alarm Setup screen allows changes to alarm settings Figure 12 Alarm Setup Alarm Glyc...

Page 21: ...Screen will display the Interlock Screen If the compressor is not starting the reason for the fault will clearly be visible on this screen Figure 16 Interlocks Touching the CRITICAL button opens the...

Page 22: ...puts Outputs Inputs Outputs Screens The Inputs Outputs screens provide the status of all digital inputs digital outputs analog inputs and outputs When the PLC input LED is on the corresponding input o...

Page 23: ...Value Mode Selection AUTO MODE The valve will always respond relative to the demand PID regardless of how many compressors are running MANUAL MODE The manual mode value percent will be the output to t...

Page 24: ...eat The difference between the saturated suction temperature and the suction line temperature is the superheat The superheat is factory set for 10 F and should never exceed 15 F or go below 4 F Only a...

Page 25: ...cription Default Value Mode In Auto Mode the valve adjusts to maintain optimum performance In manual mode it holds to the input valve AUTOMATIC Discharge Setpoint Discharge Setpoint Value 133 PSIG Low...

Page 26: ...25 100 of full capacity Figure 29 Capacity Control Screen Table 12 Capacity Control Parameters Menu Item Description Default Value Automatic or Manual Mode In Auto Mode the control system adjusts the...

Page 27: ...or Staging Screen Table 14 Compressor Staging Parameters Menu Item Description Default Value Stage Up Trigger This parameter in conjunction with the Stage Up Delay determines at what percent the next...
Page 28: ...view Figure 34 Menu 2 Screen Table 16 Menu 2 Functions Function Description Screen Reference Defaults Provides the ability to restore the control system back to factory defaults in the case that an un...

Page 29: ...rt stop When active the Remote Mode toggle will indicate Remote Start Stop Enabled and when not active it will indicate Remote Start Stop Disabled Menu 2 Backup Chiller If this feature has been enable...

Page 30: ...ankcase heater Disconnect main power only when servicing the chiller The crankcase heater should remain on when the compressor is off to ensure liquid refrigerant does not accumulate in the compressor...

Page 31: ...ecialist in the industry is involved Table 17 shows the list of water characteristics and quality limitations Table 17 Fill Water Chemistry Requirements Water Characteristic Quality Limitation Alkalin...

Page 32: ...vital that the Freezestat is set properly Step 6 Turn On Control Power Turn on the control power by turning the control power switch to On The panel displays should now be illuminated Due to extreme...

Page 33: ...that there are locations for voltage readings amperages etc for monitoring over time With this information maintenance personnel may be able to correct a potential problem before it causes any downtim...

Page 34: ...se heater when the heater is on Once a Year Repeat items 1 through 17 land continue with the following 18 Check the condition of the chilled water for algae and particulate fouling Back flush the evap...

Page 35: ...r for five seconds Incorrect three phase rotation Correct phasing of incoming power Loss of phase Check incoming power High motor temperature Check oil level superheat liquid injection High oil discha...

Page 36: ...e High condenser water temperature MXW models only Maximum temperature is 105 F Condenser water regulating valve MXW models only Replace if faulty High condenser air temperature MXR models only Maximu...

Page 37: ...apacity Check to make sure chiller is properly sized for process load Thermocouple Replace if faulty Microprocessor input card process sensor Replace if faulty Temperature values unsteady or out of ra...

Page 38: ...2 Amps Compressor L3 Amps Refrigerant Superheat Refrigerant Subcooling Compressor Discharge Check Valve Compressor Crankcase Heater Evaporator PSID Condenser PSID Clean Condenser Clean Evaporator Oil...

Page 39: ......

Page 40: ...Sales Customer Service Parts Department 847 966 2260 info thermalcare com 847 966 2260 847 966 9358 fax 847 966 2636 847 966 8560 847 966 9358 fax www thermalcare com info thermalcare com service the...

Reviews: