Thelin ECHO-COMSTOCK PELLET E.I. II Installation And Operating Instructions Manual Download Page 8

ECHO PELLET E.I. II

PELLET HEATER

8

INSTALLATION

1. When  deciding  on  the  location  of  your  heater 

and vent pipe, try to minimize the alteration and
reframing of  structural  components  of  the 
building.  Vent  pipe  must  be  installed  so  that 
access is provided for inspection and cleaning.

2. Avoid  installing  heater  in  high-traffic  areas. 

Keep  children  well  away  from  heater  when  in 
operation.

3.

A  3-inch  clearance  to  combustibles must  be 
maintained  for  horizontal  and  vertical 
venting

.  When  passing  through  ceilings  or 

walls, you  must  use  a  listed  wall  thimble, 
making  sure  all  combustible  materials  and 
insulation products are  a  minimum  of  3  inches 
away  from  the  pellet  vent  pipe.  If  using  the 

Pellet Pro, a 1” clearance is required. 

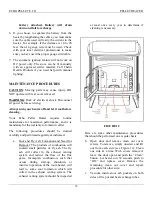
4. A  non-combustible  hearth  pad  must  be used  if 

installed on a carpet, wood floor, or other comb-
ustible  material  (see  Figure  3

).  Maintain  6” 

(152mm) beyond the front and beyond each side 
of the fuel loading and ash removal opening.

5. Keep  front  door  of  appliance  thirty-six  (36) 

inches from combustibles (drapery, furniture).

6. When  installing  the  exhaust  vent  into  an 

existing  chimney,  a  clean  out  tee  must  be 
installed behind the heater before going up into 
the  chimney.  This  is  necessary  in  order  to 
remove the fly ash accumulation.

7. Install  vent  at  clearances  specified  by  the  vent 

manufacturer.

8. Exit termination (distance to openings):

a.

3  feet  minimum  above  any  forced  air 
inlet located within 10 feet.

b. 4  feet  minimum  below  and  horizontally 

or  1  foot  minimum  above  any  door, 
window,  or  gravity  air  inlet  into any 
building.

c.

2  feet  minimum  to  an  adjacent building 
and  7  feet  minimum  above  grade  when 
located adjacent to public walkways.

FIGURE 3

5”

3”

Summary of Contents for ECHO-COMSTOCK PELLET E.I. II

Page 1: ...TIONS AND INSTALLATION INSPECTION AND PERMIT REQUIREMENTS FAILURE TO COMPLY WITH OWNER S MANUAL INSTRUCTIONS WILL VOID WARRANTY AND COULD RESULT IN PROPERTY DAMAGE BODILY INJURY OR EVEN DEATH PLEASE L...

Page 2: ...Light 16 Hopper clean out 18 filling 14 Igniter Removal 28 Installation 7 battery 16 clean out tee 7 distance to openings 7 floor protection 7 pipe configuration 7 pipe connections 11 venting requirem...

Page 3: ...re 3 8 Figure 4 9 Figure 5 10 Figure 6 11 Figure 7 12 Figure 8 14 Figure 9 15 Figure 10 15 Figure 11 16 Figure 12 18 Figure 13 Replacement Parts List 22 Figure 14 Circuit Board Diagram 23 Figure 15 El...

Page 4: ...ECHO PELLET E I II PELLET HEATER 4 LABORATORY LISTING LABEL...

Page 5: ...oor quality pellet fuel is not permitted and will void your warranty and or could cause a burn back or house fire FOR BEST RESULTS THE WOOD PELLET FUEL SHOULD BE DIAMETER AND APPROXIMATELY 1 LONG Stor...

Page 6: ...PECTION AND REPAIR FOR PROPER OPERATION CONSULT OWNER S MANUAL FOR FURTHER INFORMATION IT IS AGAINST FEDERAL REGULATIONS TO OPERATE THIS APPLIANCE IN A MANNER INCONSISTENT WITH OPERATING INSTRUCTIONS...

Page 7: ...ustion and ventilation air The air inlet must remain unrestricted while unit is in use Outside air connection is made at the air intake located on the rear of the stove see Figure 2 The Outside Air Ki...

Page 8: ...ombustible hearth pad must be used if installed on a carpet wood floor or other comb ustible material see Figure 3 Maintain 6 152mm beyond the front and beyond each side of the fuel loading and ash re...

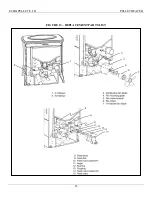
Page 9: ...ECHO PELLET E I II PELLET HEATER 9 FIGURE 4...

Page 10: ...ECHO PELLET E I II PELLET HEATER 10 FIGURE 5...

Page 11: ...ECHO PELLET E I II PELLET HEATER 11 FIGURE 6...

Page 12: ...n and regular cleaning see Figure 4 Whenever the pipe run in any installation is 10 feet or more the use of 4 inch Type L vent pipe is required Horizontal runs must be limited to 2 feet A wall band is...

Page 13: ...Echo back into the wall outlet 5 You have the option to have the thermostat run the stove either ON OFF or Hi Low Factory setting is ON OFF By changing the Type setting jumper on the circuit board see...

Page 14: ...ECHO PELLET E I II PELLET HEATER 14 FIGURE 8...

Page 15: ...ccumulate quickly IMPORTANT The quality of pellet varies from brand to brand This will affect the efficiency of your heater We suggest that you try several brands until you find one that provides a cl...

Page 16: ...roximately 1 to 1 5 pounds of pellets per hour The flame will fluctuate between 1 inch and 6 inches in height 2 In the Med position the Echo will feed approximately 3 pounds of pellets per hour The fl...

Page 17: ...back up can be purchased as an option and includes the following components a Deep cycle seated 12 volt gel cell battery available at most battery stores b Battery connector cables for hook up to the...

Page 18: ...for the warranty to remain in effect The following procedures should be studied carefully and performed regularly as indicated a Soot and Fly Ash Formation and Need for Removal The products of combust...

Page 19: ...tilizing the clean out feature will keep the exhaust blower housing and fan blades clean This cleaning can only be done when the heater is not burning For best results run the fan in the Clean positio...

Page 20: ...a good clean out Some brands of pellets burn much richer than others and you might have to change brands of pellets and or have the air fuel settings readjusted by your dealer It is normal to have the...

Page 21: ...s surging Will run on High or Clean but not on Low Solution Fan motor brushes are wearing out Brushes in fan motor need to be replaced Contact your dealer or call factory for replacement brushes 9 Pro...

Page 22: ...ECHO PELLET E I II PELLET HEATER 22 FIGURE 13 REPLACEMENT PARTS LIST...

Page 23: ...ECHO PELLET E I II PELLET HEATER 23 FIGURE 14 CIRCUIT BOARD DIAGRAM Type 2 Thermo Hi Lo Type 1 Thermo On Off 19 4...

Page 24: ...ECHO PELLET E I II PELLET HEATER 24 FIGURE 15 ELECTRICAL SCHEMATIC WIRING DIAGRAM 250 VAC 250 VAC...

Page 25: ...exchanger tubes both sides using a pellet vac or shop vac Do not use a household vacuum cleaner 4 Connect vinyl clean out tube to pellet vac or shop vac An adaptor must be used to connect to a shop v...

Page 26: ...high temp safety sensor that will shut the stove off if there is a down draft blocked flue or high temperature condition If you install the stove on the side of the house that is hit by prevailing win...

Page 27: ...ECHO PELLET E I II PELLET HEATER 27 APPENDIX B E I FIREPOT ASSEMBLY...

Page 28: ...ntake damper see Figure 2 will allow you to regulate the amount of combustion air being fed to the pellet fire pot If for example you have a high vertical run of pipe over 10 then as the pipe warms up...

Page 29: ...ECHO PELLET E I II PELLET HEATER 29 APPENDIX D IGNITER REMOVAL...

Page 30: ...rchase date This warranty is in lieu of any other express warranty Any implied warranties including but not limited to any implied warranty of merchantability or fitness for a particular purpose shall...

Page 31: ...ECHO PELLET E I II PELLET HEATER 775 241 2586...

Reviews: