


Engine
13
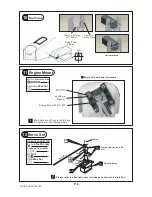
Throttle Pushwire
Ø
1.2x410mm
8
M3
Nut
d3xD7mm
Washer
8
P.7
Plastic Tube
d2xD3x280mm
14
Throttle Pushwire
Ø
1.2x410mm
Elevator Servo
Sponge
Front
Plywood
3x99.4x110.1mm
Rudder pushrod
Ø
1.8x620mm
Elevator Pushrod
Ø
1.8x465mm
Rudder Servo
Straper
Install and arrange the servo as shown in the diagram.
Fuel Tube
Ø
6x5mm
KM 2x8mm
2mm
Elevator Pushrod
Ø
1.8x75mm
BALSA
6x6x95.5mm
BALSA
6x6x95.5mm
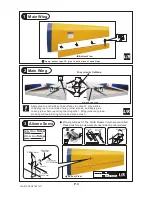
Radio Equipment
Install Engine Position
132mm
5.2 in.
M3 Nut
d3xD7mm
Washer
M 3x25mm
d3xD7mm
Washer
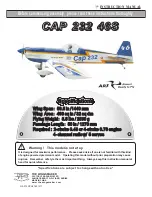
Elevator
Servo
4
M4x25mm
Socket
Head
Screw
Plastic Tube
d2xD3x280mm
Receiver
Battery
GA012SPO27831211


